
This website is a participant in the Amazon Services LLC Associates Program, an affiliate advertising program designed to provide a means for us to earn fees by linking to Amazon.com and affiliated sites.
What is the ideal 4k projector viewing distance? Use our calculator and guide to find your perfect seat. Getting this distance right is critical for an immersive home theater experience.
An incorrect setup can ruin your investment, causing eye strain or missing fine details. Our complete guide provides expert tips and proven methods to optimize your setup effortlessly.
You will learn how to calculate your ideal throw distance, understand screen size ratios, and apply professional calibration techniques for stunning 4k clarity in any room.
Best 4k Projectors for Optimal Viewing Distance
Choosing the right projector is essential for achieving the perfect viewing distance. These top-rated models offer superior image quality and flexible placement, making it easier to hit your ideal screen size and seating position for a true cinematic experience.
Epson Home Cinema 5050UB – Best Overall Performance
The Epson 5050UB features superb lens shift and zoom flexibility, allowing for easy placement. Its high brightness and exceptional contrast deliver stunning HDR, making it ideal for dedicated home theaters where you can precisely calculate and achieve the perfect 4k viewing distance.

- 4K PRO-UHD (1) Projection Technology – A new type of 4K home theater…
- True 3-Chip Projector Design – Advanced 3LCD technology displays 100% of…
- Pixel-Shift Processor – Advanced pixel-shifting processor precisely…
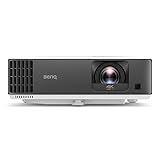
BenQ TK700STi – Best for Short Throw Gaming
This model is a short-throw gaming projector with low input lag. It can project a large 100-inch image from just 5 feet away, making it the best option for smaller rooms where achieving the recommended 4k projector viewing distance is typically a challenge.
- TK700 vs TK700STi: TK700STi possesses short-throw capabilities able to…
- 4K LOW LATENCY: Low latency 16ms at 4K/60Hz low input lag, Game Mode/Game…
- PRO PERFORMANCE: This 4K Projector is compatible with major consoles (Sony…
Optoma UHD38 – Best Value for Large Screen Enthusiasts
The Optoma UHD38 offers high brightness at an affordable price. With a versatile 1.3x zoom, it provides great placement flexibility for large screens. This model is ideal for maximizing screen size while maintaining a clear, detailed image from your calculated seating position.

- True 4K Ultra HD
- Lag-Free Gaming
- HDR & HLG Compatible
How to Calculate Your 4k Projector Viewing Distance
Determining the right distance is crucial for enjoying 4k’s full detail. This calculation balances immersion with visual comfort. Our guide simplifies the core principles and math for any room setup.
The Core Formula: Screen Size and THX Standards
The most reliable method uses your screen’s diagonal size. Industry standards provide a multiplier range for optimal viewing. This ensures you see every pixel without scanning the screen.
- THX Recommended: Multiply your screen diagonal by 0.84. For a 120-inch screen: 120″ x 0.84 = 100.8 inches (8.4 feet).
- General Cinema Range: Use a multiplier between 1.5 and 2.5 times the screen height. This is a wider, more flexible zone.
- Simple Rule of Thumb: For a 16:9 screen, sit at a distance 1.5 to 2.5 times the screen’s width for a balanced experience.
Understanding 4k Resolution and Visual Acuity
4k’s benefit disappears if you sit too far back. Your eyes must be close enough to resolve the ultra-fine details. This concept is known as the visual acuity distance.
For a 100-inch screen, the ideal distance to perceive 4k’s full resolution is approximately 5 to 10 feet. Beyond 10 feet, your eye may not distinguish 4k from 1080p. This maximizes your investment’s visual payoff.
Practical Calculation Example
Let’s calculate for a popular 120-inch screen. First, apply the THX formula for the sweet spot. Then, establish your maximum and minimum boundaries for flexibility.
- Sweet Spot (THX): 120 inches x 0.84 = 100.8 inches (8.4 feet).
- Minimum Distance: 120 inches x 1.5 = 180 inches (15 feet). This is the farthest you should sit.
- Maximum Immersion: 120 inches x 0.6 = 72 inches (6 feet). This is very close for a intense experience.
Your optimal seating range is therefore between 6 and 15 feet, with 8.4 feet being the expert-recommended target. Always measure from the screen to the viewer’s eyes.
Advanced Factors Affecting Your Viewing Distance
Beyond basic screen size, several technical factors influence your ideal seating position. Understanding these ensures a perfect blend of comfort, detail, and immersion. Let’s explore the key variables that fine-tune your setup.
Projector Throw Ratio and Room Constraints
The projector’s throw ratio determines how far it must be from the screen. This directly impacts where you can place your seating. Your room’s physical layout is a primary constraint.
- Short-Throw Projectors: Have ratios below 1.0. They create large images from just a few feet away, allowing seating closer to the wall.
- Standard-Throw Projectors: Typically have ratios between 1.5 and 2.0. They require more distance, often forcing seating farther back in the room.
- Ultra-Short-Throw (UST): Sit right against the wall or on a shelf below the screen. This frees up the entire room for optimal seating placement.
Screen Gain and Ambient Light
Your screen’s surface material significantly impacts perceived brightness. Higher gain screens reflect more light back to a narrower viewing cone. This affects where the image looks brightest.
A high-gain screen (1.3+) allows for a slightly farther seating distance in rooms with some ambient light. For a wide seating arrangement, a lower gain screen (1.0 to 1.3) provides more consistent brightness for viewers at the sides.
| Screen Gain | Best Viewing Cone | Ideal Use Case |
|---|---|---|
| 0.8 – 1.0 | Very Wide | Dedicated dark rooms, multiple seating rows |
| 1.0 – 1.3 | Wide | Most home theaters, balanced performance |
| 1.3+ | Narrow | Rooms with ambient light, single “sweet spot” seating |
Personal Preference and Content Type
Your ideal distance isn’t purely mathematical. Immersive content like movies benefits from a closer position. Critical viewing for sports or gaming might favor a slightly farther seat for full-field view.
- For Cinematic Immersion: Lean toward the closer end of your calculated range (e.g., 1.5x screen width).
- For Mixed Usage & Comfort: Choose the middle of the range (e.g., 2.0x screen width).
- For Reducing Eye Strain: Avoid the very closest positions, especially with very large screens.
Using a 4k Projector Viewing Distance Calculator: Step-by-Step Guide
Online calculators simplify the complex math into an easy process. They account for multiple variables simultaneously. This guide walks you through using them effectively for accurate results.
How Online Viewing Distance Calculators Work
These tools use algorithms based on SMPTE, THX, and visual acuity standards. You input your specific variables. The calculator then outputs a personalized seating range and screen size recommendation.
- Primary Inputs: You typically enter your desired screen size, screen aspect ratio (16:9 is standard), and room length.
- Advanced Inputs: Better calculators ask for projector model (for throw ratio) and screen gain for precise results.
- Key Outputs: You receive a minimum, maximum, and recommended distance, often in both feet and meters.
Step-by-Step Calculation Process
Follow this sequence to get the most accurate guidance for your home theater setup. Having your room measurements ready is essential.
- Measure Your Room: Determine the maximum length from the projector wall to the opposite wall. Note any permanent obstacles.
- Choose a Target Screen Size: Based on your room width and wall space, select a feasible diagonal screen size (e.g., 100″, 120″, 150″).
- Input Data into Calculator: Enter screen size, aspect ratio, and if available, your specific projector’s throw ratio details.
- Analyze the Results: The calculator provides a distance range. Verify this fits within your actual room dimensions, accounting for projector depth and furniture.
Interpreting Your Results for Real-World Setup
The calculator’s output is a starting point, not a rigid rule. You must adapt it to your room’s practical realities and your personal viewing preferences.
If the recommended distance places a seat directly in a walkway or behind a support column, adjust. You can slightly increase screen size or move within the provided range. The goal is the best practical viewing experience, not just a perfect number.
Use the calculated distance to plan your outlet placement, cable runs, and furniture layout. This foresight prevents costly adjustments after your theater is built.
Common Mistakes and Pro Tips for Perfect Placement
Avoiding frequent errors saves time and maximizes your viewing pleasure. Even with a good calculator, practical pitfalls exist. These expert tips will help you sidestep them for a flawless setup.
Top 3 Viewing Distance Mistakes to Avoid
These common errors can undermine your 4k projector investment. Being aware of them is the first step toward prevention.
- Ignoring Throw Ratio: Buying a projector before measuring your room’s throw distance. A standard-throw model needs more space than a short-throw.
- Forgetting Viewer Height: Placing seats where the screen center is too high or low, causing neck strain. The center should be at or slightly below eye level when seated.
- Overlooking Room Layout: Placing the primary seat directly in line with a bright light source, window, or speaker, which creates glare or audio imbalance.
Professional Calibration Tips for Clarity
After finding your distance, fine-tune the image. Proper calibration ensures you see every detail your 4k projector can deliver from your chosen seat.
- Focus and Zoom: From your main seating position, use a 4k test pattern to adjust lens focus and zoom for absolute sharpness corner-to-corner.
- Keystone Correction: Avoid digital keystone if possible. Physically align the projector to be square with the screen to maintain native resolution and prevent blur.
- HDR and Brightness: Calibrate HDR settings from your viewing seat. A setting that looks great up close may be too dim from the correct distance.
| Problem | Symptom | Quick Fix |
|---|---|---|
| Too Close | Seeing pixel structure, eye strain, needing to scan the screen | Move seat back to at least 1.5x screen width. |
| Too Far | Loss of immersion, inability to resolve 4k detail | Move seat forward or consider a larger screen. |
| Off-Axis Viewing | Washed-out colors, reduced contrast (especially with high-gain screens) | Re-center seating or switch to a wider-gain screen material. |
Optimizing for Multiple Seating Rows
For a true theater experience with several rows, you must calculate a compromise distance. The goal is a great experience for everyone, not perfection for one seat.
Place the primary row at the ideal calculated distance (e.g., screen width x 2.0). Position a second row approximately 1.5 to 2 feet behind the first. Use tiered seating or risers to ensure clear sightlines over the heads in front.
Ensure all seats fall within the maximum calculated distance. Use a wider horizontal seating arrangement to keep viewers within the screen’s optimal viewing cone for consistent brightness and color.
Quick Reference Charts and Final Setup Checklist
Use these quick-reference tools to finalize your home theater planning. Charts provide instant guidance, while a checklist ensures no step is missed. This section helps you move from theory to a finished, optimized room.
4k Viewing Distance Reference Chart by Screen Size
This table provides the recommended THX viewing distance for common screen sizes. It is based on the formula: Screen Diagonal (inches) x 0.84.
| Screen Size (Diagonal) | THX Recommended Distance | Minimum (Immersive) | Maximum (Comfortable) |
|---|---|---|---|
| 90 inches | 6.3 feet | 4.5 feet | 10.5 feet |
| 100 inches | 7.0 feet | 5.0 feet | 11.7 feet |
| 120 inches | 8.4 feet | 6.0 feet | 14.0 feet |
| 135 inches | 9.5 feet | 6.8 feet | 15.8 feet |
| 150 inches | 10.5 feet | 7.5 feet | 17.5 feet |
Pre-Installation Planning Checklist
Before mounting your projector or screen, complete this essential list. It covers the critical measurements and decisions for a smooth installation.
- Room Dimensions: Measured length, width, and ceiling height. Noted permanent obstructions (vents, lights, beams).
- Primary Seat Location: Marked on floor plan based on calculator results and the reference chart above.
- Projector Placement: Calculated exact mounting point using the projector’s throw ratio tool or manual.
- Screen Height: Determined so the screen’s center is at or slightly below seated eye level from the primary seat.
- Cable & Power Run: Planned for HDMI and power from the source components to the projector location.
Essential Tools for Accurate Setup
Gathering the right tools makes the installation precise and stress-free. Avoid guesswork with these simple instruments.
- Laser Distance Measurer: For accurate room and throw distance measurements.
- Stud Finder & Level: For securely and squarely mounting the screen and projector ceiling mount.
- Painter’s Tape: To mark screen borders and furniture placement on floors and walls for visualization.
- 4k Test Pattern Generator: A device or app to dial in focus, alignment, and sharpness from your seating position.
Frequently Asked Questions About 4k Viewing Distance
This section answers the most common questions users have after using a calculator. Clear, direct answers help solve final uncertainties and ensure confidence in your setup decisions.
How Does 4k Viewing Distance Differ from 1080p?
The key difference is visual acuity distance. To see 4k’s extra detail, you must sit closer. For a 100-inch screen, the 4k benefit becomes noticeable within about 10 feet.
- 1080p Distance: You can sit farther back (up to 15-20 feet for a 100″ screen) without perceiving a loss in detail.
- 4k Distance: Requires a closer seat (5-10 feet for a 100″ screen) to resolve the finer pixels and gain the immersion benefit.
- Practical Impact: A 4k setup often allows for a larger perceived screen size in the same room, as you can sit closer without seeing pixel structure.
Can I Sit Closer Than the Recommended Minimum?
Yes, but with significant trade-offs. Sitting very close creates an intensely immersive, “front-row” experience favored by some gaming and movie enthusiasts. However, it forces your eyes to scan the screen and can cause fatigue.
This is only recommended for short, intense sessions. For general viewing and family use, staying within the recommended range is best for long-term comfort and a balanced field of view.
What If My Room Is Too Short or Too Long?
Room constraints are common. The solution is to choose equipment that matches your space, not force a standard setup.
- For Short Rooms: Use an Ultra-Short-Throw (UST) projector. It can project a 100-inch image from just inches away, freeing up the entire room length for optimal seating distance.
- For Long, Narrow Rooms: You have flexibility. Use a standard-throw projector and a larger screen. Place your seating at the ideal calculated distance, using the extra space behind for a second row or additional furniture.
- General Fix: Always select your screen size after calculating the seating distance your room actually allows, not before.
Does Screen Material Affect the Ideal Distance?
Yes, primarily through gain and viewing cone. A high-gain screen (1.3+) reflects more light back in a narrower cone. Viewers outside this cone see a dimmer image.
If you use a high-gain screen, your seating must be more precisely centered. For wide or multiple rows, a lower gain screen (1.0-1.3) provides more consistent brightness across all seats, offering more flexibility in lateral seating placement.
Conclusion: Achieving Your Perfect Home Theater Experience
Mastering your 4k projector viewing distance transforms a good setup into a great one. It’s the final, critical step that unlocks the full potential of your investment. Let’s recap the essential principles for a stunning result.
Key Principles for Lasting Viewing Pleasure
Adhering to a few core concepts ensures your home theater remains enjoyable for years. These are the non-negotiable foundations of a professional-grade setup.
- Balance is Everything: The ideal distance balances immersion, visual acuity, and physical comfort. It is a range, not a single point.
- Math Informs, You Decide: Use calculators and charts as a starting guide. Your personal comfort during a prolonged viewing session is the ultimate test.
- Equipment Dictates Possibility: Your projector’s throw ratio and your screen’s gain are fixed variables. Choose them wisely based on your room’s dimensions first.
Your Action Plan for Success
Follow this final sequence to go from planning to enjoying your cinematic escape. A methodical approach prevents costly re-dos.
- Measure and Calculate: Use your room’s dimensions with our charts or a trusted online calculator to find your target screen size and seating range.
- Mock Up the Layout: Use painter’s tape and temporary furniture to physically test the sightlines and feel of the calculated positions.
- Install and Calibrate: Mount your equipment based on the mock-up. Finally, calibrate focus and image settings from your primary seat, not from the projector.
Continuing Your Home Theater Journey
Perfecting viewing distance is a major milestone. Once achieved, you can explore further enhancements. Consider acoustic treatments for sound, ambient lighting control, and seating ergonomics.
Remember that your preferences may evolve. Don’t be afraid to make small adjustments over time. The best home theater is one that consistently delivers joy and immersion for you and your guests.
You now have the knowledge to confidently plan, calculate, and achieve the ideal 4k viewing setup. Enjoy the breathtaking clarity and scale that only a properly configured projector can provide.
Conclusion: Mastering Your 4k Projector Viewing Distance
Finding your ideal 4k projector viewing distance is essential for cinematic immersion. It unlocks the full detail and scale of your investment. This guide provided the formulas, tools, and expert tips to get it right.
The key takeaway is to use the THX standard as your target. Then, adjust for your room and personal comfort. Always perform a physical mock-up before final installation.
Use our reference charts and checklist to plan your perfect setup today. Share your home theater success story or questions in the comments below.
You now have everything needed to create a stunning, comfortable viewing experience. Enjoy your breathtaking new home cinema.
Frequently Asked Questions about 4k Projector Viewing Distance
What is the simplest formula for 4k projector viewing distance?
The simplest rule is to sit 1.5 to 2.5 times the width of your screen. For a 100-inch diagonal screen (87 inches wide), your ideal range is 10.9 to 18.1 feet. This provides a good balance of immersion and comfort for most viewers and room setups.
For a more precise, cinema-standard calculation, use the THX formula: multiply your screen’s diagonal size in inches by 0.84. The result in inches is your optimal viewing distance.
How does viewing distance for 4k differ from 1080p?
You can sit closer to a 4k screen without seeing individual pixels. This allows for a more immersive experience. The higher pixel density means the “screen door effect” disappears at shorter distances.
To actually perceive 4k’s extra detail, you must sit closer. For a 100-inch screen, the benefit is most noticeable within 10 feet. With 1080p, you can sit much farther back without a noticeable loss in detail.
What happens if I sit too close to my 4k projector screen?
Sitting too close forces your eyes to scan the image, which can cause eye strain and fatigue. You may also start to see the pixel structure, breaking the illusion of a seamless picture. This diminishes the cinematic feel.
However, some enthusiasts prefer a very close, immersive “front-row” feel for gaming or movies. It’s a trade-off between intense immersion and long-term viewing comfort. Staying within the recommended range is best for most.
Can I use a regular viewing distance calculator for a 4k projector?
Yes, but you should interpret the results differently. Standard calculators often use SMPTE or THX standards, which are resolution-agnostic. They give a great starting point for general screen size-to-distance ratios.
To maximize 4k, aim for the closer end of the calculated range. This ensures you are within the “visual acuity distance” where your eyes can resolve the finer details that 4k resolution provides.
What is the best 4k projector for a small room with limited distance?
For small rooms, an Ultra-Short-Throw (UST) or Short-Throw projector is essential. Models like the BenQ TK700STi or Optoma GT1090HDR can project a large image from just a few feet away. This frees up space for proper seating distance.
These projectors allow you to place seating at the ideal calculated distance without the projector itself being in the way. Always check the specific throw ratio of any model before purchasing for a constrained space.
How does screen gain affect the ideal seating position?
Screen gain changes the brightness and viewing cone. A high-gain screen (e.g., 1.3+) reflects light more directly back. This creates a brighter image but a narrower “sweet spot” where the image looks best.
With a high-gain screen, your seating must be more precisely centered. For wider seating arrangements or multiple rows, a lower gain screen (1.0 to 1.3) offers more consistent brightness across all seats, allowing for more flexible placement.
Why is the THX viewing distance considered the gold standard?
The THX standard (screen diagonal x 0.84) is engineered to fill 40 degrees of your field of view. This creates a deeply immersive experience where the screen occupies your peripheral vision without causing discomfort. It’s the benchmark for commercial cinemas.
This distance is calculated to be the point where you can comfortably see all the detail in a master-quality film transfer. It strikes an optimal balance between immersion, detail resolution, and viewing comfort for most people.
What should I do if my room length doesn’t match the calculated ideal distance?
Choose your equipment to fit the room, not the other way around. If your room is short, select an Ultra-Short-Throw projector. If it’s very long, you can opt for a larger screen size to fill your field of view appropriately from a farther seat.
The final step is always a physical mock-up. Use tape to mark the screen size and chair positions. Test the sightlines and comfort to find the best practical compromise before installing anything permanently.
This website is a participant in the Amazon Services LLC Associates Program, an affiliate advertising program designed to provide a means for us to earn fees by linking to Amazon.com and affiliated sites.
