This website is a participant in the Amazon Services LLC Associates Program, an affiliate advertising program designed to provide a means for us to earn fees by linking to Amazon.com and affiliated sites.
Searching for a definitive upgrade to your vehicle’s lighting? The Astra Depot 2pcs mini Bi-xenon projector lens kit is a complete plug-and-play solution for superior low and high beams. This guide provides everything you need for a successful installation and maximum performance.
You will learn expert tips for choosing the right bulbs, a step-by-step installation walkthrough, and crucial beam pattern alignment advice. Transform your night driving with this proven lighting upgrade.
Best Bi-Xenon Projector Kits for Headlight Upgrades – Detailed Comparison
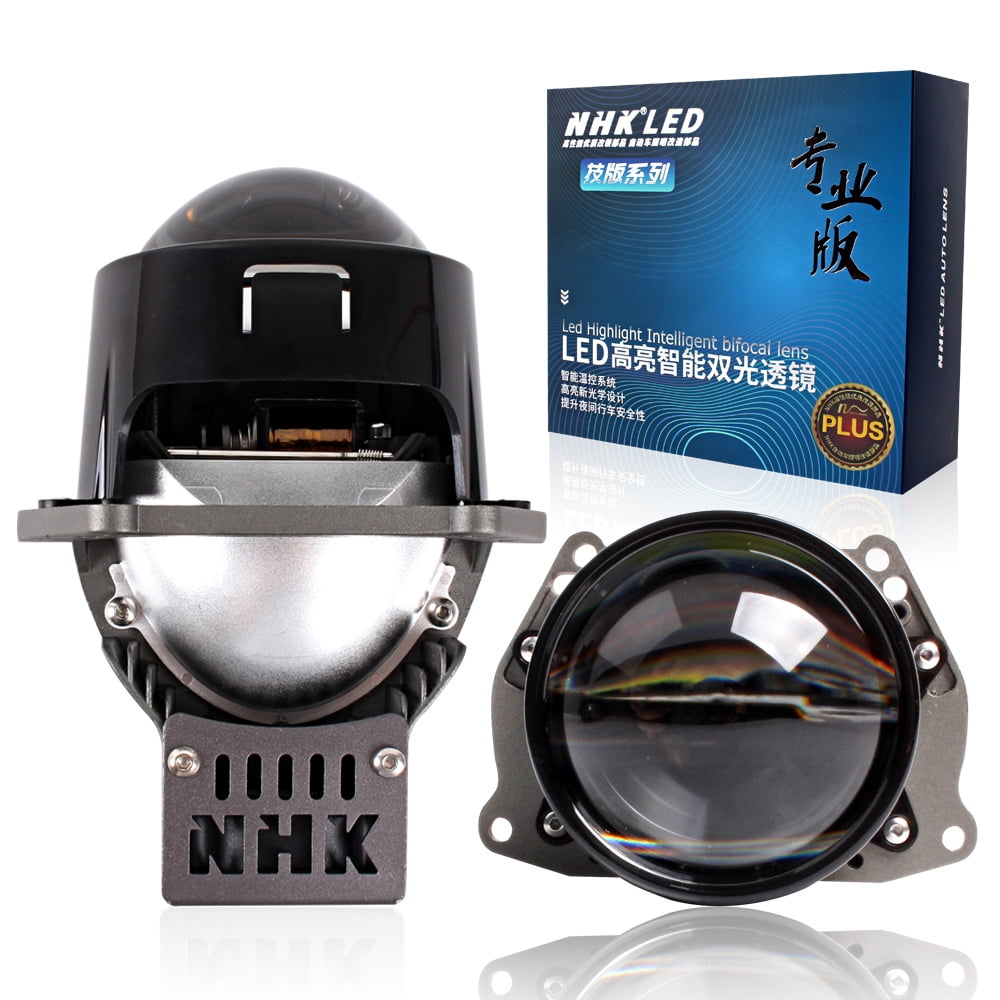
Astra Depot 2pc Mini Bi-Xenon Projector Lens Kit – Best Overall Choice
This specific kit is the ideal plug-and-play solution for most retrofit projects. It includes two complete projector units with solenoid-operated shields for seamless low-to-high beam switching. Its compact “mini” design fits a wide range of vehicle housings, making it the most versatile and recommended option for a balanced upgrade.

- Fit for most H1/H4/H7/H11/9005/9006/9007/H13 housings with modifications
- Color: Chrome Housing + Clear Lens, Shrouds Color: Black, Cut-off: Left…
- A magnetic Bi-xenon cut-off line built inside for low beam and high beam…
Morimoto Mini D2S 5.0 Bi-Xenon Projector – Best for Premium Output
For enthusiasts seeking maximum performance, the Morimoto Mini D2S 5.0 is the top-tier choice. It features a sharp, distinctive cut-off line and exceptional width for broader road illumination. This model is the best option for those prioritizing ultimate light output and a premium, OEM+ beam pattern over cost.

Depo 35-1005H-10-12 Bi-Xenon Projector Assembly – Best Direct Replacement
If you need a complete, hassle-free unit, the Depo 35-1005H-10-12 assembly is ideal. This is a full headlight housing with integrated projectors, designed as a direct replacement for specific vehicle models. It eliminates the need for a complex retrofit, offering a perfect solution for restoring or upgrading damaged OEM headlights.

- Package Dimensions: 23.368 cm (L) X 15.748 cm (W) X 15.24 cm (H)
- Package Type: Vehicle Light Assembly
- Package Quantity: 1
Key Benefits of Installing a Bi-Xenon Projector Retrofit
Upgrading to a bi-xenon projector system transforms your driving experience. This modification provides significant advantages over standard halogen reflector housings. The core benefit is achieving a proper beam pattern from high-output bulbs.
Superior Light Output and Road Illumination
Bi-xenon projectors produce a brighter, whiter light compared to halogen. This greatly improves nighttime visibility and reduces eye strain. The focused beam throws light farther down the road with a sharp cut-off.
- Enhanced Safety: See pedestrians, animals, and road hazards much sooner, allowing for more reaction time.
- Reduced Glare: The precise cut-off line prevents light from scattering into oncoming drivers’ eyes.
- Consistent Pattern: Projectors provide even illumination across the entire lane without dark spots.
How the Bi-Xenon Mechanism Works
A single bulb provides both low and high beam functions. A movable shield inside the projector lens controls the beam pattern. An electromagnetic solenoid quickly moves this shield when you activate your high beams.
This table explains the two modes:
| Beam Mode | Shield Position | Light Result |
|---|---|---|
| Low Beam | Down | Creates a sharp horizontal cut-off to prevent glare. |
| High Beam | Up/Retracted | Unleashes the bulb’s full output for maximum distance. |
Long-Term Value and Versatility
This upgrade offers excellent long-term value for your vehicle. The system is durable and often outlasts the vehicle itself. It also provides future-proof compatibility with different bulb types.
- Bulb Flexibility: The projectors work perfectly with HID (xenon) bulbs and can also be used with high-performance LED bulbs.
- Durability: Quality projectors like the Astra Depot kit are built from materials resistant to heat and UV degradation.
- Aesthetic Improvement: Provides a modern, high-end look with a distinct “projector” appearance in your headlight housing.
How to Install Your Mini Bi-Xenon Projector Kit
Proper installation is crucial for safety and performance. This process requires patience and basic mechanical skill. Always disconnect your vehicle’s battery before beginning any electrical work.
Essential Tools and Preparation Steps
Gather all necessary tools and create a clean workspace. You will need both common hand tools and specific items for the retrofit. Preparation prevents frustration during the installation process.
- Required Tools: Phillips and flathead screwdrivers, trim removal tools, socket set, drill with step bits, heat gun or oven, and silicone sealant.
- Headlight Removal: Consult your vehicle’s service manual. Typically, this involves removing the front bumper or grille to access headlight mounting bolts.
- Baking the Headlight: Carefully heat the headlight housing in an oven (~200°F for 5-8 mins) to soften the butyl sealant. Pry the lens from the housing slowly and evenly.
Step-by-Step Retrofit Process
Follow this numbered guide for the core installation. Take photos during disassembly for easy reassembly reference. Work on one headlight at a time to use the other as a guide.
- Remove the Old Reflector: Detach the halogen reflector bowl or shield from inside the housing. This usually involves unclipping or unscrewing it.
- Mount the Projector: Secure the new bi-xenon projector to the housing using its provided bracket. Ensure it is centered and level for a correct beam pattern.
- Wire the Solenoid: Connect the projector’s high-beam solenoid wires to your vehicle’s existing high-beam power source. Use solder and heat shrink for a reliable connection.
- Re-seal the Housing: Apply fresh butyl rubber sealant to the channel, reheat the housing, and press the lens back on firmly. Ensure a complete, waterproof seal.
Critical Post-Installation Steps
Your work isn’t done once the headlights are back on the car. Final adjustments are mandatory for legal and safe operation. Never skip beam pattern alignment.
- Mandatory Alignment: Park on level ground facing a wall. Adjust the projector’s aiming screws to position the cut-off line at the correct height, as specified in your owner’s manual.
- Bulb and Ballast Choice: Pair the projectors with quality HID bulbs (like D2S) and matching digital ballasts. Do not use halogen bulbs in a projector designed for HID.
- System Testing: Test both low and high beam functions. Verify the solenoid activates instantly when switching to high beams.
Choosing the Right Bulbs and Ballasts for Your Projectors
Selecting compatible components ensures optimal performance and longevity. The projector lens focuses the light, but the bulb and ballast generate it. This section helps you make an informed choice.
HID Bulb Types and Color Temperature Guide
HID bulbs are categorized by base type and color temperature measured in Kelvins (K). The Astra Depot mini projectors typically use a D2S bulb base. Color temperature affects both light output and appearance.
| Color Temperature | Light Color | Best For | Visibility Note |
|---|---|---|---|
| 4300K | Warm White | Maximum Lumens | Best overall visibility, OEM standard. |
| 5000K-5500K | Pure White | Balance & Style | Excellent output with a modern look. |
| 6000K+ | Blue/White | Aesthetics | Reduced light output, more glare. |
Digital Ballasts: Why They Are Essential
A ballast ignites the HID bulb and regulates its power. Modern digital ballasts are far superior to old magnetic ones. They are a critical component for a reliable system.
- Stable Operation: Provides consistent voltage for a steady light output without flickering.
- Quick Start: Achieves full brightness faster than older ballast types.
- Error-Free: Many are CAN-BUS compatible, preventing dashboard error messages on modern vehicles.
Can You Use LED Bulbs in Bi-Xenon Projectors?
This is a common question among enthusiasts. While designed for HID, some projectors can work with specific LED bulbs. However, significant trade-offs exist.
- Potential Compatibility: Only works with projector-specific LED bulbs that mimic the HID arc location.
- Performance Risk: Often results in a less sharp cut-off, reduced beam distance, and more glare than a proper HID setup.
- Recommendation: For guaranteed performance and a perfect beam pattern, HID bulbs with digital ballasts are the ideal choice.
Common Installation Problems and Expert Troubleshooting Tips
Even with careful planning, you may encounter issues during your retrofit. Most problems have straightforward solutions. This guide helps you diagnose and fix the most common headaches.
Solving Beam Pattern and Alignment Issues
A poor beam pattern is the most frequent post-installation complaint. This is usually caused by incorrect projector mounting or bulb placement. Proper alignment is non-negotiable for safety.
- Blurry or Double Cut-off: This indicates the bulb is not seated correctly in the projector’s focal point. Remove and re-seat the bulb, ensuring it is locked perfectly straight.
- Beam Pointing Too High/Low: Use the horizontal and vertical adjustment screws on the projector or housing. Park on level ground 25 feet from a wall to fine-tune.
- Uneven Left/Right Beams: Verify both projectors are mounted at the exact same height and rotation within their housings. Use a level during installation.
Electrical and Solenoid Malfunctions
Electrical problems can prevent the system from working entirely. These often stem from poor connections or incompatible components. Always check the simplest solution first.
- No Light / Intermittent Flickering: Check all power and ground connections. Ensure the ballast is properly grounded to bare metal, not painted surfaces.
- High-Beam Solenoid Not Working: Test the solenoid wires for 12V when high beams are activated. A faulty relay or incorrect wiring to the vehicle’s harness is the likely culprit.
- Dashboard Error Messages: Install CAN-BUS compatible ballasts or add load resistors (decoders) to simulate the electrical draw of the original halogen bulbs.
Moisture and Sealing Failures
Condensation inside the headlight ruins the upgrade. A proper seal is your defense against water damage. Resealing is a critical step you cannot rush.
- Prevention is Key: Use new butyl rubber sealant, not silicone. Ensure the channel is clean and apply an even, continuous bead.
- If Moisture Appears: Place the entire headlight in a sealed bag with silica gel packets for 24-48 hours to absorb moisture, then reseal it properly.
- Pressure Test: After reassembly, let the headlights cool completely before exposing them to rain or a car wash. Rapid temperature changes can suck in moisture.
Maintenance and Long-Term Care for Your Bi-Xenon System
Proper maintenance ensures your lighting upgrade performs reliably for years. Bi-xenon systems are durable but require specific care. Follow these best practices to protect your investment.
Regular Cleaning and Inspection Routine
Keep your headlights clean and clear for maximum light output. External dirt and internal haze are the main enemies of performance. A simple routine prevents major issues.
- Lens Cleaning: Wash the external polycarbonate lens regularly with car shampoo. Use a dedicated plastic headlight cleaner and UV sealant twice a year to prevent oxidation and yellowing.
- Internal Inspection: Periodically check for any signs of moisture, dust, or insect ingress inside the housing. Early detection allows for easy resealing.
- Bulb Longevity: Avoid frequently turning the HID system on and off for very short periods. The ignition cycle stresses the bulb more than continuous operation.
When to Replace HID Bulbs and Ballasts
HID components have a long lifespan but will eventually fail. Recognizing the signs of wear prevents being left in the dark. Always replace bulbs in pairs.
| Component | Typical Lifespan | Failure Signs | Replacement Tip |
|---|---|---|---|
| HID Bulb | 2,000 – 3,000 hrs | Flickering, unusual color (pink/blue), dim output, or failure to strike. | Replace both left and right bulbs simultaneously to maintain consistent color and output. |
| Digital Ballast | 5+ years | Bulb won’t ignite, intermittent operation, or audible buzzing. | Ensure the replacement ballast has the same power rating (35w/55w) as your original setup. |
Protecting Your Projector Lens and Housing
The physical projector unit and housing are built to last. A few precautions will keep them in perfect condition. Focus on preventing heat and impact damage.
- Heat Management: Ensure the rear headlight cover has adequate ventilation for ballast heat. Never use bulbs with a wattage higher than the projector is rated for.
- Impact Protection: Consider applying a clear protective film to the external lens to guard against stone chips and scratches that can scatter light.
- Wiring Check: Every few years, inspect the wiring harness, especially near the solenoid and ballast connections, for any chafing or brittleness.
Legal Considerations and Safety Compliance for Headlight Upgrades
Modifying your vehicle’s lighting has important legal implications. Compliance ensures your safety and avoids fines. This section clarifies key regulations for bi-xenon retrofits.
Understanding DOT and SAE Compliance Standards
In the United States, headlights must comply with Department of Transportation (DOT) or Society of Automotive Engineers (SAE) standards. These regulations govern beam pattern, glare, and output.
- Retrofit Kits: Most aftermarket projector kits, including the Astra Depot, are not DOT/SAE certified as standalone components. Their legality depends on the final installed result.
- The Final Test: Compliance is determined by the actual beam pattern and output produced by the complete system in your vehicle. A proper cutoff is mandatory.
- OEM vs. Aftermarket: Factory-installed HID systems are certified as part of the vehicle. Aftermarket retrofits must self-comply with FMVSS-108 safety standards.
Avoiding Glare and Being a Responsible Driver
The primary legal concern with any bright headlight is excessive glare for other drivers. A correctly installed and aimed bi-xenon projector is designed to minimize this.
- Proper Aiming is Law: Headlights that are aimed too high are illegal and dangerous. You are responsible for ensuring your beams are correctly aligned after installation.
- Color Temperature Limits: Some states have laws against bulbs that emit blue light, typically restricting color temperature to 6000K or below. Check your local vehicle code.
- Use Low Beams Appropriately: Always dim your high beams for oncoming traffic within 500 feet. The bi-xenon solenoid makes this switch instant and crucial.
State Inspections and Potential Insurance Implications
Your modified headlights may be scrutinized during annual safety inspections. They can also affect insurance claims in the event of an accident.
- Passing Safety Inspection: Inspectors will check for proper aim, function, and lack of excessive glare. A clean, professional installation with a sharp cutoff is your best defense.
- Insurance Disclosure: While not always required, informing your insurer of significant modifications is advisable. Non-compliant lighting could potentially complicate a claim.
- Best Practice: Keep documentation of your parts and installation process. This demonstrates a commitment to a safe, professional upgrade.
Advanced Customization and Professional Finishing Touches
Once your retrofit is functional, you can explore enhancements for aesthetics and performance. These advanced steps separate a basic install from a show-quality build. Proceed only after mastering the core installation.
Adding Angel Eyes or Halos for Style
LED Angel Eyes (or halos) are a popular aesthetic addition mounted inside the headlight housing. They provide a distinctive daytime running light (DRL) signature. Integration requires careful planning and wiring.
- Wiring Options: Halos can be wired to activate with your parking lights, low beams, or as dedicated DRLs. Using a separate, fused circuit is recommended for reliability.
- Mounting Methods: They are typically secured behind the projector shroud or around its perimeter using high-temperature adhesive or brackets. Ensure they do not interfere with the beam pattern.
- Color Choices: Select from white, blue, or multi-color RGB options. Check local regulations, as some colors may be restricted for forward-facing lights on public roads.
Painting and Blacking Out the Housing
Painting the internal chrome reflector bowls is a common way to achieve a sleek, blacked-out look. This is purely cosmetic and must be done correctly to avoid damaging components.
- Proper Preparation: Lightly sand the chrome surfaces to be painted. Use a high-temperature engine or caliper paint designed to withstand headlight heat.
- Critical Masking: Completely mask off the projector lens, solenoid, and any areas where light is meant to reflect. Paint only the non-functional shroud and bezel areas.
- Curing: Allow the paint to cure fully before reassembling the headlight. Heat from the bulbs and ballasts will further cure the paint over time.
Upgrading to a Clear Lens for Maximum Output
The stock projector lens may have a slight texture or “fresnel” pattern. Swapping it for an aftermarket clear ECE or clear lens can increase light transmission and sharpness.
- Performance Gain: A clear lens removes minor diffusion, resulting in a slightly sharper cutoff and a small boost in overall light output.
- Installation Difficulty: This requires carefully prying the original lens from the projector barrel and gluing the new one in place with UV-resistant adhesive. It is a delicate process.
- Consideration: The gain is often subtle. This upgrade is recommended primarily for enthusiasts seeking every possible performance advantage from their system.
Conclusion: Transform Your Driving with a Bi-Xenon Projector Retrofit
Installing an Astra Depot bi-xenon projector kit is a transformative upgrade. You gain superior light output, enhanced safety, and a modern aesthetic. This guide has provided the complete roadmap for success.
The key takeaway is that proper installation and alignment are non-negotiable. Follow the steps for a legal, high-performing system. Source quality bulbs and ballasts to match your new projectors.
Begin by gathering the recommended tools and selecting your ideal kit. Take your time during the installation process for a professional result.
You now have the knowledge to confidently upgrade your vehicle’s lighting. Enjoy the brighter, safer road ahead.
Frequently Asked Questions about Bi-Xenon Projector Retrofits
What is a bi-xenon projector and how does it work?
A bi-xenon projector is a single headlight unit that produces both low and high beams. It uses one HID bulb and an internal movable shield. A solenoid moves this shield to change the beam pattern instantly.
For low beams, the shield blocks the upper portion of light to create a sharp cutoff. When you activate high beams, the shield retracts to unleash the bulb’s full light output forward.
How do I aim my bi-xenon projectors correctly after installation?
Park your car on level ground 25 feet from a wall. Mark the horizontal and vertical center of each headlight beam on the wall. Adjust the projector’s aiming screws until the cutoff line is at the correct height.
Consult your vehicle’s manual for the exact specification. The passenger side beam is often slightly lower to prevent glare. Proper aiming is critical for safety and legal compliance.
What is the best color temperature for HID bulbs in projectors?
For maximum visibility and a legal appearance, 4300K or 5000K is ideal. 4300K produces a warm white light with the highest lumen output. 5000K offers a pure white light that is still excellent for night driving.
Avoid bulbs above 6000K. They produce a blue tint that significantly reduces usable light output and can attract unwanted attention from law enforcement.
Why do my new HID lights flicker or not turn on?
Flickering or failure to ignite is usually an electrical issue. First, check all connections, especially the ground. The ballast must be grounded to clean, bare metal, not a painted surface.
If connections are solid, you may need CAN-BUS adapters or load resistors. These components prevent error codes and power fluctuations common in modern vehicle electrical systems.
Can I install LED bulbs in my Astra Depot bi-xenon projectors?
While physically possible, it is not recommended for optimal performance. These projectors are optically designed for the specific focal point of an HID bulb’s arc. LED bulbs often sit in a different position.
Using LEDs typically results in a blurry cutoff, reduced beam distance, and increased glare. For the best beam pattern, use the D2S HID bulbs the projectors were engineered for.
Is a bi-xenon projector retrofit legal and will it pass inspection?
Legality depends on the final installed result, not the kit itself. The system must produce a proper beam pattern with a sharp cutoff and be correctly aimed to prevent glare. This is the key legal requirement.
It will pass a safety inspection if it meets these criteria. A professional-looking installation with proper alignment demonstrates compliance with vehicle lighting standards.
What tools are absolutely necessary for a DIY projector retrofit?
Essential tools include a drill with step bits, screwdrivers, socket set, and trim removal tools. You also need a heat gun or oven for opening the headlights and a strong sealant like butyl rubber for resealing.
Having a level and a measuring tape is crucial for aligning the projectors inside the housing. Proper tools make the difference between a frustrating and a successful project.
How long do HID bulbs and ballasts typically last?
Quality HID bulbs have a lifespan of approximately 2,000 to 3,000 hours. Digital ballasts often last 5 years or more. Signs of bulb failure include flickering, changing color, or dimming output.
Always replace HID bulbs in pairs. Using one old and one new bulb will create a noticeable mismatch in color and brightness, compromising your lighting performance.
This website is a participant in the Amazon Services LLC Associates Program, an affiliate advertising program designed to provide a means for us to earn fees by linking to Amazon.com and affiliated sites.
Related Posts

Where to Get Preloaded Projector Halloween Movies (2025 Guide)- Do Projectors Project the Color Black? Understanding Black Levels in Projection Technology
What Is the 4 6 8 Rule for Projector? A Simple Guide to Choosing the Right Screen Size- Do Projectors Have Low Enough Input Lag for Gaming? Ultimate Guide for Gamers