This website is a participant in the Amazon Services LLC Associates Program, an affiliate advertising program designed to provide a means for us to earn fees by linking to Amazon.com and affiliated sites.
Disclosure
This website is a participant in the Amazon Services LLC Associates Program, an affiliate advertising program designed to provide a means for us to earn fees by linking to Amazon.com and affiliated sites.
Yes, you do need a special projector for rear projection if you want the best image quality and performance for that setup.
Rear projection is a fascinating method often used in home theaters, trade shows, digital signage, and even outdoor movie nights. Unlike traditional front projection, rear projection involves placing the projector behind a translucent screen. This setup eliminates shadows and allows for cleaner visuals in tight or crowded spaces. But here’s the catch — not all projectors are designed to work well from behind a screen.
If you’ve ever wondered why your regular projector produces a washed-out or inverted image when placed behind a screen, you’re not alone. That’s because rear projection requires specific features, such as reversed image settings and high brightness output. Investing in the right type of projector can make or break your viewing experience.
Best for Rear Projection — Top Product Recommendations
When it comes to rear projection, choosing the right projector makes all the difference. Here are three top-performing models that are widely recognized for their excellent rear projection capabilities:
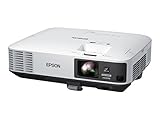
Epson PowerLite 2250U Full HD WUXGA 3LCD Projector
Why we picked it:
Delivers high brightness (5000 lumens) and crystal-clear images, making it ideal for rear projection in bright or ambient-light settings.
- Far more accurate color with Epson — 3LCD, 3-chip technology for 3x…
- Look for two numbers — 5,000 lumens (2) Color Brightness for more…
- Bright, widescreen images up to 300″ — WUXGA resolution (1920 x…
Optoma ZH406 Laser Home Theater and Business Projector
Why we picked it:
Its laser light source, 1080p resolution, and rear projection compatibility offer incredible long-term value for professional and home use alike.

- DEPENDABLE LASER LIGHT SOURCE: DuraCore laser light source eliminates lamp…
- 4K HDR INPUT: HDR10 & HLG technologies enable brigher whites and deeper…
- HIGH-BRIGHT, SUPERB PICTURE QUALITY: 1080p resolution (1920×1080), an…
BenQ MW632ST WXGA Short Throw Projector.
Why we picked it:
This short-throw model is excellent for small spaces and features rear projection support, ideal for presentations and tight indoor setups.

- EXECUTIVE QUALITY PROJECTOR – WXGA resolution (1280×800) offers 2x more…
- DESIGNED FOR ANY ENVIRONMENT – With it’s 3, 200 lumens and a high…
- EXTENDED LAMP LIFE – Up to an impressive 10, 000 hour lamp life, your…
How Does Rear Projection Work?
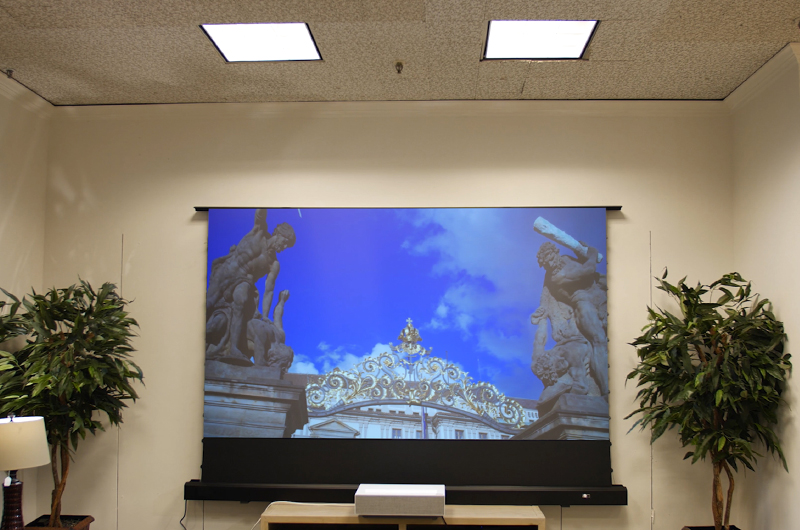
Rear projection is a display method where the projector is placed behind a semi-translucent screen, casting images through it toward the viewer. This is the opposite of the more common front projection setup. Rear projection offers several advantages—most notably, it eliminates shadows and disruptions caused by people walking in front of the projector beam.
At its core, rear projection works by using a rear projection screen, which is typically made from a special diffusive material. This screen is designed to transmit light evenly while preventing hot spots and glare. The projector beams light onto the back of this screen, and the light diffuses through it to create a clear image visible from the front.
However, not every projector is suited for this task. Most standard projectors are designed to project forward and may not support image mirroring (flipping the image horizontally), which is necessary when projecting from behind. Without this feature, the image will appear reversed, which can be a major issue, especially for text or detailed visuals.
Key factors that enable effective rear projection include:
- High brightness (lumens) to penetrate the screen material.
- Short or ultra-short throw lenses to reduce the space required behind the screen.
- Horizontal image flip/mirror settings to display the image correctly.
- High contrast ratios to maintain color integrity in different lighting conditions.
Benefits of Rear Projection:
- No shadows or obstructions from presenters or viewers.
- Cleaner, more immersive display experience.
- Easier to manage in crowded or interactive spaces.
Whether you’re using it for business presentations, events, or home theater, understanding how rear projection works is essential to choosing the right equipment and setup.
Do You Need a Special Projector for Rear Projection?
Yes, you generally need a projector with specific features to ensure optimal results when setting up a rear projection system. While some standard projectors may technically function in a rear projection layout, they often lack key capabilities that are essential for a proper viewing experience.
One of the primary requirements is the ability to flip or mirror the image horizontally. When projecting from behind a screen, the image is reversed—much like looking in a mirror. A projector without image-flipping settings will display everything backward, which is especially problematic for presentations, videos with text, or any content with directional visuals.
Another important feature is brightness, typically measured in lumens. Rear projection screens absorb more light than front projection surfaces, meaning your projector needs to be significantly brighter—especially in environments with ambient lighting. A projector with at least 3,000–5,000 lumens is recommended for most rear setups.
Here’s why a specialized projector is preferred:
- Rear projection mode support (image flip & reverse)
- High lumen output to combat screen diffusion
- Short or ultra-short throw lens for limited rear space
- Compatibility with diffusive screen materials
Standard vs. Rear Projection-Compatible Projectors:
| Feature | Standard Projector | Rear-Projection-Ready |
|---|---|---|
| Horizontal Flip Option | ❌ Sometimes | ✅ Usually Included |
| High Brightness (3000+ lm) | ❌ Not Always | ✅ Preferred |
| Short Throw Lens | ❌ Rare | ✅ Often Built-In |
| Designed for Rear Setup | ❌ No | ✅ Yes |
In summary, while some conventional models can be used in a pinch, you’ll get the best results—and save yourself major frustration—by choosing a projector specifically rated for rear projection.
Key Features to Look for in a Rear Projection Projector
Choosing the right projector for rear projection isn’t just about compatibility—it’s about performance, image quality, and ease of setup. Here are the most important features to prioritize when shopping for a rear projection-ready projector:
Image Flipping (Horizontal Mirroring)
This is non-negotiable. A rear projection projector must allow you to flip or mirror the image horizontally. Without this feature, the projected visuals will appear reversed from the viewer’s side, making content difficult to understand.
High Brightness (3,000+ Lumens)
Rear projection screens diffuse light, which reduces brightness. To counter this, your projector needs to emit enough light to maintain image clarity.
- Indoor environments: 3,000–4,000 lumens
- Outdoor/daylight setups: 4,500–6,000 lumens or more.
Throw Ratio (Short or Ultra-Short Throw)
Space behind the screen is often limited, especially in trade shows or home theaters. Projectors with a short throw (0.5–1.0) or ultra-short throw (less than 0.5) lens can project large images from very short distances.
High Contrast Ratio
A high contrast ratio ensures deeper blacks and more vibrant colors. This becomes especially important when using grey rear projection screens or in settings with ambient light.
Screen Compatibility
Ensure the projector works well with rear projection screens, which may have different gain and diffusion characteristics. Look for models specifically labeled as rear projection compatible.
Other Features to Consider
- Resolution (1080p or higher) for sharp visuals
- Lens shift and keystone correction to fine-tune alignment
- Connectivity options like HDMI, USB-C, and wireless support
- Long lamp life or laser technology for reduced maintenance
Selecting a projector with these features guarantees that you won’t just make rear projection work—you’ll make it exceptional.
Pros and Cons of Rear Projection vs. Front Projection
Before committing to a rear projection setup, it’s crucial to understand how it compares to the more traditional front projection. Each method has its strengths and drawbacks depending on your use case, environment, and budget.
Pros of Rear Projection
- No Shadows or Obstructions
Because the projector sits behind the screen, there’s no chance of people walking in front of the beam and casting shadows—ideal for interactive displays, trade shows, or active spaces. - Cleaner Setup Appearance
Cables, equipment, and heat from the projector remain out of sight behind the screen, making the front-facing side look neat and professional. - More Immersive Viewing Experience
Viewers focus entirely on the screen content without being distracted by a projector or beam light. - Better for Bright Environments
When paired with a high-brightness projector and quality screen, rear projection often handles ambient light better than front setups.
Cons of Rear Projection
- More Space Required Behind the Screen
Even short-throw projectors need a bit of rear clearance, which may not be feasible in small rooms or tight venues. - Higher Cost
Rear projection-compatible projectors tend to cost more, especially when considering brightness and image-flipping features. - Special Screens Needed
Rear projection requires a translucent or diffusion-based screen, which can be more expensive than standard white screens. - Complex Installation
Setting up a rear projection system may involve custom mounts, blackout curtains, or modified enclosures to block rear light leaks.
Side-by-Side Comparison Table
| Feature | Rear Projection | Front Projection |
|---|---|---|
| Shadows from Viewers | ❌ None | ✅ Common |
| Space Efficiency | ❌ Needs Rear Space | ✅ Wall Mountable |
| Cost | ❌ Higher | ✅ More Budget-Friendly |
| Installation Difficulty | ❌ More Complex | ✅ Easier Setup |
| Visual Clarity in Bright Rooms | ✅ Better with Right Projector | ❌ May Wash Out |
Rear projection offers a clean, interactive viewing experience but requires careful planning, the right gear, and a higher upfront investment.
Is Rear Projection Worth It for Home Theater or Events?
Rear projection can be a game-changer in the right environment—but it’s not always the best or most practical choice for everyone. Whether you’re building a home theater or planning large-scale events, the decision comes down to a balance of space, budget, and viewing needs.
Rear Projection for Home Theater
For home use, rear projection offers a sleek and immersive experience. Since the projector is hidden behind the screen, the setup looks cleaner and eliminates annoying beam glare or shadows from movement.
However, there are challenges:
- Space behind the wall: You’ll need at least a few feet of clearance for the projector. If your theater room is small or against an external wall, this could be a deal-breaker.
- Installation complexity: Rear projection often requires building a false wall or enclosure, which can add time and cost to your project.
When it’s worth it:
- You’re building a dedicated theater room.
- You want a minimalist, no-clutter screen setup.
- You’re using a short-throw or ultra-short throw projector with the proper brightness and flip settings.
Rear Projection for Events and Business Use
For trade shows, conferences, storefront displays, or live events, rear projection is often preferred due to its polished appearance and resistance to interference from people or objects in front of the screen.
Ideal situations include:
- Digital signage in retail or exhibitions.
- Interactive presentations where speakers move around the stage.
- Outdoor movie nights where wind or people can block front projection.
It may not be worth it if:
- The venue doesn’t allow space behind the screen.
- You have limited setup time or personnel.
Final Verdict: Is It Worth It?
If you have the space, budget, and desire for a clutter-free visual experience, rear projection is 100% worth it—especially for professional displays and immersive viewing. But if you’re tight on space or need something plug-and-play, front projection may be a better fit.
Conclusion
Rear projection offers a powerful and professional display option that eliminates shadows, enhances image clarity, and creates a cleaner setup—especially in public or high-traffic environments. However, it’s not as simple as flipping your projector around. To get the best results, you need a projector with specific features: horizontal image flip, high brightness, and preferably a short throw lens.
Whether you’re setting up a high-end home theater or preparing for an engaging event, investing in the right equipment can transform your viewing experience. While rear projection does require more space and planning, the payoff in visual quality and presentation aesthetics is often well worth the effort.
If you’re considering making the switch, be sure to explore models like the Epson PowerLite 2250U, Optoma ZH406, and BenQ MW632ST, which are all excellent choices for rear projection.
Frequently Asked Questions About “Do You Need a Special Projector for Rear Projection?”
Can I use any projector for rear projection?
Not all projectors are suitable for rear projection. While many modern models include a rear projection mode, which allows for horizontal image flipping, budget or older projectors often lack this feature. For best results, you need a projector that supports rear projection settings, including image mirroring and high brightness output.
What is the difference between front and rear projection screens?
Front projection screens reflect light back toward the audience, while rear projection screens transmit light through a diffusive surface. Rear screens are typically semi-translucent and specially designed to distribute the image evenly without hot spots. Using the wrong type of screen for your setup will result in poor image quality.
How much brightness is needed for rear projection?
Rear projection requires higher brightness levels than front projection. That’s because some light is absorbed by the screen material. Aim for at least 3,000 lumens in controlled lighting and upwards of 5,000 lumens in well-lit or outdoor environments.
Do I need a short throw projector for rear projection?
Not always, but a short throw or ultra-short throw projector is recommended if you have limited space behind the screen. These types can project large images from a short distance, making them ideal for rear setups in compact rooms or event booths.
Are there any disadvantages to rear projection?
Yes. Rear projection requires more space behind the screen, costs more due to specialized equipment, and needs careful installation. However, the benefits—such as no shadows and a professional appearance—often outweigh these drawbacks in the right environment.
This website is a participant in the Amazon Services LLC Associates Program, an affiliate advertising program designed to provide a means for us to earn fees by linking to Amazon.com and affiliated sites.