This website is a participant in the Amazon Services LLC Associates Program, an affiliate advertising program designed to provide a means for us to earn fees by linking to Amazon.com and affiliated sites.
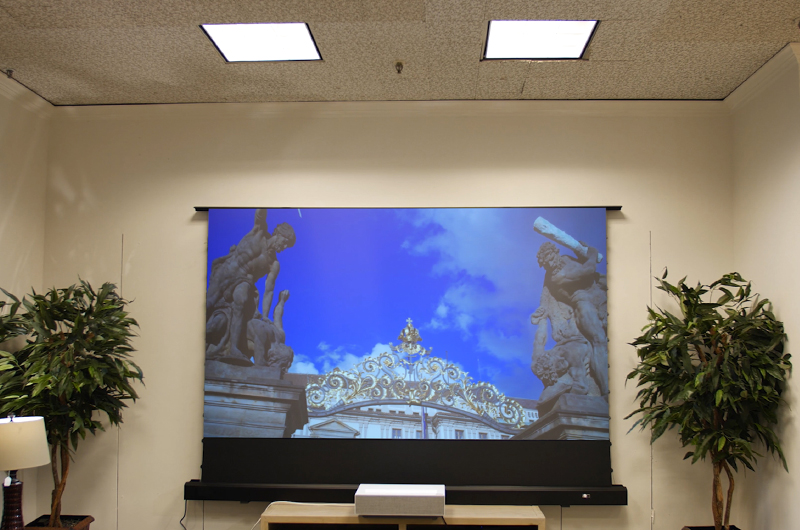
Connecting your iPhone to an HDMI projector is simple with the right adapter or wireless method. This complete guide covers every proven technique for a flawless connection. You can instantly mirror your screen for presentations, videos, and photos.
We solve the common frustration of incompatible ports and unclear setup steps. Our expert tips ensure you get the best video and audio quality on the big screen. Avoid lag, poor resolution, and connection drops.
You will learn the best adapters, wireless screen mirroring options, and advanced troubleshooting. We detail steps for both wired and wireless connections for any scenario. Get ready to project your iPhone display perfectly.
Best Adapters for Connecting iPhone to HDMI Projector
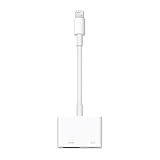
Apple Lightning to Digital AV Adapter – Best Overall Choice
The official Apple Lightning to Digital AV Adapter (Model: MD826AM/A) is the most reliable wired solution. It supports mirroring your iPhone screen up to 1080p HD and includes a secondary Lightning port for charging during use. This adapter is ideal for guaranteed compatibility and stable performance in professional settings.

- Use the Lightning Digital AV Adapter with your iPhone, iPad, or iPod with…
- The Lightning Digital AV Adapter supports mirroring of what is displayed on…
- It also outputs video content — movies, TV shows, captured video — to…
Belkin Lightning to HDMI Adapter – Best Premium Alternative
The Belkin Lightning to HDMI Adapter offers robust build quality and excellent signal integrity. It provides a seamless plug-and-play experience with no extra power needed. This model is recommended for users seeking a durable, high-performance alternative to the Apple adapter for extended movie streaming or gaming.
- Use the Lightning Digital AV Adapter with your iPhone, iPad, or iPod with…
- The Lightning Digital AV Adapter supports mirroring of what is displayed on…
- It also outputs video content — movies, TV shows, captured video — to…
Anker 4-in-1 Lightning to HDMI Adapter – Best for Versatility
For added functionality, the Anker 4-in-1 Adapter (Model A8346) is ideal. It features an HDMI port, a USB-A port, and both USB-C and Lightning charging ports. This best option lets you connect to a projector while charging your iPhone and connecting other USB accessories simultaneously.
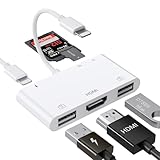
- [6 in 1 Multi Port HDMI Adapter] This USB adapter in addition to the SD…
- [Full 1080P HDMI Display] The Lighting digital AV adapter supports…
- [Office Helper USB Adapter] The USB port of the Multi port HDMI Lighting…
How to Connect iPhone to Projector Using a Wired Adapter
Using a wired adapter is the most reliable method for iPhone to HDMI projector connection. It provides a stable, high-quality signal with no lag. This method is perfect for important presentations or movie nights.
Step-by-Step Wired Connection Guide
Follow these simple steps for a successful setup every time. Ensure all devices are powered on before connecting cables. This prevents handshake issues between your iPhone and the projector.
- Plug the adapter into your iPhone’s Lightning or USB-C port. Ensure it is securely connected.
- Connect a standard HDMI cable from the adapter to an available HDMI port on your projector.
- Power on your projector and select the correct HDMI input source using its remote.
- Unlock your iPhone. Your screen should mirror automatically to the projector.
Essential Tips for Optimal Wired Performance
For the best experience, follow these expert recommendations. They solve common audio and video problems users face.
- Use a Powered Adapter: For longer sessions, use an adapter with a pass-through charging port. This prevents your iPhone battery from draining.
- Check HDMI Cable Quality: Use a high-speed HDMI cable certified for 1080p or 4K. Poor cables can cause flickering or no signal.
- Restart if Needed: If the screen doesn’t mirror, restart your iPhone with the adapter connected. This often resolves software glitches.
Key Takeaway: A wired connection is the gold standard for stability. Always use a high-quality adapter and HDMI cable, and ensure your iPhone is charged or charging during use.
Wireless iPhone to Projector Connection Methods
Wireless screen mirroring offers cable-free convenience for your iPhone and projector setup. It uses Wi-Fi to transmit audio and video seamlessly. This method is ideal for quick sharing and flexible room layouts.
Using Apple AirPlay with a Compatible Projector
Many modern smart projectors have built-in AirPlay 2 support. This allows for direct wireless streaming from your iPhone. Ensure both devices are on the same Wi-Fi network.
- Connect your projector to your Wi-Fi network using its settings menu.
- Swipe down from your iPhone’s top-right corner to open Control Center.
- Tap the Screen Mirroring button (two overlapping rectangles).
- Select your projector’s name from the list of available devices.
Wireless HDMI Adapters as a Universal Solution
For projectors without smart features, a wireless HDMI adapter is key. Devices like the Google Chromecast or Roku Streaming Stick plug into the HDMI port. They create a wireless receiver for your iPhone’s screen.
- Chromecast with Google TV: Use the Google Home app to set up, then cast from apps like YouTube or Netflix.
- Roku Streaming Stick: Use the Roku mobile app, which includes a private listening feature and screen mirroring.
- Apple TV: The most integrated option for Apple users, enabling full AirPlay mirroring and audio routing.
Key Takeaway: Wireless methods require a strong, stable Wi-Fi network. For best results, use a 5GHz band to reduce lag and ensure a smooth mirroring experience for video content.
Advanced Troubleshooting and Pro Tips
Even with the right gear, you may encounter issues connecting your iPhone. This section solves common problems and shares expert techniques. These tips ensure a professional presentation every time.
Solving Common iPhone Projector Connection Problems
If your screen isn’t projecting, work through this checklist. Start with the simplest solution before moving to complex fixes.
- No Signal on Projector: Verify the HDMI input source is correct. Try a different HDMI cable or port on the projector.
- iPhone Not Mirroring: Ensure your iOS is updated. Restart your iPhone and the projector, then reconnect the adapter.
- Audio Not Playing Through Projector: On your iPhone, go to Settings > General > AirPlay & Handoff and set Auto-AirPlay to “Automatic.” For wired connections, check the projector’s audio settings.
Optimizing Display and Audio Settings
Fine-tune your iPhone and projector for the best output quality. Small adjustments make a big difference in clarity and sound.
- Enable Mirroring Mode: Go to Settings > Display & Brightness > Display Zoom. Select “Standard” for the most compatible resolution.
- Adjust Projector Settings: Use the projector’s menu to set the aspect ratio to “16:9” and disable any overscan or zoom features.
- Manage Notifications: Before presenting, enable Do Not Disturb mode to prevent alerts from appearing on the big screen.
| Issue | Likely Cause | Quick Fix |
|---|---|---|
| Flickering or Blurry Image | Poor cable or adapter | Use a certified high-speed HDMI cable |
| Lag or Delay (Wireless) | Weak Wi-Fi signal | Move closer to router, use 5GHz band |
| Charging Not Working | Insufficient power | Use the adapter’s charging port with a powerful wall charger |
Key Takeaway: Most connection failures are due to simple oversights. Systematically check your cable, input source, and power. Always test your full setup before a critical presentation or event.
Choosing the Right Method: Wired vs. Wireless Comparison
Selecting the best connection method depends on your specific needs and equipment. Each approach has distinct advantages and ideal use cases. This comparison helps you make an informed decision quickly.
When to Use a Wired HDMI Connection
A wired connection is the most dependable choice for critical situations. It provides a direct, uncompressed signal from your iPhone to the projector.
- Formal Presentations: Eliminates the risk of Wi-Fi dropout or lag during important business or academic talks.
- High-Bandwidth Content: Essential for streaming high-frame-rate video or gaming where latency is unacceptable.
- Unreliable Wi-Fi Environments: The perfect solution for conference rooms, hotels, or venues with poor or congested wireless networks.
When to Choose a Wireless Solution
Wireless mirroring offers unparalleled convenience and flexibility. It is best for casual use and dynamic environments.
- Impromptu Sharing: Quickly show photos, videos, or websites without searching for cables or adapters.
- Flexible Room Setups: Present from anywhere in the room without being tethered to the projector.
- Group Collaboration: Allows multiple users to easily share their iPhone screens to the same display in succession.
| Factor | Wired Connection | Wireless Connection |
|---|---|---|
| Reliability | Excellent (No signal interference) | Good (Depends on Wi-Fi strength) |
| Setup Speed | Fast (Plug and play) | Moderate (Network pairing required) |
| Video/Audio Quality | Maximum (Lossless) | High (Can be compressed) |
| Best For | Presentations, Movies, Gaming | Casual Sharing, Meetings, Photos |
Key Takeaway: For guaranteed performance, always choose a wired connection. Opt for wireless when convenience and mobility are your top priorities, and you have control over the Wi-Fi network.
Essential Accessories for a Perfect Setup
Beyond the core adapter, the right accessories enhance your iPhone projector experience. They solve common pain points like short cables and low battery. Investing in these items creates a professional, worry-free system.
Cables and Power Solutions
Don’t let cable length or dead batteries interrupt your presentation. These accessories provide freedom and reliability.
- Long HDMI Cable (10-25 ft): Gives you flexibility to place your projector further from the screen or your seating area.
- High-Wattage Wall Charger: Use a 20W or higher USB-C charger with your adapter’s pass-through port to keep your iPhone charged during long sessions.
- Compact Power Strip: A small surge protector provides enough outlets for your projector, iPhone charger, and any other devices.
Audio Enhancement Gear
Projector speakers are often weak. These solutions deliver powerful, clear sound to match your brilliant video.
- Bluetooth Speaker: Pair a portable Bluetooth speaker directly with your iPhone for easy wireless audio. Ensure it’s charged.
- HDMI Audio Extractor: This device splits audio from the HDMI signal, sending it to external speakers via RCA or optical cable for a home theater feel.
- 3.5mm Audio Cable: If your projector has an audio-out jack, connect it directly to powered speakers for a simple wired solution.
Mounts and Physical Support
Keep your equipment secure and organized. These tools prevent accidents and cable mess.
- Adapter Holder or Velcro Strips: Secure the dongle to the back of the projector or a table leg to prevent stress on your iPhone’s port.
- Cable Management Clips: Use adhesive clips or a sleeve to bundle the HDMI and power cables together neatly.
- Sturdy Phone Stand: If you need to use your iPhone while it’s connected, a stand keeps it upright and visible for you.
Key Takeaway: A long HDMI cable, a powerful charger, and an external speaker are the three most impactful upgrades. They transform a basic connection into a robust, professional-grade setup for any event.
Optimizing Content for Projector Display
Connecting your iPhone is only half the battle. Preparing your content ensures it looks stunning on the big screen. These tips cover app settings, display modes, and presentation techniques.
App-Specific Settings for Best Results
Many apps have hidden settings to improve projected video quality. Adjust these before you start your presentation or movie.
- Video Streaming Apps (Netflix, YouTube): Manually select the highest playback quality in the app’s settings, as auto-quality may drop on a shared network.
- Presentation Apps (Keynote, PowerPoint): Enable “Presenter Mode” to see your notes and next slides on your iPhone while the audience sees only the main slide.
- Photo Apps: Disable automatic screen dimming in Settings > Display & Brightness > Auto-Lock and set it to “Never” during your slideshow.
Using iPhone Screen Mirroring Features Effectively
Understand the difference between simple mirroring and second-screen output. This knowledge unlocks more professional presentations.
- Full Mirroring: This duplicates your iPhone screen exactly. Close all unrelated apps and disable notifications via Control Center before starting.
- Video Output (Supported Apps): Some apps like Netflix or Apple TV+ will output only the video signal, hiding your iPhone’s interface for a clean, cinematic view.
- Orientation Lock: Lock your iPhone in landscape mode (swipe down for Control Center, tap lock icon) to prevent the projected image from rotating unexpectedly.
Pre-Presentation Checklist
Run through this list five minutes before you begin. It prevents last-minute technical hiccups and boosts your confidence.
- Charge Check: Ensure iPhone is above 50% or connected to power. Verify projector has adequate lamp life.
- Sound Test: Play a short video clip to confirm audio is routing correctly to the projector or external speakers.
- Focus & Keystone: Use the projector’s focus ring and keystone correction to make the image rectangle sharp and even on the screen.
Key Takeaway: The most professional results come from preparation. Test your specific content and apps beforehand, lock your screen orientation, and use presenter modes when available to control the experience seamlessly.
iPhone to Projector Connection for Specific Use Cases
Your ideal setup changes based on what you’re projecting. Tailoring your method to the activity guarantees the best experience. This guide covers optimized setups for common scenarios.
Business Presentations and Meetings
Reliability and professionalism are paramount in business environments. A wired connection is non-negotiable for critical pitches or client meetings.
- Primary Method: Use the official Apple Lightning to Digital AV Adapter with a long HDMI cable.
- Pro Tip: Practice advancing slides using a Bluetooth clicker paired to your iPhone for seamless movement.
- Backup Plan: Have your presentation saved in cloud storage (iCloud, Google Drive) as a backup you can access from any device.
Home Theater and Movie Nights
For film lovers, the goal is immersive audio and pristine video quality. Both wired and wireless methods can work well here.
- For Best Quality: Use a wired adapter to stream from services like Apple TV+ or Disney+ to avoid compression artifacts.
- For Convenience: Use an Apple TV or Chromecast connected to your projector for easy wireless control from your couch.
- Audio Setup: Connect a high-quality soundbar or Bluetooth speaker to your iPhone or projector for theater-like sound.
Gaming and Interactive Content
Screen mirroring for gaming demands ultra-low latency. Any delay between your touch and the on-screen action ruins the experience.
| Game Type | Recommended Connection | Critical Setting |
|---|---|---|
| Turn-Based (Chess, Puzzles) | Wireless (AirPlay or Chromecast) | Ensure Game Center notifications are off. |
| Action/Real-Time Games | Wired HDMI Only | Enable “Low Latency Mode” on projector if available. |
| Party/Group Games | Wireless with Apple TV | Use a game that supports AirPlay mirroring as a second screen. |
Key Takeaway: Match your connection method to your priority: Wired for reliability (Business/Gaming), Wireless for convenience (Movies/Casual). Always do a full audio and video test with your specific content before the main event.
Conclusion: Mastering Your iPhone to Projector Connection
Connecting your iPhone to an HDMI projector unlocks a world of big-screen potential. You can share presentations, enjoy movies, and play games with ease. The process is straightforward with the right tools and knowledge.
For guaranteed success, choose a wired adapter for critical events and wireless for casual flexibility. Always test your full setup before any important meeting or gathering. This simple step prevents last-minute stress.
Gather your chosen adapter or streaming device and try it today. Experiment with both methods to see which fits your lifestyle best. Your next presentation or movie night is about to get a major upgrade.
You now have the expert guide to connect and project with confidence. Enjoy your stunning new view.
Frequently Asked Questions about Connecting iPhone to HDMI Projector
What is the best way to connect an iPhone to a projector?
The best method depends on your needs. For reliability and quality, use a wired Lightning to HDMI adapter. For convenience and mobility, use a wireless solution like AirPlay or a Chromecast.
Always test your chosen method before a critical event. Ensure you have the correct cables and a strong Wi-Fi network if going wireless.
How do I connect my iPhone to a projector without an adapter?
You can connect wirelessly if your projector supports AirPlay or has a streaming stick. Use an Apple TV, Google Chromecast, or Roku plugged into the projector’s HDMI port.
Your iPhone and the streaming device must be on the same Wi-Fi network. Then, use the Screen Mirroring function in your iPhone’s Control Center.
Why is my iPhone not mirroring to the projector?
First, check your physical connections and input source. Ensure the HDMI cable is firmly seated and the projector is set to the correct HDMI input. Restart both your iPhone and the projector.
For wireless issues, verify both devices are on the same network. Try disabling and re-enabling Wi-Fi on your iPhone, or use a wired adapter as a fail-safe.
Can I charge my iPhone while it’s connected to the projector?
Yes, with the right adapter. Choose a Lightning to HDMI adapter that includes a pass-through charging port, like the official Apple model. Plug your standard iPhone charger into this extra port.
This is essential for long presentations or movie marathons. It prevents your battery from draining while the screen is actively mirroring.
What is the difference between AirPlay and using an HDMI adapter?
AirPlay is a wireless protocol that streams content over Wi-Fi. An HDMI adapter creates a direct, physical wired connection between your iPhone and the projector.
The wired adapter offers zero lag and perfect reliability, ideal for gaming or presentations. AirPlay provides cable-free convenience but depends on network stability.
How can I improve the audio when connecting my iPhone to a projector?
Projector speakers are often weak. For better sound, connect a Bluetooth speaker directly to your iPhone. Alternatively, use an HDMI audio extractor to route sound to a separate sound system.
Check your iPhone’s audio output in Control Center. Ensure it is set to your external speaker and not the iPhone’s internal speakers.
Which iPhone models require a specific adapter for HDMI output?
iPhones with a Lightning port (iPhone 5 through iPhone 14) need a Lightning to Digital AV Adapter. iPhone 15 models and newer with a USB-C port require a USB-C to HDMI adapter.
Always verify your iPhone’s port type before purchasing. Using the wrong adapter will result in no connection.
What should I do if the projected image is blurry or doesn’t fit the screen?
Adjust the projector’s focus ring manually for clarity. Use the keystone correction in the projector’s menu to fix any trapezoidal distortion.
On your iPhone, ensure the display zoom is set to “Standard” in Settings. Also, check the projector’s aspect ratio setting and set it to “16:9” for the correct fit.
This website is a participant in the Amazon Services LLC Associates Program, an affiliate advertising program designed to provide a means for us to earn fees by linking to Amazon.com and affiliated sites.