
Connecting your MacBook Air to a projector is simpler than you might think — and this guide will walk you through it step by step with images. Whether you’re setting up for a business presentation, a classroom lesson, or a cozy movie night, understanding how to link your MacBook Air to a projector can make all the difference.
Many MacBook Air users struggle to find the right cable or adapter, especially with newer models that rely on USB-C or Thunderbolt ports instead of HDMI. In this guide, we’ll break down every connection method — from wired (HDMI, VGA) to wireless (AirPlay, Apple TV) — so you can project your screen in minutes
Best for Presentations, Movies & Teaching
When connecting your MacBook Air to a projector, choosing the right projector can enhance your overall viewing experience — whether for professional slides, classroom lessons, or home entertainment. Here are our top picks:
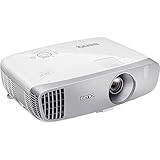
Epson EX3280 3LCD Projector – Best for Business Presentations
This reliable projector offers 3,600 lumens of brightness and vibrant color accuracy. It connects easily via HDMI, ensuring crisp visuals and lag-free performance for meetings and office presentations.

- Amazing brightness — 3,600 lumens of color and white brightness (1) ideal…
- Crisp image quality — XGA resolution delivers crisp text and images;…
- True 3-Chip 3LCD technology — displays 100% of the RGB color signal for…
BenQ HT2050A – Best for Home Movies
Featuring Full HD resolution and superior contrast, this projector delivers cinematic-quality visuals. Its HDMI compatibility ensures smooth connectivity with the MacBook Air for immersive home theater experiences.
- SUPERIOR PICTURE QUALITY: 1080p Projector with brightness of 2,200 Lumens,…
- HIGH RESPONSIVENESS: The specialized low input lag of 16ms and unique game…
- WOW YOUR FRIENDS: Take the action to the big screen by projecting a 100…
ViewSonic PA503S – Best for Classroom & Teaching
This budget-friendly projector provides excellent brightness and easy setup. Compatible with both USB-C adapters and HDMI connections, it’s perfect for educators and trainers who use a MacBook Air.

- High Brightness DLP Lamp Projector: SVGA (800x600p) resolution with a…
- Vibrant Colors: SuperColor technology delivers a wide color gamut and…
- Designed for Fast Paced Content: A low 16ms input latency and 120Hz refresh…
Check Your MacBook Air Ports and Projector Input Options
Before connecting your MacBook Air to a projector, the first and most important step is to identify the type of ports on both devices. This ensures you use the correct cable or adapter and avoid display issues later.
MacBook Air Ports
Depending on the model year, your MacBook Air may have:
- USB-C or Thunderbolt 3 ports (most 2018 and later models).
- MagSafe and Thunderbolt 4 ports (for M1 and M2 versions).
- HDMI port (available on some newer models like the MacBook Air M3).
If your laptop only has USB-C ports, you’ll need a USB-C to HDMI or USB-C to VGA adapter to connect to most projectors.
Projector Input Ports
Common projector inputs include:
- HDMI – for digital video and sound (most reliable option).
- VGA – found on older projectors.
- USB or DisplayPort – for newer models or smart projectors.
Tip: Match Ports Before Buying Cables
Check both devices before purchasing. For instance, if your projector only has an HDMI input and your MacBook Air has USB-C ports, a USB-C to HDMI adapter will be essential.

- The Anker Advantage: Join the 80 million+ powered by our leading…
- Vivid Video: The HDMI adapter lets you connect to any TV or display with an…
- Plug and Play: Instantly turn your laptop’s USB-C port into an HDMI port,…
Understanding your connection types saves time, prevents compatibility issues, and guarantees a smooth setup when you move to the next step — connecting your MacBook Air to the projector.
How to Connect a MacBook Air to a Projector Using a Cable (HDMI or VGA)
Wired connections are the most stable and straightforward way to connect your MacBook Air to a projector. This method guarantees a steady signal and clear visuals without relying on Wi-Fi.
What You’ll Need
- Your MacBook Air
- HDMI cable (for newer projectors) or VGA cable (for older ones)
- USB-C to HDMI or VGA adapter, depending on your MacBook model
Step-by-Step Setup
- Turn off both devices before connecting.
- Plug the HDMI or VGA cable into your projector’s input port.
- Connect the other end of the cable to your MacBook Air adapter.
- Attach the adapter securely to your MacBook Air USB-C or Thunderbolt port.
- Turn on your projector first, then your MacBook Air.
- Your MacBook should automatically detect the projector and mirror your display.
If it doesn’t, go to System Settings → Displays → Detect Displays, then select Mirror Display or Extend Display based on your preference.
Pro Tip:
For higher-quality visuals, always choose HDMI over VGA. HDMI supports both audio and video, while VGA only transmits video signals.
With your cable connection established, you’re ready to fine-tune display settings for perfect image clarity and screen fit.
How to Connect a MacBook Air to a Projector Wirelessly (AirPlay or Apple TV)
If you prefer a clean setup without cables, you can easily connect your MacBook Air to a projector wirelessly using AirPlay or a wireless display adapter. This method is ideal for quick presentations or home streaming without clutter.
Option 1: Using AirPlay with Apple TV
If your projector is connected to an Apple TV or supports AirPlay 2, follow these steps:
- Turn on your MacBook Air, projector, and Apple TV.
- Ensure all devices are on the same Wi-Fi network.
- On your MacBook Air, click the Control Center icon in the top-right menu bar.
- Select Screen Mirroring → Apple TV.
- Your MacBook display will appear on the projector screen within seconds.
Tip: You can choose between mirroring your entire screen or extending your display for multitasking.
Option 2: Using a Wireless HDMI Adapter
If your projector doesn’t support AirPlay, you can use devices like Anycast, Chromecast, or MiraScreen:
- Plug the adapter into your projector’s HDMI port and connect it to power.
- Switch the projector’s input source to the HDMI port in use.
- On your MacBook Air, go to System Settings → Displays → Add Display → Select the Adapter Name.
Wireless connections give you freedom of movement and a cleaner setup — perfect for classrooms, conference rooms, or home entertainment.
Adjusting Display Settings on MacBook Air for the Best Projection Quality
Once your MacBook Air is connected to a projector, fine-tuning your display settings ensures the projected image is sharp, properly aligned, and easy to read. Whether you’re presenting slides or streaming a movie, these adjustments make all the difference.
Step 1: Open Display Settings
- Click the Apple menu in the top-left corner.
- Select System Settings → Displays.
- You’ll see two display options: your MacBook screen and the projector display.
Step 2: Choose Display Mode
- Mirror Display: Shows the same screen on both your MacBook Air and projector — ideal for presentations.
- Extend Display: Expands your desktop, giving you more workspace — perfect for multitasking or dual-screen use.
Step 3: Adjust Resolution and Refresh Rate
Under “Resolution,” choose Scaled to adjust clarity and text size. For most projectors, 1080p at 60Hz offers excellent quality and smooth visuals.
Step 4: Manage Color and Brightness
If your image looks dull or oversaturated, select Color Profile → Projector Profile (if available) to enhance accuracy.
You can also manually tweak brightness and contrast in your projector’s menu for the best image balance.
Pro Tip:
Always keep your projector lens clean and use a darkened room for optimal brightness and contrast.
These simple tweaks help deliver crystal-clear visuals every time you connect your MacBook Air to a projector.
Troubleshooting Common MacBook Air to Projector Connection Issues
Even with the right cables or wireless setup, your MacBook Air may occasionally fail to connect or display properly on a projector. Here are common issues and step-by-step fixes to help you resolve them quickly.
Projector Not Detecting MacBook Air
- Ensure both devices are powered on.
- Go to System Settings → Displays → Detect Displays and click “Detect.”
- Try reconnecting your HDMI or USB-C adapter, ensuring a snug fit.
- Restart both the MacBook Air and projector to refresh the connection.

- SPEED OF LIGHTNESS — MacBook Air with the M4 chip lets you blaze through…
- SUPERCHARGED BY M4 — The Apple M4 chip brings even more speed and…
- BUILT FOR APPLE INTELLIGENCE — Apple Intelligence is the personal…
No Image or Black Screen
- Confirm the projector’s input source matches the correct HDMI or VGA port.
- If using an adapter, test with another cable or adapter to rule out hardware faults.
- Lower the MacBook’s display resolution to match the projector’s native resolution (usually 1080p).
Sound Not Coming Through Projector
- Go to System Settings → Sound → Output and select the projector or HDMI output device.
- Some projectors require a separate audio cable when using VGA connections.
Image Cut Off or Misaligned
- In Display Settings, uncheck “Overscan” or use the Zoom/Keystone feature on your projector.
- Adjust the projector’s position or focus manually for a centered display.
Quick Tip:
If all else fails, update macOS to the latest version — this often resolves compatibility bugs affecting display connections.
With these troubleshooting steps, you can confidently fix any connection hiccup and get your MacBook Air projecting smoothly again.
Conclusion
Connecting your MacBook Air to a projector is quick and straightforward once you know which cables, adapters, or wireless methods to use. Whether you’re presenting slides in a meeting, streaming a movie, or teaching a class, the process becomes effortless with the right setup.
By identifying your ports, choosing the proper connection method (HDMI, VGA, or AirPlay), and adjusting display settings, you’ll enjoy smooth, high-quality projections every time. Don’t forget to clean your projector lens, fine-tune brightness, and check audio output for the best experience.
Related articles:
Frequently Asked Questions About Connecting a MacBook Air to a Projector
How do I connect my MacBook Air to a projector with HDMI?
To connect using HDMI, plug one end of the HDMI cable into the projector and the other into a USB-C to HDMI adapter attached to your MacBook Air. Then, select the correct input source on your projector. Your screen should appear automatically.
Why won’t my MacBook Air detect the projector?
If your projector isn’t detected, open System Settings → Displays → Detect Displays. Ensure cables and adapters are firmly connected, the projector is powered on, and both devices are using compatible resolutions.
Can I connect wirelessly without Apple TV?
Yes! You can use wireless HDMI adapters such as Anycast, MiraScreen, or Chromecast. Connect the adapter to your projector’s HDMI port, switch input, and pair it with your MacBook Air from the “Add Display” menu.
How do I get sound from my projector?
Go to System Settings → Sound → Output and select your projector or HDMI device. If using VGA, you’ll need a separate 3.5mm audio cable to transmit sound.
What’s the best display mode for presentations?
Choose Mirror Display for identical screens on both devices—perfect for presenting. Use Extend Display when you want extra workspace, such as showing notes on your Mac while projecting slides.
Does every projector work with a MacBook Air?
Almost all modern projectors are compatible. Just ensure you have the correct adapter or wireless connection method based on your MacBook Air’s ports and your projector’s input options.
This website is a participant in the Amazon Services LLC Associates Program, an affiliate advertising program designed to provide a means for us to earn fees by linking to Amazon.com and affiliated sites.