This website is a participant in the Amazon Services LLC Associates Program, an affiliate advertising program designed to provide a means for us to earn fees by linking to Amazon.com and affiliated sites.
Halloween is the perfect time to bring your home to life with ghosts, ghouls, and other spooky illusions. With a portable projector and some clever digital effects, you can turn any window, wall, or doorway into a haunted holographic display that wows your neighbors and scares your guests—in the best way possible.
Unlike traditional decorations, hologram projections offer dynamic visuals, eerie sounds, and a lifelike experience that static decor simply can’t match. The best part? You don’t need to be a tech wizard to pull this off. Whether you’re aiming for a full-blown haunted house setup or just a spooky touch to your Halloween party, all you need is the right gear, the right space, and the right content.
Best for Projecting Halloween Holograms: Top 3 Projectors & Accessories
Creating a stunning Halloween hologram display starts with the right equipment. Here are the three best products to help you project spooky, lifelike illusions easily at home:
AtmosFX Digital Decorating Kit Plus
Why we picked it:
This all-in-one kit comes preloaded with Halloween-specific hologram effects and is plug-and-play, making it perfect for beginners and pros alike.
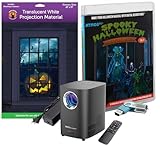
- 1280 x 720 Resolution LED Projector with sound, remote and wide-angle lens…
- Qty 1 – 48″ x 72″ White Reaper Brothers Translucent Fabric Screen…
- Atmosfx USB Stick contains 9 different Halloween scenes
Anker Nebula Capsule 3 Laser Portable Projector
Why we picked it:
Ultra-portable with a bright 300 ANSI lumen laser display, this projector is ideal for window or wall projections and can run for hours on battery.
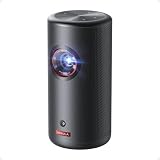
- Laser Engine to Illuminate Your World: Experience vibrant visuals with this…
- Travel Light, Project Big: At just 2 lb (900 g) and 90% smaller than others…
- Marathon Viewing Sessions: Watch a full 2.5-hour movie or listen to 8 hours…
. AtmosFX Hollusion Projection Material
Why we picked it:
Specifically designed for holographic effects, this semi-transparent screen creates the illusion of floating figures—perfect for outdoor or window-based haunts.

- Specially designed for use with digital projectors to create…
- Project any AtmosFX “Hollusion” digital decoration onto the material for a…
- Features 5.5 foot by 9 foot grey mesh material, fitted with corner and edge…
Related Gear You Might Also Need:
- Tripod or projector stand (for adjustable angles)
- Bluetooth speaker (to enhance audio for sound-based effects)
- Extension cords & weatherproof covers (for outdoor setups)
What You Need to Project Halloween Holograms
Creating a professional-looking Halloween hologram setup is more accessible than ever, thanks to compact and affordable tech. To get started, you’ll need just a few essential items:
Essential Equipment Checklist
- Portable projector (preferably 200+ ANSI lumens for outdoor clarity)
- Projection material or semi-transparent screen (like AtmosFX Hollusion)
- Digital hologram videos (available from platforms like AtmosFX, YouTube, or custom creators)
- Tripod or mounting bracket (to position the projector at the correct height and angle)
- Speakers (optional but great for syncing eerie sound effects)
- Extension cords & power source (especially important for outdoor setups)
Why a Portable Projector Is Key
Portable projectors are lightweight, easy to position, and don’t require complicated installation. They’re ideal for temporary seasonal setups like Halloween. Choose a model with at least 720p resolution and solid brightness to ensure your holograms remain clear and visible—even in semi-lit areas.
Choosing the Right Content
The magic lies in the content you project. You can:
- Purchase pre-made hologram loops from sites like AtmosFX
- Download free Halloween projection effects from creative commons sources
- Create your own using green screen videos and video editing tools
Make sure your videos are in a loopable format (like MP4) and feature dark backgrounds to enhance the illusion of figures floating in thin air.
How to Set Up a Halloween Hologram Projection (Step-by-Step)
Setting up your hologram display may sound high-tech, but it’s surprisingly simple once you follow a few practical steps. Here’s how to create a spooky setup that will stop trick-or-treaters in their tracks.
Step-by-Step Setup Guide
- Choose Your Location
- Popular choices: windows, doorways, porches, or front yards
- Make sure the area is dim or dark for maximum visibility
- Hang the Hologram Screen
- Use semi-transparent projection material like AtmosFX Hollusion
- Secure it tightly using tape, clips, or a frame to avoid movement
- Position Your Portable Projector
- Set it on a tripod or stable surface, about 4–8 feet from the screen
- Adjust the angle and height until the image is centered
- Load and Loop Your Halloween Content
- Plug in a USB or stream from a laptop or phone
- Use apps like VLC or built-in projector software to loop your video
- Add Audio (Optional)
- Pair your projector with a Bluetooth speaker for eerie sound effects
- Sync the sound with the visual for extra spook factor
- Pro Tips for Realistic Effects
- Project from slightly below eye level for ghostly “floating” illusions
- Hide the projector with decor (pumpkins, tombstones, etc.)
- Set up a motion sensor to activate sound as people approach
Best Halloween Hologram Effects to Download or Buy
The heart of any great Halloween projection is the digital content. Whether you’re aiming for bone-chilling horror or family-friendly fun, there’s a perfect hologram effect out there for your setup.
Top Places to Get Hologram Effects
- AtmosFX
- Industry leader in digital decorating
- Offers high-quality hologram effects like ghosts, skeletons, zombies, witches, and more
- Formats compatible with most projectors
- YouTube (Free Options)
- Great for budget setups
- Search for terms like “Halloween hologram loop” or “ghost window projection”
- Make sure the video has a black background and no watermark
- Etsy & Creative Market
- Indie creators offer unique effects for all types of displays
- Some even allow customization or personalized hauntings
Best Effects for Different Moods
- Scary: Screaming ghosts, poltergeists, gory zombies breaking through walls
- Magical: Floating witches, flying books, spell-casting sorcerers
- Family-Friendly: Animated pumpkins, skeleton dances, playful ghosts
Tips for Choosing the Right Effects
- Match the effect to the size of your projection surface
- Look for loopable content (5–15 seconds long is ideal)
- Consider mixing visuals with matching sound effects for greater impact
- Use multiple videos across different surfaces for an immersive experience
Common Mistakes to Avoid When Projecting Holograms
Even with the best gear, a few overlooked details can ruin your Halloween hologram setup. Here are the most common mistakes and how to avoid them for a flawless spooky effect.
Using the Wrong Surface
A regular wall or solid surface won’t create a true holographic illusion.
Fix: Always use a semi-transparent screen (like AtmosFX Hollusion or DIY shower curtain) to allow for the “floating” ghostly effect.
Projecting in a Bright Area
Ambient light from streetlamps or porch lights will weaken the hologram’s visibility.
Fix: Set up in dark or shaded areas. Consider projecting indoors through a window if outside light is unavoidable.
Not Aligning the Projector Correctly
Poor angle or distance can result in a distorted or too-small image.
Fix: Test the angle before final placement. Ideal distance is 4–8 feet away, aligned directly at the center of the screen.
Low-Resolution or Unlooped Videos
Grainy or abrupt video clips ruin immersion and break the illusion.
Fix: Use high-quality, looped videos (preferably 720p or higher). Pre-test each clip for quality and seamless replay.
Low-Resolution or Unlooped Videos
Grainy or abrupt video clips ruin immersion and break the illusion.
Fix: Use high-quality, looped videos (preferably 720p or higher). Pre-test each clip for quality and seamless replay.
Can You Make Your Own Halloween Holograms?
Absolutely! If you’re feeling creative, you can make your own Halloween holograms using a smartphone, camera, green screen, and basic video editing software. While pre-made effects are quick and easy, creating your own lets you personalize your haunt in a way no one else can.
What You’ll Need
- Smartphone or DSLR camera
- Green screen backdrop (fabric or foldable panel)
- Video editing software (like Adobe Premiere Pro, iMovie, or DaVinci Resolve)
- Tripod or steady camera setup
- Costume, props, and actors (optional)
How to Create Your Own Hologram Content
- Record Your Scene
- Dress up in costume (ghost, witch, zombie, etc.)
- Act out a short spooky loop (5–15 seconds) in front of the green screen
- Keep movements slow and simple for best effect
- Edit Your Video
- Use software to remove the green screen background (chroma key effect)
- Export with a transparent or black background
- Save in MP4 or MOV format with loop enabled
- Test It on Your Projector
- Load the file onto your device
- Project onto your Halloween screen to preview how it looks
- Tweak lighting, contrast, and audio for the best results
Bonus Tip
You can also use AI video tools or stock green screen assets if you don’t want to film yourself. Simply remove the background and loop the effect.
Creating your own holograms adds a one-of-a-kind touch that can’t be bought—perfect for impressing guests or competing in neighborhood haunt contests.
Creating your own holograms adds a one-of-a-kind touch that can’t be bought—perfect for impressing guests or competing in neighborhood haunt contests.
Now that you know how to project holograms for your Halloween with a portable projector, you’re ready to create a haunted experience that’s both spine-tingling and unforgettable. With the right tools—like a quality portable projector, semi-transparent screen, and spooky digital effects—you can turn any space into a ghost-filled spectacle.
Whether you use pre-made content or craft your own chilling scenes, the key is in thoughtful setup, proper lighting, and a touch of creativity. Don’t forget to test everything ahead of time and avoid common mistakes like using solid surfaces or low-resolution clips.
Frequently Asked Questions About How to Project Holograms for Your Halloween with a Portable Projector
Do I need a special projector to create Halloween holograms?
Not necessarily. Any portable projector with a decent brightness rating (200+ ANSI lumens) and HD resolution (720p or higher) can work. However, projectors like the Nebula Capsule 3 Laser or AtmosFX Digital Decorating Kit are optimized for this type of setup.
What kind of screen or surface do I need?
To create a “floating ghost” effect, use a semi-transparent screen like Hollusion fabric, sheer curtains, or frosted shower liners. These surfaces allow light to pass through while displaying the projected image clearly.
Can I do this outdoors?
Yes! Outdoor setups work great, especially on porches or in yards. Just make sure the area is dark enough and your gear is weather-protected. Use outdoor-rated extension cords and shelter your projector if rain is expected.
Where do I find the actual hologram videos?
You can buy high-quality loops from AtmosFX, search for free content on YouTube, or create your own using a green screen and video editing tools.
How long does setup usually take?
For most setups, it takes 30–60 minutes to hang the screen, position the projector, and test your video and sound. If you’re adding DIY elements, allow extra time.
This website is a participant in the Amazon Services LLC Associates Program, an affiliate advertising program designed to provide a means for us to earn fees by linking to Amazon.com and affiliated sites.