
This website is a participant in the Amazon Services LLC Associates Program, an affiliate advertising program designed to provide a means for us to earn fees by linking to Amazon.com and affiliated sites.
If you’ve ever wondered how to use a projector for Halloween, the answer is simpler—and spookier—than you might think. With just a projector, a few creative visuals, and a dark backdrop, you can turn your home into a haunted spectacle that amazes your guests and delights trick-or-treaters.
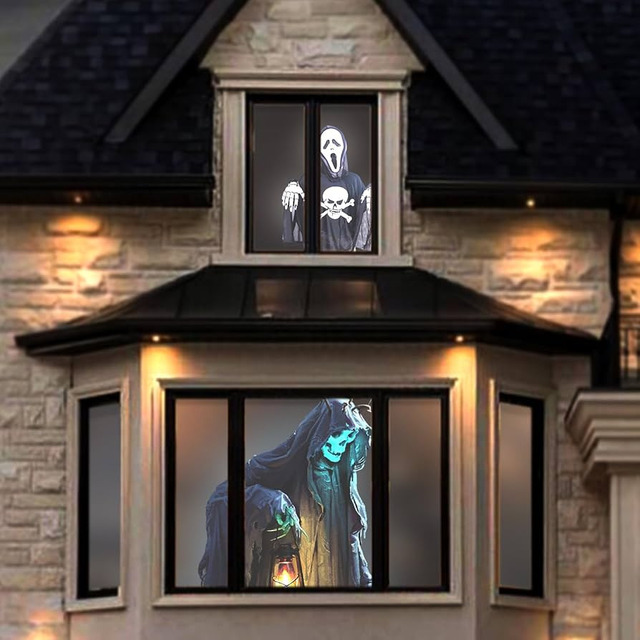
Imagine eerie ghosts floating across your windows, creepy eyes glowing on your walls, or pumpkins dancing in the night—all projected in high definition. Halloween projectors make this possible without complicated setups or expensive decorations. Whether you’re hosting a party, decorating your yard, or creating an interactive haunted house, a projector adds that cinematic, spine-chilling touch.
Best for Halloween Projector Displays
Looking to bring your spooky vision to life? These three projectors are excellent picks for your Halloween setup.
- Optoma UHZ58LV: This 4K UHD projector delivers vivid brightness and high-end features, making it perfect for large-scale outdoor projections on your home facade.

- IP6X-certified Dust Resistance
- 360 Orientation For Installation
- Full HD 3D Support
- XGIMI Aura 2: A compact ultrashort-throw projector that can sit close to your wall and still project a huge image — ideal if you’re tight on space or want to minimize cords.

- Google TV with licensed Netflix: Just power on and instantly stream the…
- Dolby Vision & IMAX Enhanced* Certified: Experience the ultimate home…
- Remarkable Visual Experience: Enjoy unparalleled brightness at 2300 ISO…
- Artsea 4K 1080p Mini Projector: A budget-friendly pick that still packs good visuals. Great if you’re starting out and want to experiment before investing big.

- Note: For the best viewing experience, we recommend a 5.2ft distance for a…
- Enhanced Clarity and Brightness: With 8000 lumens and an 8000:1 contrast…
- Versatile and Portable Design: This mini proyector offers flexibility with…
Why I picked them:
- Optoma: premium visual clarity, high brightness and 4K resolution mean your Halloween effects will stand out even in environments with some ambient light.
- XGIMI Aura 2: clever short-throw setup allows projecting large images from a small distance — particularly useful for yard/side-house decorations.
- Artsea Mini: affordable entry point; you can test projection effects economically and decide later if you want to upgrade.
Choosing the Right Projector for Halloween Displays
Before setting up your spooky scene, the first step in learning how to use a projector for Halloween is choosing the right model. The type of projector you pick determines the quality, brightness, and impact of your visuals.
Start by considering brightness, measured in lumens. For indoor projections, 1,000–2,000 lumens usually suffice. But for outdoor Halloween displays, you’ll need at least 3,000 lumens or more to ensure your ghosts and ghouls remain visible even in low ambient light.
Resolution also matters. A 1080p or 4K projector delivers crisp and realistic visuals, making your holographic ghosts or animated pumpkins appear lifelike. Portable mini projectors like the Artsea 4K 1080p are great for smaller setups, while high-end models like the Optoma UHZ58LV excel in professional outdoor displays.
Next, think about the throw distance—the space between the projector and the surface. Short-throw projectors, like the XGIMI Aura 2, are ideal if you’re projecting onto windows or have limited yard space. Standard throw models work best for larger walls or garage doors.
Finally, consider connectivity options. HDMI, USB, or even wireless casting via smartphone or laptop makes it easier to play Halloween visuals without extra equipment.
Quick Tips:
- Use white or light-colored surfaces for the sharpest image.
- Look for projectors with “keystone correction” to align images properly.
- If projecting outdoors, ensure your device is protected from moisture and dust.
With the right projector, your Halloween effects will look vibrant, professional, and eerily real.
Setting Up Your Halloween Projector Display
Once you’ve chosen the perfect projector, the next step in how to use a projector for Halloween is setting it up correctly. Proper setup ensures your visuals are clear, aligned, and immersive for all your spooky visitors.
Start with choosing the projection surface. Windows, walls, garage doors, or even sheets can serve as canvases. Light-colored, flat surfaces work best, while textured or dark surfaces may distort or dull the image. If you want a ghostly, semi-transparent effect, consider projecting onto a thin fabric or mesh screen.
Positioning your projector is key. Place it at the proper distance from the surface according to your projector’s throw ratio. Short-throw projectors like the XGIMI Aura 2 can be placed just a few feet away, perfect for confined spaces. Standard projectors like the Optoma UHZ58LV may require 10–15 feet for full-size displays. Adjust the height to avoid distortion—tripods or adjustable stands work well.
Adjust your projector settings for optimal visuals. Increase brightness if projecting outdoors, and tweak contrast and sharpness to make images pop. Enable keystone correction to ensure your visuals remain rectangular, especially if projecting at an angle.
Cable management and safety are also crucial. Keep cords secure to prevent trips or accidents, especially if trick-or-treaters are around. If outdoors, use weatherproof extension cords and cover any exposed cables.
Creative Tips:
- Layer projections by using multiple projectors for dynamic effects.
- Combine visuals with ambient sound for a fully immersive haunted experience.
- Test your setup during the day and night to perfect alignment and visibility.
A well-planned setup ensures your Halloween projector display is both safe and spectacular, captivating everyone who walks by.
Creative Halloween Projection Ideas and Effects
Using a projector for Halloween opens up endless possibilities for spooky creativity. Once your projector is set up, you can turn ordinary surfaces into eerie experiences that wow guests and trick-or-treaters alike.
Ghostly Animations: Project moving ghosts, ghouls, or witches on windows or walls for a classic haunted house effect. Semi-transparent fabrics make these apparitions appear more realistic, as if floating in the air.
Pumpkin and Monster Scenes: Project dancing pumpkins, scary monsters, or creepy eyes on your garage or house walls. Motion graphics add depth, making decorations come alive at night.
Themed Storytelling: Turn your display into a short narrative by sequencing visuals. For example, show a haunted forest, followed by a witch on a broomstick, then a skeleton dance. This approach engages your audience and makes the experience memorable.
Interactive Effects: If your projector supports sensors or smart devices, you can create motion-activated visuals. Ghosts or bats appear when someone walks past, adding a surprising, immersive element to your Halloween display.
Mixing Audio with Visuals: Adding sound effects like howling wind, creaking doors, or distant screams amplifies the spooky effect. Pair your visuals with a Bluetooth speaker to fully immerse viewers in your haunted scene.
Quick Tips:
- Use high-resolution GIFs or video files for smooth animations.
- Experiment with projection angles and layering to create depth.
- Incorporate small props or fog machines to blend the digital and physical elements seamlessly.
Whether you aim for a subtle eerie vibe or a full-blown haunted experience, creative projections make your Halloween display unforgettable. With the right visuals, projector, and setup, your home becomes a storytelling canvas for all things spooky.
Optimizing Brightness, Distance, and Image Quality.
To make the most of your Halloween projector, understanding brightness, distance, and image quality is crucial. Proper optimization ensures your visuals are clear, vivid, and spooky—even in challenging lighting conditions.
Brightness (Lumens): Brightness determines how visible your projection is. For indoor displays, 1,000–2,000 lumens often suffice. Outdoor setups require 3,000 lumens or more to combat ambient light from street lamps or porch lights. High-brightness projectors like the Optoma UHZ58LV ensure your visuals remain sharp and eye-catching.
Distance and Throw Ratio: The distance between your projector and the surface—called the throw distance—affects image size and clarity. Short-throw projectors, such as the XGIMI Aura 2, allow you to project large images from a small distance, perfect for tight spaces. Standard-throw projectors require more distance but produce larger images without distortion. Adjust placement carefully to avoid stretching or blurring.
Image Quality Settings: Tweak settings like contrast, sharpness, and color to make visuals pop. Use keystone correction to align rectangular images if projecting at an angle. High-resolution files (1080p or 4K) will appear more lifelike, especially for detailed Halloween animations like ghostly faces or animated pumpkins.
Surface Selection: Smooth, light-colored surfaces reflect light better and improve image clarity. Avoid textured walls or dark materials that can reduce visibility.
Quick Tips:
- Test your setup during daytime and nighttime to check visibility.
- Keep ambient lighting minimal for maximum effect.
- Combine projector settings with physical props (fog machines, translucent screens) to enhance depth and realism.
By optimizing brightness, distance, and image quality, you can ensure your Halloween projections are visually striking, immersive, and memorable for all who experience them.
Safety Tips and Maintenance for Halloween Projectors.
When using a projector for Halloween, safety and maintenance are just as important as creativity. Following these tips ensures your spooky display is both impressive and hazard-free.
Electrical Safety: Always use weatherproof extension cords and avoid overloading outlets, especially for outdoor setups. Keep cords away from walkways to prevent trips and falls. If your projector isn’t rated for outdoor use, protect it from rain, moisture, and humidity.
Projector Placement: Position your projector on a stable surface or tripod to avoid tipping. Short-throw projectors like the XGIMI Aura 2 can sit closer to surfaces, but still need a secure stand. Avoid placing the projector where children or pets can knock it over.
Heat Management: Projectors can generate heat, especially during long displays. Ensure adequate ventilation and avoid blocking air vents. Turn off the projector when not in use to prevent overheating.
Maintenance Tips:
- Clean the lens regularly with a microfiber cloth to maintain image clarity.
- Check for dust accumulation inside the projector vents.
- Update firmware if available to improve performance and stability.
General Safety Considerations:
- Avoid projecting directly into people’s eyes.
- Keep a safe distance from flammable decorations or fog machines.
- Supervise children around your setup, especially outdoors.
By combining proper placement, careful maintenance, and electrical safety, you can enjoy a worry-free Halloween projection that’s both visually stunning and safe. Proper care ensures your projector lasts for many spooky seasons to come.
Conclusion
Using a projector for Halloween is a fun, creative way to transform your home into a spooky spectacle. From choosing the right projector and optimizing brightness to crafting eerie animations and ensuring safety, each step contributes to an unforgettable haunted display. High-quality projectors like the Optoma UHZ58LV, XGIMI Aura 2, and Artsea 4K Mini make it easy to create vibrant, professional-looking visuals both indoors and outdoors.
Remember to experiment with projection surfaces, layering effects, and sound to fully immerse your audience. With careful setup, attention to detail, and adherence to safety guidelines, your Halloween projector display can become the highlight of the neighborhood.
Frequently Asked Questions About Using a Projector for Halloween
Can I use any projector for Halloween displays?
Not all projectors are ideal for Halloween. Brightness, resolution, and throw distance are key factors. For outdoor displays, choose projectors with 3,000 lumens or more. High-resolution projectors like 1080p or 4K make animations sharper and more realistic. Short-throw projectors are best for tight spaces or projecting onto windows.
What surfaces work best for Halloween projections?
Light-colored, smooth surfaces reflect images better and enhance clarity. Walls, garage doors, windows, or plain white sheets work well. For ghostly effects, semi-transparent fabrics or mesh screens add a floating, ethereal look. Avoid textured or dark surfaces, as they can distort visuals.
How do I keep my projector safe outdoors?
Ensure your projector is protected from rain and moisture. Use weatherproof extension cords, avoid placing it on unstable surfaces, and keep it elevated off the ground. Short-throw projectors can be placed closer to the surface but still require secure positioning to prevent tipping.
Can I combine audio with projections?
Absolutely! Pairing spooky visuals with sound effects like creaking doors, howling wind, or ghostly whispers significantly enhances the immersive experience. Use a Bluetooth speaker or a sound system near the projection area.
How can I make my projections more creative?
Layer multiple projectors, sequence visuals for storytelling, and incorporate motion-activated effects for interaction. Adding fog machines, props, or colored lighting blends digital visuals with physical elements, making your display more dynamic and engaging.
Do I need special software for Halloween animations?
Not necessarily. Many projectors support standard video files or GIFs, which you can play directly via USB, HDMI, or wireless casting. For more advanced setups, video editing or animation software can create custom sequences.
This website is a participant in the Amazon Services LLC Associates Program, an affiliate advertising program designed to provide a means for us to earn fees by linking to Amazon.com and affiliated sites.