
This website is a participant in the Amazon Services LLC Associates Program, an affiliate advertising program designed to provide a means for us to earn fees by linking to Amazon.com and affiliated sites.
Using a projector remote with PowerPoint makes giving presentations easier, smoother, and more professional. With just a few button clicks, you can move through slides, control volume, and even blank the screen without touching your computer. This hands-free setup keeps you focused on engaging your audience instead of fumbling with your laptop.
Imagine walking confidently across the room while changing slides seamlessly — that’s the power of a well-connected projector remote. Whether you’re teaching, pitching a project, or giving a business presentation, this tool saves time and boosts audience engagement.
Best for PowerPoint Presentations
Recommended products: • Logitech Spotlight Presentation Remote • Logitech R500s Laser Presentation Remote • Kensington Wireless Presenter
- Logitech Spotlight Presentation Remote
Reason: This one stands out because of its modern digital pointer features (magnify, highlight, virtual laser), great for engaging audiences beyond simple slide changes.

- Highlight And Magnify On Screen(1): Go beyond traditional laser pointing…
- Mouse-Like Cursor Control: Use the on-screen cursor to play and pause…
- Smart Time Management (1): Configure key timing milestones in Logi Options…
- Logitech R500s Laser Presentation Remote
Reason: A reliable choice for most business-users: simple slide navigation, a built-in laser pointer, and solid compatibility with PowerPoint.

- Universal compatibility: optimized to work with Windows, Mac OS, iOS…
- Meter operating range: move with the wireless presenter freely from as far…
- Dual connectivity: connect to your computer via USB receiver or Bluetooth…
- Kensington Wireless Presenter
Reason: A compact and user-friendly remote that’s plug-and-play via USB dongle and works well with typical presentation setups; great value and simplicity.

- Ultra bright green laser pointer for use on all screens
- Designed to fit comfortably in the palm of your hand
- 2.4 GHz wireless with extended range up to 150 feet
- Logitech Spotlight Presentation Remote: Premium digital pointer features (magnify/highlight/virtual laser) — great for high-engagement presentations.
- Logitech R500s Laser Presentation Remote: Solid mid-range choice: built-in laser pointer + reliable slide navigation.
- Kensington Wireless Presenter: Compact, plug-and-play via USB dongle — excellent value especially for typical business/education use.
- Microsoft Presenter+: Advanced Bluetooth remote, customizable buttons and settings via accessory app. (See full setup instructions)
- Generic Wireless Presenter Clicker (USB‑dongle): Entry-level remote using USB dongle—good budget option if you just need basic slide changes.
- Budget Presenter Remote Clicker with Laser Pointer: Super-budget variant with laser pointer—suitable for smaller rooms.
- Bluetooth Presentation Remote with Timer Display: Advanced remote with built-in timer display on device—useful for timed talks.
- Presenter Remote for Smartphones/Tablet App Control: Uses your phone/tablet as the remote control. Handy if you already carry a device. (See smartphone pointer support)
How to Connect Your Projector Remote to PowerPoint
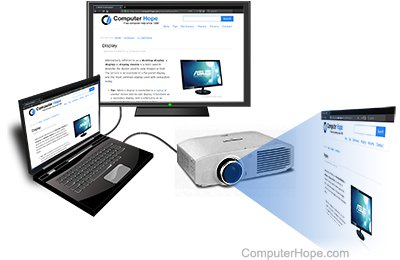
Connecting your projector remote to PowerPoint is the first step toward achieving seamless, hands-free control during your presentation. Most presentation remotes connect using either USB dongles, Bluetooth, or infrared (IR) technology. The setup process will depend on the type of remote and projector you’re using.
If your remote uses a USB receiver, simply plug it into your computer’s USB port. PowerPoint will automatically recognize it as an input device, much like a keyboard. Within seconds, you can start changing slides using the remote buttons. This is the most common and reliable connection type, as it requires no additional software or pairing.
For Bluetooth-enabled remotes, turn on your remote and enable Bluetooth on your laptop. Go to Settings → Bluetooth & Devices → Add Device, then select your remote from the list. Once connected, open PowerPoint and test the navigation buttons to confirm it responds.
Some projectors also support direct IR control. In this case, ensure there’s a clear line of sight between the projector and remote sensor. IR remotes typically work best in small to medium rooms where you’re positioned in front of the projector.
Quick setup checklist:
- Insert or charge remote batteries fully.
- Ensure the projector and laptop are turned on.
- Plug in or pair the remote before launching PowerPoint.
- Test navigation (next/previous slide) before starting your presentation.
With your remote connected and recognized, you’re ready to start controlling slides smoothly — no need to stay tethered to your computer.
Configuring PowerPoint to Work with Your Remote
Once your projector remote is connected, the next crucial step is configuring PowerPoint to ensure smooth communication between the two. While most presentation remotes work automatically, adjusting a few settings can optimize performance and prevent disruptions during your talk.
Start by launching Microsoft PowerPoint and opening your presentation. Then, go to the Slide Show tab on the toolbar. Under this section, make sure the “Use Presenter View” option is checked. Presenter View allows you to see notes and upcoming slides on your laptop screen while your audience only sees the full presentation on the projector. It also ensures your remote’s slide controls work correctly.
If your remote isn’t responding, check the PowerPoint Options settings. Navigate to:
File → Options → Advanced → Slide Show and ensure that “Hardware graphics acceleration” is enabled. This helps the remote send slide-change signals smoothly, especially for animation-heavy presentations.
For Bluetooth or wireless remotes, ensure your computer recognizes the device as a “Keyboard Input.” If it doesn’t, try unpairing and re-pairing it. Some brands like Logitech Spotlight and Kensington Presenter allow customization of button functions through their dedicated software—perfect for tailoring shortcuts like starting the slide show or blacking out the screen.
Pro Tip: Before every presentation, test your remote with PowerPoint in slideshow mode. Use the F5 key (or “From Beginning” button) to start and verify all functions: next/previous slide, pointer, and blackout.
Configuring PowerPoint properly ensures your projector remote performs reliably, giving you full control and confidence in your delivery.
Mastering Basic Controls: Slide Navigation, Volume & Screen Blackout
Knowing how to use your projector remote’s basic controls can transform your PowerPoint presentation from static to dynamic. Each button is designed to help you stay focused on your audience while managing slides with ease. Let’s break down what each function does and how to use it effectively.
The Next and Previous Slide buttons are the most frequently used. They allow you to move forward or backward through slides without touching your computer. Press the right arrow (or “Next”) to advance, and the left arrow (or “Back”) to revisit a previous point. This simple navigation gives your presentation a natural flow and prevents awkward pauses.
Many remotes also feature a “Start/Stop Slide Show” button. On most models, this corresponds to the F5 key in PowerPoint, instantly launching or exiting slideshow mode. This saves valuable time, especially when presenting in front of an audience.
For presenters who use multimedia elements, the Volume Control buttons are incredibly useful. They let you adjust sound levels for embedded videos or audio clips directly from the remote—no need to reach for your laptop mid-talk.
The Black Screen (or “Blank”) button is another essential feature. Pressing it temporarily turns off the projection, allowing you to recapture attention or emphasize a discussion point without distractions. Press it again to resume the slides.
Quick recap of key buttons:
- Next/Previous – Navigate slides smoothly.
- Start/Stop Show – Launch or exit presentation mode.
- Volume Up/Down – Control media sound levels.
- Blank Screen – Temporarily hide the presentation.
Mastering these simple commands helps you maintain complete control, ensuring every slide transition feels natural and confident.
Troubleshooting Common Remote & Projector Issues
Even with the best setup, projector remotes can occasionally stop responding or behave unpredictably. Understanding common problems and their quick fixes ensures your PowerPoint presentation runs without interruption.
The most frequent issue is an unresponsive remote. If pressing buttons doesn’t change slides, check the battery level first. Weak or old batteries often cause intermittent signals. Replace or recharge them before every presentation. Next, verify that your USB receiver or Bluetooth connection is active. If using a USB dongle, unplug and reinsert it into another port. For Bluetooth, re-pair the device via your laptop’s Bluetooth settings.
Another issue arises when PowerPoint doesn’t recognize remote inputs. In this case, restart PowerPoint and ensure it’s running in Slide Show mode (F5). Some remotes only function when the presentation is active. Also, make sure your remote is within its signal range—typically 10 to 20 meters depending on the model.
If slides are lagging or skipping, interference may be to blame. Wireless signals can be affected by Wi-Fi routers or other Bluetooth devices nearby. Move your receiver closer to your laptop or switch off other wireless devices.
For infrared remotes, check that nothing blocks the sensor between the remote and projector. IR remotes need a clear line of sight to function correctly.
Quick Fix Checklist:
- Replace or recharge batteries.
- Check connection (USB or Bluetooth).
- Keep within 10–20 meters range.
- Test in PowerPoint Slide Show mode.
- Remove nearby wireless interference.
Troubleshooting these simple factors restores smooth functionality, keeping your presentation professional and interruption-free.
Pro Tips for a Seamless PowerPoint Presentation Using a Remote
Once your projector remote is working perfectly, the next step is mastering presentation flow and confidence. A smooth, professional performance isn’t just about technology—it’s about how you use it.
Start by rehearsing with your remote before the big day. Practice advancing and reversing slides while speaking to ensure your timing matches your message. Familiarity with your remote’s layout—especially the “black screen,” “pointer,” and “next slide” buttons—helps you avoid fumbling during live presentations.
Use Presenter View in PowerPoint to your advantage. This mode lets you view notes, track time, and preview upcoming slides. Combine it with your remote to stay organized and maintain eye contact with your audience instead of constantly glancing at your laptop.
Engage your audience with purposeful pauses. Pressing the Blank Screen button lets you darken the display momentarily—ideal for drawing focus back to a discussion or emphasizing a key takeaway. When used strategically, it creates natural rhythm and professionalism.
Another useful tip is aligning body movement with slide transitions. For instance, take a step forward when moving to a new idea or slide. This physical cue helps keep your delivery energetic and connected.
Finally, always test the setup on-site. Check projector brightness, remote range, and signal responsiveness. Different rooms and lighting conditions can affect visibility and connectivity, so a quick test run can prevent surprises.
Presentation Mastery Tips:
- Rehearse full presentation with remote.
- Use Presenter View for notes and timing.
- Leverage Blank Screen for attention control.
- Sync gestures with slide transitions.
- Test equipment before going live.
With these techniques, you’ll project confidence and command every slide effortlessly.
Conclusion
Using a projector remote with PowerPoint transforms your presentation experience from static to seamless. With proper setup, configuration, and a few practice runs, you can navigate slides effortlessly while engaging directly with your audience. A reliable remote gives you the freedom to move around the room, emphasize key points, and maintain control without being tethered to your laptop.
By understanding how to connect, configure, and troubleshoot your remote, you’ll avoid common interruptions and deliver a polished, confident performance every time. Whether you’re using the Logitech Spotlight, R500s, or Kensington Wireless Presenter, the goal is the same — to enhance clarity, timing, and audience connection.
Frequently Asked Questions About Using a Projector Remote with PowerPoint
How do I connect my projector remote to PowerPoint?
Most projector remotes connect through a USB dongle or Bluetooth. For USB, simply plug in the receiver, and PowerPoint will automatically detect it. For Bluetooth, turn on both your remote and your computer’s Bluetooth, then pair them under your system’s Bluetooth settings.
Why isn’t my projector remote working with PowerPoint?
If your remote isn’t responding, check the battery level first. Then, ensure your remote is paired or plugged in properly. Also, confirm you’re in Slide Show mode (F5), as most remotes only function when PowerPoint is actively presenting.
Can I use any projector remote with PowerPoint?
Yes, as long as the remote is compatible with your operating system (Windows or macOS) and connects via USB or Bluetooth. Popular universal remotes like the Logitech R500s and Kensington Presenter work seamlessly with PowerPoint and most projector brands.
What if my remote doesn’t control the volume or pointer?
Not all remotes include media or pointer functions. For advanced features like a digital spotlight, magnifier, or customizable shortcuts, opt for higher-end models like the Logitech Spotlight Presentation Remote or the Microsoft Presenter+.
How far can I use a projector remote from my computer or projector?
Most wireless remotes have a range between 10 to 20 meters (30–65 feet). Always test your range before presenting to ensure signal reliability—especially in larger rooms or lecture halls.
Can I use my smartphone as a projector remote?
Absolutely. Apps like Microsoft Office Remote and Unified Remote let you control PowerPoint slides via Bluetooth or Wi-Fi. This is a great backup option if your hardware remote malfunctions.
This website is a participant in the Amazon Services LLC Associates Program, an affiliate advertising program designed to provide a means for us to earn fees by linking to Amazon.com and affiliated sites.