This website is a participant in the Amazon Services LLC Associates Program, an affiliate advertising program designed to provide a means for us to earn fees by linking to Amazon.com and affiliated sites.
Is your Kodak Luma 150 projector sound skipping or lagging? This common audio problem disrupts your viewing experience. It is often caused by simple connection or settings issues.
This frustrating audio stuttering can ruin movie nights and presentations. Our guide provides proven methods to diagnose and resolve the glitch quickly. You will restore perfect audio-video sync.
This complete troubleshooting guide will teach you expert tips. Learn to check your source device, adjust projector settings, and perform key resets. Fix the sound skipping issue for good with our clear, step-by-step solutions.
Best Projectors for Smooth Audio Playback – Detailed Comparison
Anker Nebula Capsule 3 Laser – Best Portable Alternative
This compact powerhouse eliminates audio sync issues with its integrated 8W speaker and Dolby Digital Plus support. Its dedicated audio-out port provides a stable connection to external sound systems. It’s the ideal portable upgrade for flawless, room-filling sound without lag or skipping during playback.
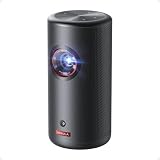
- Laser Engine to Illuminate Your World: Experience vibrant visuals with this…
- Travel Light, Project Big: At just 2 lb (900 g) and 90% smaller than others…
- Marathon Viewing Sessions: Watch a full 2.5-hour movie or listen to 8 hours…
XGIMI MoGo 2 Pro – Best for Smart Features & Stability
Featuring Android TV and built-in Chromecast, the MoGo 2 Pro streams content directly, minimizing connection-based audio problems. Its dual 5W Harman Kardon speakers deliver rich, synchronized sound. This model is highly recommended for users who want a stable, all-in-one smart projector experience.

ViewSonic M2e – Best for Versatile Connectivity
Designed for reliability, the M2e offers multiple robust connection options including HDMI, USB-C, and Bluetooth 5.0. This versatility helps isolate and bypass audio skipping sources. Its dual JBL speakers and durable build make it the best option for presenters and home users needing dependable audio performance.

- PORTABLE PROJECTOR: Ultra portable Full HD 1080p LED projector with…
- VIVID COLORS: 125 percent Rec. 709 color accuracy and HDR content support…
- PREMIUM AUDIO: Built in dual Harman Kardon Bluetooth speakers (audio only…
Common Causes of Kodak Luma 150 Audio Problems
Understanding the root cause is the first step to fixing your projector’s sound. The Luma 150’s audio skipping or lagging is rarely a hardware defect. It is typically triggered by external factors related to your setup or source device.
Source Device and Connection Issues
Faulty cables or incorrect output settings are prime suspects. An unstable signal path directly causes audio stuttering and sync loss. Always check these elements before investigating the projector itself.
- HDMI/Connection Cable: A damaged, low-quality, or excessively long HDMI cable can degrade the audio signal. Try a shorter, high-speed certified cable.
- Source Output Settings: Some laptops and phones have audio format mismatches. Ensure the output is set to a compatible format like PCM or stereo, not surround sound.
- Bluetooth Latency: If using Bluetooth speakers, inherent latency can cause audio-video delay. Use a wired connection for perfect sync.
Projector Settings and Software Factors
Incorrect internal settings or outdated software can disrupt audio processing. The projector may struggle to decode certain audio streams smoothly.
Two key settings to check are Audio Mode and Firmware Version. An outdated system can have bugs that affect performance.
Overheating and Power Supply Problems
Insufficient power or overheating can cause the projector to malfunction. This can lead to audio processing glitches as the system struggles.
- Using the Wrong Power Adapter: Always use the official Kodak power supply. An underpowered adapter cannot sustain stable performance.
- Blocked Ventilation: Check that the projector’s vents are not obstructed. Overheating can throttle internal components, causing audio to cut out.
- Power Source Fluctuations: Plugging into a crowded power strip or an unstable outlet can cause brief power dips that interrupt audio.
Step-by-Step Guide to Fix Sound Skipping
Follow this systematic troubleshooting guide to resolve your Luma 150’s audio problems. Start with simple fixes before moving to advanced steps. This method isolates the issue efficiently.
Basic Troubleshooting Steps (Start Here)
These quick actions solve a majority of audio skipping cases. They address common connection and power glitches.
- Power Cycle Everything: Turn off and unplug the projector and your source device (laptop, phone, etc.). Wait 60 seconds, then plug in and restart the projector first, followed by the source.
- Check Physical Connections: Firmly reseat the HDMI cable at both ends. If possible, test with a different, high-speed HDMI cable to rule out cable failure.
- Test a Different Source: Try playing audio from a different device (e.g., switch from a laptop to a phone). This determines if the problem is with your original source device.
Advanced Audio Settings & Resets
If basics fail, dive into the projector’s settings menu. Incorrect configurations here are a frequent culprit.
Navigate to Settings > Audio on your Luma 150. Try changing the ‘Audio Mode’ to a different setting. Also, ensure any ‘Audio Delay’ or ‘Lip Sync’ adjustment is set to zero.
Firmware Update and Hardware Check
Outdated software can contain bugs that cause audio stuttering. Ensuring you have the latest firmware is crucial.
- Update Firmware: Go to Settings > Device Preferences > About > System update. Install any available updates with the projector connected to stable Wi-Fi.
- Bypass Internal Speakers: Connect external speakers via the 3.5mm audio-out jack. If the audio is smooth on externals, the issue may be with the projector’s internal speaker or amplifier.
- Inspect the Audio Port: Check the 3.5mm jack for any debris or damage. A faulty port can cause intermittent sound.
Optimizing Your Setup to Prevent Future Audio Issues
Once your sound is fixed, optimize your setup to prevent the problem from returning. Proactive measures ensure reliable, long-term performance. A stable environment is key for consistent audio-video sync.
Ideal Connection and Source Configuration
Your choice of cables and source settings forms the foundation of a stable signal. Small optimizations here make a significant difference.
- Use Certified Short Cables: For HDMI, use a High-Speed HDMI cable that is 6 feet or shorter. Longer cables are more prone to signal degradation.
- Standardize Audio Output: Configure your laptop, smartphone, or streaming stick to output stereo (2.0 PCM) audio. Avoid sending complex surround sound formats like Dolby Digital to the projector.
- Direct Power Connection: Plug the Luma 150’s power adapter directly into a wall outlet. Avoid power strips, especially those shared with other high-draw devices.
Environmental and Maintenance Best Practices
Heat and physical placement directly impact electronic performance. Proper care extends your projector’s life and stability.
Always place the projector on a flat, stable surface with at least 6 inches of clearance around all vents. Never operate it on a soft surface like a bed or couch.
| Setting | Recommended Configuration | Reason |
|---|---|---|
| Audio Mode | Standard or Movie | Provides balanced processing without heavy effects that can cause lag. |
| Brightness Mode | Eco or Normal | Reduces heat and power draw, minimizing potential for thermal throttling. |
| Wi-Fi vs. Wired | Wired Ethernet (via adapter) | For streaming, a wired connection is more stable than Wi-Fi, reducing buffering and audio skip. |
When to Contact Kodak Support
If all troubleshooting fails, the issue may be hardware-related. Knowing when to seek professional help saves time and frustration.
- Persistent Issue After Reset: If audio skipping continues after a full factory reset and with multiple source devices, it indicates an internal fault.
- Distorted Sound or Buzzing: This suggests a failing internal speaker or amplifier component, not just a sync issue.
- Check Warranty Status: Visit the official Kodak support website with your serial number. Your Luma 150 may be eligible for repair or replacement under its limited warranty.
Alternative Solutions and Audio Workarounds
If internal fixes don’t fully resolve the skipping, external solutions can restore your audio experience. These workarounds bypass the projector’s internal audio processing. They often provide superior sound quality as a bonus.
Using External Speakers and Sound Systems
Connecting to an external audio system is the most effective permanent solution. It removes the projector’s speakers from the equation entirely.
- Wired 3.5mm Connection: Use the projector’s audio-out jack to connect to a soundbar, portable speaker, or home theater system. This provides a stable, lag-free analog signal.
- Bluetooth Transmitter: If your external speakers are Bluetooth-only, use a low-latency Bluetooth transmitter plugged into the audio-out jack. This is better than the projector’s built-in Bluetooth.
- HDMI ARC Soundbar: For a cleaner setup, connect a streaming device to the soundbar’s HDMI input, then run the soundbar’s HDMI ARC output to the projector. The projector acts only as a display.
Adjusting Source Device Audio Settings
Sometimes the fix requires changes on your laptop, phone, or streaming device. These devices often have hidden audio controls.
On a Windows PC, right-click the sound icon and open Sound Settings > Advanced Sound Options. Try disabling audio enhancements or exclusive mode for the playback device.
Software and Media File Considerations
The format of your media files or the player software you use can cause decoding issues. The projector may struggle with certain audio codecs.
- Try a Different Media Player: If playing local files, switch from the default player to VLC Media Player on your source device. VLC has robust codec support and audio sync controls.
- Transcode Audio Streams: For MKV files with complex audio (e.g., DTS), use free software like HandBrake to convert the audio track to a simple AAC or MP3 stereo stream.
- Lower Streaming Quality: On streaming apps, temporarily lower the playback quality from 4K to 1080p. This reduces the data bandwidth, which can stabilize both video and audio playback.
Kodak Luma 150 Sound vs. Video: Isolating the Problem
It’s crucial to determine if the issue is purely audio or a broader system lag. This diagnostic step guides your troubleshooting in the right direction. A systematic check saves valuable time.
How to Perform a Basic Audio-Video Sync Test
Use specific content designed to reveal synchronization problems. This test confirms whether the audio is skipping or simply delayed.
- Find a Sync Test Video: Search YouTube for “audio video sync test” or “clapperboard test.” These videos show a clear visual cue with a corresponding sharp sound.
- Observe the Clap: Play the test and watch for the moment two boards clap together. Listen carefully. Does the sound happen at the exact moment of visual contact?
- Interpret the Result: If the sound is a consistent, smooth delay behind the picture, you have a lip sync issue. If the sound crackles, stutters, or drops out, you have true audio skipping.
Diagnosing System-Wide Lag vs. Audio-Only Skip
Understanding this distinction points to different root causes. The solution for system lag differs from fixing audio-only glitches.
| Symptom | Likely Cause | Primary Fix Direction |
|---|---|---|
| Audio stutters, but video is smooth | Faulty cable, source audio settings, or internal speaker issue. | Check connections, update source drivers, use external speakers. |
| Both video and audio are choppy/laggy | Source device underperformance, overheating, or insufficient power. | Restart source device, ensure proper cooling, use correct power adapter. |
| Audio is a constant, smooth delay behind video | Audio processing latency (common with Bluetooth or certain apps). | Use wired audio, adjust sync settings in source or projector menu. |
Using Built-in Media for Accurate Diagnosis
Eliminate external variables by using the projector’s own system. This tells you if the problem is internal or input-related.
- Play from USB Drive: Load a simple video file (MP4 with AAC audio) onto a USB stick and play it directly through the Luma 150’s media player. If the audio is perfect, the issue is with your external source or connection.
- Test Built-in Apps: Play content directly from a pre-installed app like YouTube. If audio skips here, the problem is almost certainly with the projector’s software, network, or hardware.
- Listen to System Sounds: Navigate the projector’s menu. Do the navigation “clicks” also stutter? If yes, this strongly indicates an internal hardware or serious software fault.
Community Solutions and User-Reported Fixes
Many Luma 150 owners have shared their success stories online. These community-driven fixes address niche scenarios not covered in official guides. They provide real-world insights from extensive user testing.
Most Effective User-Verified Methods
Forums and review sites reveal patterns in what actually works. These are the most frequently cited solutions from the user community.
- Disable CEC Control: In the projector’s Settings > HDMI menu, turn off HDMI-CEC (Consumer Electronics Control). This protocol can cause handshake issues that disrupt audio.
- Change HDMI Input Mode: Some users report success by switching the HDMI input format. Try toggling between “Standard” and “Enhanced” mode in the HDMI settings if the option exists.
- Factory Reset with No Cables Attached: Perform the factory reset with only the power cable connected. After resetting, power down, connect your source, and then power up again.
Niche Fixes for Specific Streaming Apps
Audio problems can be isolated to a single application. These app-specific tweaks have resolved issues for many users.
A common fix for Netflix audio stutter is to change the playback quality within the app’s settings. Lowering it from “High” to “Medium” can immediately stabilize the audio stream on some networks.
When Hardware Modification is Mentioned (Proceed with Caution)
In rare, persistent cases, users have explored hardware interventions. These should only be considered as a last resort and may void your warranty.
- Internal Speaker Connection Check: A few technically adept users have opened the casing to ensure the internal speaker’s ribbon cable is securely seated in its connector.
- Thermal Pad Addition: To combat heat-related throttling, some have added small thermal pads between the main processor and the internal heatsink for better cooling.
- Firmware Rollback: If the problem started after an update, the community often seeks ways to revert to an older, more stable firmware version. This usually requires direct contact with Kodak support.
Preventive Maintenance for Long-Term Audio Health
Regular care prevents the common issues that lead to sound skipping. A proactive maintenance routine extends your projector’s lifespan. It ensures reliable performance for every movie night or presentation.
Regular Cleaning and Ventilation Care
Dust and overheating are silent enemies of electronics. They cause components to throttle performance or fail prematurely.
- Weekly Vent Dusting: Use a can of compressed air to gently blow dust out of the intake and exhaust vents. Do this with the projector unplugged and cool.
- Proper Storage: Always store the projector in a clean, dry case or cupboard when not in use. This prevents dust accumulation inside the unit.
- Surface Check: Never place the projector on surfaces that can block vents, like carpets or blankets. Always use a hard, flat surface.
Firmware and Software Update Schedule
Keeping software current is as important as physical cleaning. Updates often contain critical bug fixes and performance improvements.
Set a quarterly reminder to check for firmware updates via Settings > Device Preferences. Also, update the apps on your connected streaming devices (Fire Stick, Roku) regularly.
| Maintenance Task | Frequency | Benefit for Audio |
|---|---|---|
| Check & clean vents | Monthly | Prevents overheating that causes audio processor glitches. |
| Check for firmware updates | Quarterly | Patches known audio bugs and improves system stability. |
| Inspect all cables | Every 6 months | Identifies fraying or damaged connectors before they cause signal dropouts. |
| Full system power cycle | Monthly | Clears system memory and resets temporary software states that can cause lag. |
Cable and Connection Management
Poor cable health is a leading cause of intermittent audio problems. Organized connections prevent physical strain and damage.
- Label Your Cables: Use tags or colored tape to identify your dedicated high-speed HDMI cable. This prevents accidentally using a lower-quality substitute.
- Avoid Sharp Bends: Route cables with gentle curves, not tight 90-degree angles. Sharp bends can break internal wire strands over time.
- Unplug Correctly: Always grip the connector body, not the cable itself, when disconnecting. Pulling the cable damages the internal solder points.
Conclusion: Resolving Your Kodak Luma 150 Sound Skipping
The Kodak Luma 150 projector sound skipping issue is typically solvable. Most problems stem from cables, source settings, or simple software glitches. Our guide provides a clear path from basic checks to advanced fixes.
The most effective first step is always a full power cycle and cable inspection. For persistent issues, connecting external speakers provides an excellent workaround. This ensures your entertainment continues uninterrupted.
We encourage you to work through the troubleshooting steps methodically. Start with the simplest solutions in Section 2 before moving to advanced diagnostics. Share your success story in the comments below to help other users.
With patience and this guide, you can restore perfect audio and enjoy your projector as intended. A flawless viewing experience is well within reach.
Frequently Asked Questions about Kodak Luma 150 Audio Problems
What causes Kodak Luma 150 sound skipping?
The most common causes are faulty HDMI cables, incorrect audio output settings on your source device, or outdated projector firmware. Overheating due to blocked vents can also cause audio processing to glitch. These issues interrupt the clean flow of the audio signal to the projector’s speakers.
Begin troubleshooting by checking your physical connections and power cycling all devices. Often, a simple reset or cable swap resolves the intermittent skipping or stuttering sound you’re experiencing.
How do I fix audio lag on my Kodak Luma 150?
To fix audio lag, first use a wired connection instead of Bluetooth. Then, check for an “Audio Delay” or “Lip Sync” setting in the projector’s sound menu and set it to zero. Ensure your source device’s audio format is set to stereo PCM, not surround sound.
If the lag persists, connect external speakers directly to the 3.5mm audio-out jack. This bypasses any internal processing delay. Playing media from a USB drive can also help determine if the lag is from your external source.
Why is there no sound from my Kodak Luma 150 projector?
First, check that the volume is not muted or turned all the way down on both the projector and your source device. Verify the audio cable is fully seated if using the 3.5mm jack. Also, ensure the HDMI cable is firmly connected at both ends.
Test the internal speakers by playing a file directly from a USB drive. If there’s still no sound, perform a factory reset. Continued silence likely indicates a hardware issue requiring support.
What is the best way to update Kodak Luma 150 firmware?
The best way is via the projector’s built-in menu. Connect the Luma 150 to a stable Wi-Fi network. Navigate to Settings > Device Preferences > About > System update. The projector will check for and install any available updates automatically.
Always ensure the projector is plugged into power during an update. Do not turn it off. Updated firmware often includes bug fixes that can resolve audio stuttering and improve overall system stability.
Can I connect Bluetooth speakers to fix the sound skipping?
Yes, but Bluetooth can introduce its own latency, causing audio-video delay. For a more stable fix, use a wired connection to external speakers via the 3.5mm audio-out port. This provides a direct, lag-free signal.
If you must use Bluetooth, try a low-latency Bluetooth transmitter plugged into the audio-out jack instead of the projector’s built-in Bluetooth. This often provides better sync than the internal system.
How do I perform a factory reset on the Kodak Luma 150?
Go to Settings > Device Preferences > Reset > Factory data reset. Confirm your selection. The projector will reboot and restore original settings. This clears all accounts, Wi-Fi passwords, and installed apps.
Perform this reset with only the power cable connected. After the reset is complete, you can reconnect your devices. This is a powerful step for resolving persistent software-related audio glitches.
Is Kodak Luma 150 sound skipping a hardware defect?
Often, it is not a hardware defect. Most sound skipping is caused by external factors like cables, source settings, or software. However, if the problem persists after all troubleshooting—including a factory reset and testing with multiple sources—it could indicate failing internal components.
In this case, contact Kodak customer support with your serial number to check warranty status. They can diagnose if a repair or replacement is needed for a genuine hardware fault.
What are the best external speakers for the Kodak Luma 150?
The best are compact soundbars or powered bookshelf speakers with a 3.5mm aux input. For portability, a high-quality Bluetooth speaker with an aux-in port offers flexibility. This gives you the option for a wired connection to avoid lag.
When choosing, prioritize speakers known for clear dialogue. This enhances movie watching. Connecting any reliable external speaker is often the most effective permanent solution to internal audio issues.
This website is a participant in the Amazon Services LLC Associates Program, an affiliate advertising program designed to provide a means for us to earn fees by linking to Amazon.com and affiliated sites.