
This website is a participant in the Amazon Services LLC Associates Program, an affiliate advertising program designed to provide a means for us to earn fees by linking to Amazon.com and affiliated sites.
Looking for the best universal ceiling mount for your projector? The Vivo universal ceiling extending projector tray mount is a top-tier solution. It securely lifts your device for a perfect home theater setup.
This mount solves key problems like limited placement and unstable projection angles. It provides a sturdy, adjustable tray to optimize your viewing experience from above.
Our complete guide delivers expert tips for installation, compatibility checks, and setup. You’ll learn proven methods to achieve a flawless, professional-grade projection in any room.
Best Projector Mounts for Ceiling Installation – Detailed Comparison
Vivo Universal Ceiling Extending Projector Tray Mount – Best Overall Choice
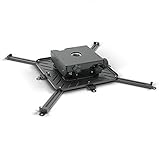
The Vivo UNIVERSAL-PROJ-TRAY is our top recommendation. It features a robust 22-inch telescoping pole and a universal tray fitting most projectors. Its 360-degree tilt and swivel head allow for perfect image alignment. This model is ideal for creating a permanent, professional home theater setup with maximum placement flexibility.

- Drop Ceiling Projector Mount: Easy to install on a suspended metal drop…
- Universal Projector Mount: Designed with adjustable arms to fit most…
- Mini Projector Compatibility: Adjustable extension arms can be removed to…
Chief RPMAU Universal Projector Mount – Best Premium Option
The Chief RPMAU is a commercial-grade solution known for exceptional stability. It offers micro-adjustable fine-tuning knobs for precise leveling and a low-profile design. Built with heavy-duty materials, it supports higher weight capacities securely. This mount is recommended for high-end projectors in dedicated media rooms where precision is critical.
VideoSecu ML531BE Projector Ceiling Mount – Best Value Pick
The VideoSecu ML531BE provides excellent functionality at an affordable price point. It includes a 15-inch extension pole and a universal quick-release plate for easy installation. The all-steel construction ensures reliable support. This is the ideal budget-friendly option for standard home or office projector installations without compromising on core features.

- High quality steel construction with glossy white finish
- 4 fully adjustable arms to fit various mounting patterns
- Removeable extension pole included, this mount extends from the ceiling…
Key Features and Benefits of a Universal Ceiling Projector Mount
Understanding the core features of a universal ceiling mount is crucial. This knowledge helps you maximize your projector’s potential and ensure a safe installation. The right mount transforms your viewing experience with stability and flexibility.
Universal Compatibility and Secure Tray Design
The defining feature is its universal tray, designed to fit a wide range of projector models. This eliminates the need for a brand-specific mount. It provides a future-proof solution for your home theater.
- Adjustable Tray: Features sliding arms or an adaptable plate to accommodate different projector sizes and screw hole patterns.
- Secure Locking Mechanism: Often includes safety screws or a quick-release latch to prevent accidental slips during adjustment or cleaning.
- Weight Distribution: The tray design evenly disperses the projector’s weight, reducing stress points and enhancing overall stability.
Extending Pole and Precision Adjustment
The telescoping pole is vital for optimal placement. It allows you to fine-tune the height after installation. This ensures your image fills the screen perfectly from edge to edge.
Once extended, the adjustment head provides micro-level control. You can correct for keystone issues mechanically. This results in a sharper picture without degrading digital image processing.
Installation and Structural Benefits
A proper ceiling mount offers significant advantages over temporary setups. It creates a clean, professional look by hiding cables through the pole. This also enhances safety by removing trip hazards.
- Permanent Solution: Provides a stable, vibration-free platform superior to shelves or tables.
- Cable Management: Integrated channels within the pole keep power and video cables organized and out of sight.
- Space Saving: Frees up valuable floor and furniture space, which is essential in smaller media rooms.
How to Install Your Vivo Projector Ceiling Mount
Proper installation is key to safety and performance. A secure mount protects your investment and ensures a perfect picture. Follow this step-by-step guide for a successful setup.
Pre-Installation Planning and Preparation
Begin by identifying the optimal mounting location on your ceiling. This spot must align with your screen’s center and accommodate the projector’s throw distance. Always consult your projector manual for specific placement requirements.
Gather all necessary tools before starting. You will typically need a stud finder, drill, wrench, screwdriver, and level. Ensure you have the correct hardware for your ceiling type, whether it’s wood joists, concrete, or a drop ceiling.
Step-by-Step Mounting Process
- Locate and Mark Joists: Use a stud finder to locate solid ceiling joists. Mark the exact drill points for the mounting plate’s lag bolts. Never mount solely into drywall.
- Attach the Mounting Plate: Drill pilot holes and securely fasten the ceiling plate to the joists using the provided lag bolts. Use a level to ensure the plate is perfectly flat.
- Assemble the Extension Pole: Connect the telescoping pole to the ceiling plate. Adjust it to your desired length and tighten the locking collar. Route your cables through the pole’s center.
- Secure the Projector Tray: Attach the universal adapter plate to your projector’s bottom. Then, lift and connect the projector to the mounting head, tightening all safety screws.
Final Alignment and Safety Check
Power on your projector and display a test pattern. Use the mount’s tilt, swivel, and extension adjustments to center the image on your screen. Make small, incremental changes for precision.
Conduct a thorough safety inspection once aligned. Ensure all bolts and locking collars are fully tightened. Gently test the stability by applying slight pressure. Verify that cables are not pinched or pulling on the connections.
Choosing the Right Projector Mount: Key Specifications
Selecting the correct mount requires checking critical specifications. Mismatched components can lead to instability or damage. This guide helps you verify compatibility and make an informed purchase.
Weight Capacity and Projector Compatibility
The mount’s maximum weight capacity is the most important spec. It must exceed your projector’s total weight. Always include the weight of any attached cables for a safe margin.
Next, verify the universal tray’s compatibility. Check the VESA pattern or the tray’s adjustable range. Ensure it can securely attach to your projector’s mounting points without modification.
- Check Your Projector’s Weight: Find this in the manual or on the manufacturer’s website, typically listed in pounds or kilograms.
- Understand VESA Patterns: Some universal mounts support standard VESA screw patterns (e.g., 100x100mm, 200x200mm) common on many projectors.
- Measure Tray Dimensions: Confirm the tray’s physical size can fully support your projector’s base for even weight distribution.
Pole Extension and Ceiling Types
The extension range determines how low the projector can hang. Measure the distance from your ceiling to the desired lens height. Choose a mount whose pole meets or exceeds this measurement.
Your ceiling structure dictates the required mounting hardware. Different anchors are needed for wood joists, concrete, or suspended tile ceilings. Most kits include hardware for common scenarios.
| Ceiling Type | Key Consideration | Recommended Hardware |
|---|---|---|
| Wood Joist (Standard) | Must anchor directly into the structural joist. | Long lag bolts (included). |
| Concrete / Cement | Requires drilling into the solid material. | Concrete anchors or wedge bolts. |
| Drop / Suspended Tile | Needs a support bar that spans across the grid. | Toggle bolts or a specialty crossbar. |
Adjustment Range and Build Quality
Review the mount’s tilt, swivel, and rotation limits. Greater adjustment ranges offer more flexibility to correct the image. This is crucial for off-center installations.
Finally, assess the build materials. Look for heavy-gauge steel construction and durable locking mechanisms. Quality finishes also resist corrosion, ensuring long-term reliability for your home theater.
Maintenance and Troubleshooting for Your Projector Mount
Regular upkeep ensures your ceiling mount remains safe and functional for years. Simple maintenance prevents common issues like drifting images or annoying squeaks. Address problems promptly to protect your projector.
Routine Maintenance Checklist
Perform a visual and physical inspection every six months. Check for any signs of loosening, dust buildup, or corrosion. This proactive approach catches minor issues before they become major failures.
- Tighten All Fasteners: Gently check and tighten lag bolts, pole collars, and tray screws. Avoid over-tightening, which can strip threads.
- Clean the Mount: Wipe down the pole and tray with a dry, soft cloth. For stubborn spots, use a slightly damp cloth and dry immediately.
- Inspect Cables: Ensure cables routed through the pole are not frayed or pinched. Verify they have enough slack to avoid tension on the ports.
Common Issues and Solutions
Even with good care, you may encounter occasional problems. Most have straightforward fixes you can perform yourself without taking the entire mount down.
Problem: Projector Image Drifts or Tilts
This indicates the adjustment knobs or locking collars have loosened. The mount’s joints have gradually shifted under the projector’s weight.
Solution: Re-project your alignment test pattern. While the image is displayed, carefully re-tighten all adjustment and locking mechanisms on the mount’s head and pole. Tighten them incrementally until the image is perfectly stable.
Problem: Mount Squeaks or Vibrates
Squeaking often comes from metal-on-metal friction at the joints. Vibration can be caused by a loose ceiling plate or a nearby subwoofer.
Solution: For squeaks, apply a tiny amount of dry lubricant (like Teflon spray) to the swivel and tilt joints. For vibration, ensure the ceiling plate is firmly anchored to the joist and check that all pole connections are tight.
Expert Tips for Optimizing Your Projector Setup
Proper installation is just the first step. Fine-tuning your setup unlocks the full potential of your projector and mount. These professional tips enhance picture quality, convenience, and longevity.
Perfecting Image Alignment and Focus
Achieving a perfectly rectangular image is critical. Use the mount’s mechanical adjustments first, before relying on your projector’s digital keystone correction. Digital correction can reduce image sharpness and clarity.
- Use a Grid Test Pattern: Display a grid or alignment pattern from your projector’s menu or a calibration Blu-ray.
- Adjust Mount Mechanics: Use the swivel, tilt, and extension to center the image and make the lines straight and parallel to the screen edges.
- Fine-Tune Digitally (If Needed): Only use minimal digital keystone or lens shift for final micro-adjustments.
Cable Management and Accessories
Clean cable routing is essential for safety and aesthetics. Utilize the hollow center of the extension pole to run cables from the ceiling to the projector. This hides wires and prevents strain on the connections.
Consider adding these useful accessories to your setup:
- Surge Protector / Power Conditioner: Plug your projector and media devices into a quality unit mounted near the ceiling plate for centralized power and protection.
- HDMI Over Ethernet Extenders: For long cable runs from your source devices, these provide a stable, high-quality signal without bulky cables.
- Dust Cover: When not in use for extended periods, a soft dust cover protects your projector’s lens and vents from accumulation.
Enhancing Flexibility and Future-Proofing
Plan for potential future upgrades. When installing, you might leave a little extra length in your cables. This allows you to swap projectors later without re-running wires through the ceiling.
Mark your ideal settings with a pencil or tape once everything is perfectly aligned. This makes it easy to return to the optimal position if the mount is ever adjusted for cleaning or servicing.
Frequently Asked Questions About Ceiling Projector Mounts
Choosing and installing a mount raises common questions. This FAQ section provides clear, direct answers to help you feel confident. Find quick solutions to the most frequent user concerns below.
Compatibility and Installation Questions
Users often worry about fit and structural requirements. These answers clarify universal compatibility and safe mounting practices.
Is the Vivo mount truly universal for all projectors?
Yes, it is designed to fit most home and business projectors. The adjustable tray accommodates various screw hole patterns and base sizes. Always verify your projector’s weight is under the mount’s maximum capacity for safety.
Can I install this mount on a sloped or vaulted ceiling?
Standard mounts are designed for flat ceilings. For sloped surfaces, you need a specialized sloped-ceiling adapter kit. This accessory creates a level mounting platform, ensuring proper projector alignment.
Usage and Adjustment Questions
Once installed, users have questions about operation and fine-tuning. These answers focus on practical daily use.
How do I prevent the projector from shifting over time?
Ensure all locking collars and adjustment knobs are fully tightened after alignment. Perform the semi-annual maintenance check to re-tighten any fasteners that may have loosened from subtle vibrations.
Can I lower the projector for bulb replacement?
Many extending mounts allow this. Loosen the pole’s locking collar to lower the projector to a comfortable working height. Some models also feature a quick-release tray for easy removal.
Safety and Warranty Concerns
Safety is paramount when mounting expensive equipment overhead. These answers address common warranty and risk questions.
What happens if my projector is heavier than the rated capacity?
Exceeding the weight limit is unsafe and voids the warranty. It risks mount failure, which could damage your projector and cause injury. Always choose a mount rated for a higher weight than your projector.
Does the mount come with a warranty?
Most quality mounts, including Vivo, come with a limited warranty, often covering defects for several years. The warranty typically does not cover improper installation or damage from exceeding weight limits.
Conclusion: Achieving the Perfect Home Theater Setup
Investing in a quality universal ceiling mount is a transformative step for your home theater. It provides the stable, flexible foundation your projector needs to perform at its best. The right installation elevates both the visual experience and the room’s aesthetics.
Recap of Core Benefits and Value
The Vivo universal ceiling extending projector tray mount solves key spatial and technical challenges. It unlocks optimal placement that tables or shelves cannot offer. This leads to a cleaner, more immersive viewing environment.
Remember the primary advantages we’ve covered:
- Superior Stability: Eliminates vibrations and provides a permanent, secure installation.
- Maximized Placement: The extending pole and adjustable head allow for perfect image alignment with your screen.
- Professional Finish: Conceals cables and frees up floor space, creating a dedicated theater feel.
Final Recommendations for Success
Your success hinges on three critical actions: verifying compatibility, installing securely into a structural joist, and taking time to align the image mechanically. Skipping any of these steps compromises the entire setup.
We recommend starting with our Best Overall Choice, the Vivo UNIVERSAL-PROJ-TRAY, for most home users. Follow the detailed installation and optimization guides provided. Perform regular maintenance checks to ensure lasting performance and safety.
- Double-check your projector’s weight and mounting pattern.
- Locate the ceiling joist at your ideal screen-center point.
- Gather tools and carefully follow the step-by-step installation guide.
- Use a test pattern to mechanically align the image for the sharpest results.
With careful planning and execution, your new ceiling mount will deliver a stunning, theater-quality picture for years to come. Enjoy your elevated viewing experience.
Conclusion: Elevate Your Viewing with a Universal Ceiling Mount
A Vivo universal ceiling extending projector tray mount is a game-changer. It provides the secure, flexible foundation your home theater deserves. This setup ensures perfect alignment and a clutter-free space.
The key takeaway is to prioritize secure installation into a ceiling joist and precise mechanical alignment. This guarantees safety and optimal image quality for every movie night.
Ready to transform your setup? Choose the right model for your projector’s weight and your room’s layout. Follow our detailed guides for a flawless installation.
Enjoy a stunning, professional-grade projection experience that will impress for years to come.
Frequently Asked Questions about Universal Ceiling Projector Mounts
What is a universal ceiling extending projector tray mount?
A universal ceiling extending projector tray mount is an adjustable mounting system. It securely attaches a projector to a ceiling joist using a telescoping pole and an adaptable tray. This allows for precise height and angle adjustments.
The “universal” tray fits various projector models by accommodating different screw patterns. The extending pole lets you fine-tune the projector’s position after installation for perfect screen alignment.
How do I know if my ceiling can support a projector mount?
Your ceiling must have solid wooden joists or concrete beams to support the weight. Use a stud finder to locate a joist at your desired mounting location. Never install solely into drywall or ceiling tile.
Check the mount’s specifications for required joist spacing and hardware. For concrete ceilings, you will need specific masonry anchors. If unsure, consult a professional to assess your ceiling’s structure.
What is the best way to align my projector after mounting it?
First, use the mount’s mechanical adjustments—tilt, swivel, and extension—to center the image. Display a grid test pattern from your projector’s menu. Make the lines straight and parallel to your screen edges.
Only use your projector’s digital keystone correction for minor final tweaks. Relying too much on digital correction can degrade image sharpness. Mechanical alignment always provides the best picture quality.
Can I install a ceiling projector mount by myself?
Yes, a DIY installation is very achievable with proper preparation. You will need basic tools like a stud finder, drill, level, and wrench. Carefully follow the manufacturer’s step-by-step instructions.
Having a helper is highly recommended for the final step of attaching the projector to the tray. They can hold the weight while you secure the safety screws, preventing strain or accidental drops.
Why is my mounted projector image shaking or vibrating?
Image vibration is often caused by a loose connection or external resonance. First, check and tighten all locking collars on the pole and adjustment head. Ensure the ceiling plate is firmly anchored to the joist.
If the issue persists, check for nearby sources of vibration like a powerful subwoofer. Isolating the subwoofer with a pad or decoupling the mount from the ceiling with a rubber washer can help dampen vibrations.
What is the difference between a universal mount and a custom mount?
A universal mount uses an adjustable tray or plate to fit many projector brands and models. It’s a versatile, cost-effective solution for most home theaters. Custom mounts are made for a specific projector model.
Custom mounts offer a perfect fit but lack flexibility if you upgrade your projector later. Universal mounts provide future-proofing and are the best choice for most users seeking flexibility and value.
How often should I perform maintenance on my ceiling projector mount?
Perform a basic maintenance check every six months. This involves visually inspecting for dust and gently ensuring all bolts and locking collars are snug. Look for any signs of sagging or metal fatigue.
Always power off and unplug your projector before any maintenance. If you notice persistent loosening or hear unusual noises, address it immediately to prevent safety issues or damage to your equipment.
What is the maximum weight a typical universal ceiling mount can hold?
Weight capacity varies by model but typically ranges from 20 to 50 pounds. Always check the specific specifications for your Vivo or other brand mount. The limit is usually clearly stated on the product packaging and manual.
It is critical that your projector’s weight, including any attached cables, is under this limit. Exceeding the capacity risks mount failure, which could damage your projector and create a safety hazard.
This website is a participant in the Amazon Services LLC Associates Program, an affiliate advertising program designed to provide a means for us to earn fees by linking to Amazon.com and affiliated sites.