
This website is a participant in the Amazon Services LLC Associates Program, an affiliate advertising program designed to provide a means for us to earn fees by linking to Amazon.com and affiliated sites.
A projector cabinet with a faux front is a specialized media console. It discreetly houses your projector and components behind a decorative panel. This solution merges seamless home theater integration with elegant room decor.
It solves the common problem of bulky, unsightly AV equipment dominating your living space. You achieve a clean, minimalist look without sacrificing functionality or performance. The cabinet conceals technology while the faux front maintains aesthetic appeal.
This guide will explore the key benefits and various styles available. You will learn expert tips for choosing the right model and placement strategies. We provide everything needed to make an informed decision for your space.
Best Projector Cabinets With Faux Front – Detailed Comparison
Salamander Designs Synergy Triple 20 – Best Overall Choice
The Synergy Triple 20 offers professional-grade construction and versatile configuration. Its modular design allows for a custom faux front panel that perfectly matches your decor. This model features superior ventilation and cable management, making it ideal for high-end home theater setups requiring flawless integration.

- Three infinitely adjustable shelves
- Perforated door inserts permit IR signals, add ventilation and mask…
- Snap-on hinges fully extend doors and remove easily for better in-cabinet…
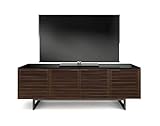
BDI Corridor 8173 – Best for Modern Aesthetics
With its sleek, low-profile design, the BDI Corridor 8173 features a motorized retractable door that acts as the ultimate faux front. It provides ample storage for large AV components while maintaining a minimalist look. This cabinet is the recommended option for contemporary living rooms.
- The award-winning Corridor 8179 is a complete home for even the most…
- CABLE MANAGEMENT: Engineered to keep cables and power cords controlled and…
- REAR ACCESS PANELS: Engineered with removable or sliding back panels for…
Whalen Furniture Xtend 60″ – Best Value Pick
The Whalen Xtend provides excellent functionality at an accessible price point. It includes a removable center speaker panel that can be replaced with a solid faux front. Offering great storage space and sturdy build quality, it is the ideal for budget-conscious enthusiasts seeking a clean look.

- GLASS COMPUTER DESK: Brings convenience and style to any work area whether…
- PULLOUT KEYBOARD TRAY: Features a space-saving pullout keyboard tray that…
- SLEEK AND STYLISH DESIGN: Elegant cherry finished plywood crisscross frame…
Key Benefits of a Projector Cabinet With Faux Front
Choosing a dedicated media cabinet with a faux front transforms your viewing space. It solves common home theater dilemmas with elegant, functional design. This section breaks down the primary advantages you’ll experience.
Enhanced Room Aesthetics and Decor Integration
A faux front panel allows your cabinet to blend seamlessly into your room’s design. It can mimic wood grains, matte finishes, or even be customized to match existing furniture. This creates a cohesive and uncluttered living environment, free from tech clutter.
- Design Flexibility: Choose from various materials and colors to complement any style, from rustic to modern.
- Visual Continuity: The cabinet appears as a stylish piece of furniture, not an electronics box.
- Reduced Visual Noise: Hiding wires, devices, and the projector itself promotes a calming, tidy space.
Superior Equipment Protection and Performance
These cabinets do more than just hide your gear; they protect your investment. Properly designed models feature essential built-in safeguards that standalone shelves lack.
- Dust and Debris Shield: The enclosed space and sealed front significantly reduce dust accumulation on sensitive projector lenses and components.
- Controlled Ventilation: Strategic venting or built-in fan systems prevent overheating, ensuring optimal performance and longevity.
- Cable Management: Integrated channels and ports keep power and AV cables organized, safe, and out of sight.
Acoustic and Viewing Experience Improvements
The right cabinet can subtly enhance your audio and visual immersion. By containing equipment noise and providing a stable platform, it improves the overall sensory experience. This leads to more engaging movie nights and gaming sessions.
Vibration dampening is a critical feature. A sturdy, well-built cabinet minimizes resonances from speakers or subwoofers. This prevents distracting buzzes and ensures your projector image remains perfectly stable and sharp.
How to Choose the Right Projector Cabinet With Faux Front
Selecting the perfect cabinet requires careful consideration of your space and gear. This decision impacts both functionality and room aesthetics. Follow this guide to ensure you make the best investment for your home theater setup.
Critical Measurements and Space Planning
Accurate measurements are the non-negotiable first step. You must account for the cabinet’s external dimensions and the internal space needed for your equipment. Always verify the interior height, width, and depth against your largest component.
- Projector Clearance: Ensure ample space for the projector’s body and required rear/side ventilation gaps.
- Component Stacking: Measure AV receivers, game consoles, and streaming devices to plan shelf layouts.
- Room for Growth: Allow extra interior space for future upgrades or additional devices.
Essential Features and Material Considerations
Not all cabinets are created equal. Prioritize features that protect your equipment and enhance usability. The construction material also dictates durability and style.
Ventilation is paramount for electronic longevity. Look for designs with strategic rear vents, perforated backs, or integrated silent cooling fans. This prevents dangerous heat buildup during long viewing sessions.
| Material | Best For | Considerations |
|---|---|---|
| Engineered Wood | Budget-friendly options, lighter weight | Check for sturdy construction and thick panels |
| Solid Wood | Durability, classic/heirloom aesthetics | Heavier, often more expensive, can be susceptible to humidity changes |
| Metal & Glass | Modern, industrial styles | Excellent stability; ensure glass is tempered for safety |
Matching the Faux Front to Your Decor
The faux front is the centerpiece of the cabinet’s disguise. Its style should be chosen intentionally to complement your existing furniture and room theme. This is where the cabinet transitions from utility to decor.
- Finish Matching: Bring fabric swatches or paint samples when shopping to match wood stains or paint colors precisely.
- Style Cohesion: Choose between shaker, flat-panel, or decorative styles that align with your room’s design language.
- Customization Options: Some manufacturers offer custom panel fronts or the ability to use your own material for a perfect match.
Professional Installation and Setup Tips
Proper installation maximizes the functionality and safety of your projector cabinet. A thoughtful setup ensures optimal performance and seamless integration. These expert tips will guide you through the process from unboxing to first use.
Step-by-Step Assembly and Placement Guide
Follow a logical sequence to avoid mistakes and damage. Begin by clearing your workspace and carefully inventorying all parts against the manual. Never force components together, as this can strip screws or crack panels.
- Assemble the Main Frame: Build the cabinet’s core structure on a soft surface to prevent scratches. Ensure all joints are square and tight.
- Install Interior Shelving: Adjust shelf heights to accommodate your specific components before securing them permanently.
- Position the Cabinet: Move the assembled unit to its final location. Use furniture sliders and enlist help to protect your floors and back.
- Attach the Faux Front: Install the decorative panel last, following the manufacturer’s instructions for hinges, magnets, or mounting hardware.
Optimizing Ventilation and Cable Management
Effective heat dissipation is critical for electronics. Even with built-in vents, you must arrange components strategically. Avoid blocking intake or exhaust areas with other devices or media.
- Create Air Channels: Leave space between hot-running components like AV receivers and projectors. Use small stands or feet to elevate devices if necessary.
- Implement Proactive Cable Routing: Use velcro straps, zip ties, and adhesive clips inside cable channels. Label both ends of each cable for easy future identification.
- Consider Active Cooling: For high-power setups, a small, quiet USB-powered fan placed at a rear vent can significantly improve airflow.
Integrating Smart Home and Control Systems
A modern cabinet should work with your home automation. Ensure your setup allows for seamless control of all hidden components. This maintains the clean aesthetic without sacrificing convenience.
For IR-controlled devices, use an infrared repeater system with a discreet receiver placed outside the cabinet. Smart plugs and power strips with individual outlet control allow you to power cycle equipment remotely. This integration is the final step for a truly polished, high-functioning media center.
Maintenance and Long-Term Care for Your Cabinet
Regular upkeep preserves the beauty and function of your projector cabinet. A simple maintenance routine prevents common issues and extends its lifespan. This section covers essential care practices for both the furniture and the electronics inside.
Cleaning the Faux Front and Exterior Surfaces
Different materials require specific cleaning methods to avoid damage. Always start by dusting with a soft, microfiber cloth to remove loose particles. Avoid abrasive cleaners or rough sponges that can scratch finishes.
- Wood & Laminate Finishes: Use a slightly damp cloth followed by a dry one. For smudges, a mild soap solution is safe.
- Painted or Lacquered Surfaces: Dust regularly. Use a dedicated furniture polish sparingly, if recommended by the manufacturer.
- Glass or Acrylic Panels: Clean with a vinegar-water solution or a dedicated glass cleaner. Spray onto the cloth, not directly on the surface.
Interior Ventilation and Dust Control
The interior environment is crucial for your AV equipment’s health. Dust accumulation is the enemy of electronic cooling systems and projector optics. A proactive approach saves you from costly repairs.
Schedule a quarterly interior cleaning. Unplug all equipment and use a vacuum with a soft brush attachment to gently remove dust from shelves and vents. For the projector lens, use only a specialized camera lens blower and brush to avoid scratches.
| Task | Frequency | Key Tool |
|---|---|---|
| Exterior Dusting | Weekly | Microfiber Cloth |
| Vent & Filter Check | Monthly | Can of Compressed Air |
| Full Interior Clean | Quarterly | Vacuum with Soft Brush |
| Hardware Inspection | Bi-Annually | Screwdriver (for tightening) |
Preventing Common Wear and Tear Issues
Be mindful of daily use to maintain the cabinet’s structure and appearance. Small habits can prevent significant damage over time. Address minor issues promptly before they worsen.
- Door & Hinge Care: Avoid slamming the faux front door. Periodically check and tighten hinge screws to prevent sagging.
- Weight Distribution: Do not overload shelves. Place heavier components like AV receivers on the most supported, lower shelves.
- Sunlight & Humidity: Position the cabinet away from direct sunlight to prevent fading. Maintain stable room humidity to protect wood components from warping.
Creative Alternatives and DIY Solutions
Not every setup requires a store-bought specialty cabinet. Creative solutions can achieve a similar aesthetic at a lower cost. This section explores alternative approaches to concealing your projector with a faux front.
Modifying Existing Furniture for AV Use
Many standard cabinets and consoles can be converted into effective media hubs. The key is ensuring proper ventilation and access. This is a popular project for achieving a custom look on a budget.
Start with a sturdy piece like a sideboard or a large TV stand. You will need to create strategic ventilation openings in the back panel using a drill and hole saw. Install wire grommets in these holes for a clean, finished appearance and to protect cables.
- Add a Custom Faux Front: Attach a new decorative panel to the existing doors using hinges or strong magnets.
- Install Internal Lighting: Low-voltage LED strip lights inside the cabinet improve visibility and add ambiance.
- Upgrade Shelving: Replace fixed shelves with adjustable glass or ventilated metal shelves to improve airflow.
Building a Custom Projector Cabinet From Scratch
For the ultimate tailored solution, a DIY build offers complete control. This project requires intermediate woodworking skills but results in a perfect fit for your space and gear. Detailed planning is essential for success.
Using Room Dividers and False Walls
For projectors in open-plan spaces, freestanding concealment can be effective. A room divider with a solid panel can double as a projector screen backdrop and equipment hideaway. This approach offers great flexibility.
You can build a simple false wall or use a large, decorative screen. Place your projector cabinet behind it, ensuring there is ample space for heat to dissipate. This method creates a dedicated theater zone without permanent renovations, perfect for renters or flexible spaces.
Cost Analysis and Budgeting for Your Project
Understanding the investment range helps you plan effectively for your projector cabinet. Prices vary widely based on materials, features, and brand. This financial breakdown ensures you allocate funds wisely for maximum value.
Price Ranges: From Budget to Premium
The cost spectrum for quality cabinets is broad, catering to different needs. Your budget should reflect the cabinet’s role as a long-term furniture and protection investment.
- Budget Tier ($200 – $500): Typically includes engineered wood construction, basic ventilation, and simpler faux front mechanisms. Ideal for starter setups.
- Mid-Range Tier ($500 – $1,500): Features better build quality, improved cable management, more finish options, and often modular designs. This is the sweet spot for most enthusiasts.
- Premium Tier ($1,500+): Offers solid wood construction, custom sizing, motorized doors, integrated cooling, and high-end finishes from specialty brands.
Where to Invest vs. Where to Save
Strategic spending ensures you get critical features without overspending. Prioritize elements that directly impact performance and longevity. You can compromise on purely aesthetic details.
Never sacrifice interior space or proper airflow to fit a lower budget. A cramped cabinet will cause overheating and limit future upgrades. It is better to choose a simpler model from a reputable brand than a poorly designed unit.
Factoring in Hidden and Long-Term Costs
The initial purchase price is only part of the total cost of ownership. Account for additional items needed for a complete, functional installation. This prevents budget surprises.
| Cost Category | Typical Items | Estimated Cost |
|---|---|---|
| Installation & Tools | Professional assembly, specialty screwdrivers, level | $0 – $200 |
| Cable Management | High-quality power strip, cable sleeves, clips, IR repeater kit | $50 – $150 |
| Cooling & Accessories | Silent USB fans, dust filters, internal LED lighting | $30 – $100 |
Planning for these extras from the start leads to a smoother setup. It also ensures your cabinet system operates reliably for years, protecting your more expensive AV components.
Frequently Asked Questions (FAQs)
This section addresses the most common queries about projector cabinets with faux fronts. Clear, direct answers help you make confident decisions and troubleshoot potential issues. Find quick solutions to your specific concerns below.
Common Concerns About Ventilation and Heat
Q: Will my projector overheat in a closed cabinet?
A: Not if you choose or modify the cabinet correctly. Look for models with dedicated rear vents, perforated backs, or integrated fans. You can also add aftermarket USB fans to improve airflow if needed.
Q: How much clearance does my projector need inside?
A: Consult your projector’s manual for specific requirements. As a general rule, allow at least 3-4 inches of space on all sides, especially around the intake and exhaust vents, for safe operation.
Questions on Compatibility and Installation
Q: Can I use a universal remote if everything is hidden?
A: Yes. Use an infrared (IR) repeater system. Place the receiver where it can see your remote signal, and it will relay commands to the devices inside the cabinet via small emitters.
Q: Will the cabinet work with a ultra short throw (UST) projector?
A: It can, but requires precise planning. The cabinet must be very low-profile and the faux front may need to be a acoustically transparent screen material. Always check the projector’s placement specifications first.
Inquiries About Customization and Aesthetics
Q: Can I paint or refinish the faux front to match my room?
A: Often, yes. For laminate surfaces, use a primer designed for slick surfaces before painting. For real wood, sand lightly and apply a stain or paint that matches your decor. Always test in an inconspicuous area first.
Q: Is it difficult to add or swap out components later?
A: A well-designed cabinet makes this easy. Models with removable back panels, adjustable shelves, and deep cable channels simplify upgrades. Good initial cable management is key for future access.
Conclusion: Elevate Your Home Theater With a Projector Cabinet
A projector cabinet with a faux front is the ultimate solution for a clean, integrated media space. It protects your investment while enhancing your room’s decor. This approach successfully hides technology without sacrificing performance.
The key takeaway is to prioritize proper ventilation and precise measurements during your selection. A well-chosen cabinet serves as both functional furniture and a design statement. It transforms your viewing experience from cluttered to cinematic.
Begin by assessing your current equipment and room layout. Use the guidelines in this article to choose or create the perfect cabinet for your needs. Take the next step toward your dream home theater setup today.
With careful planning, you can enjoy a stunning, immersive entertainment space that looks as good as it sounds.
Frequently Asked Questions About Projector Cabinets With Faux Fronts
What is the main purpose of a faux front on a projector cabinet?
The primary purpose is aesthetic concealment. It disguises the cabinet as ordinary furniture, hiding all AV equipment behind a decorative panel. This maintains your room’s design theme without visible electronics.
Functionally, it also provides a physical barrier against dust and accidental contact. The front protects sensitive projector lenses and components while allowing for easy access when you need to adjust settings or change media.
How to ensure proper ventilation in a closed cabinet?
Select a cabinet with built-in rear vents or a perforated back panel. You can also install quiet, USB-powered exhaust fans to actively circulate air. These fans are inexpensive and highly effective at preventing heat buildup.
Internally, avoid stacking components directly on top of each other. Use shelf risers or feet to create vertical space for air to flow. Regularly check that intake and exhaust areas are not blocked by cables or media.
What is the best material for a durable projector cabinet?
Solid wood and high-quality plywood offer the best durability and stability. They resist warping and can support substantial weight without sagging. These materials also provide better sound dampening for a quieter operation.
For a modern look, powder-coated steel frames with wood panels are excellent. Avoid particleboard for heavy setups, as it may not hold up over time. The best material balances structural integrity with your desired aesthetic.
Can I use a universal remote with a closed cabinet?
Yes, using an infrared (IR) repeater system is the standard solution. A small receiver sits outside the cabinet to capture your remote’s signal. It then transmits the command via wired emitters placed in front of each device’s sensor.
For RF (Radio Frequency) or Wi-Fi based remotes and smart home systems, no repeater is needed. These signals penetrate the cabinet material easily, offering seamless control without any additional hardware.
What are the key measurements before buying a cabinet?
Measure the exterior dimensions to ensure it fits your room’s footprint. Crucially, measure the interior height, width, and depth to confirm it can house your largest component, typically an AV receiver or the projector itself.
Don’t forget to account for cable bend radius and rear connector space. Add at least 2-3 inches to the depth of your deepest device to allow for proper cable connections and airflow behind it.
How to clean and maintain the faux front panel?
For most surfaces, dust weekly with a soft, dry microfiber cloth. For smudges on wood or laminate, use a slightly damp cloth followed immediately by a dry one. Avoid abrasive cleaners or chemical sprays that can damage the finish.
For glass or acrylic panels, use a dedicated glass cleaner sprayed onto the cloth, not directly on the surface. Inspect hinges and mounting hardware annually, tightening any loose screws to ensure the door operates smoothly and remains aligned.
Is a DIY projector cabinet a viable project for a beginner?
It can be, with careful planning and modest goals. Beginners should start with a simple design using pre-cut materials or by modifying an existing piece of furniture. Focus on mastering ventilation cuts and basic assembly before attempting complex joinery.
Many online plans offer step-by-step instructions. The key is patience and precision in measuring. A successful DIY cabinet can be very rewarding and cost-effective, but purchasing a pre-made unit is often better for those wanting guaranteed results and professional finish.
What should I do if my equipment overheats inside the cabinet?
First, immediately power down the equipment and let it cool. Improve ventilation by adding exhaust fans or enlarging existing vent holes. Ensure no internal components are blocking the projector’s or receiver’s own air intakes.
Consider installing a temperature-controlled fan system that automatically turns on at a set temperature. As a last resort, you may need to slightly prop open the faux front during extended use or reassess if the cabinet is large enough for your specific gear’s thermal output.
4K Projector with HDR10+: Ultimate Guide to Stunning Home Theater Visuals in 2026
This website is a participant in the Amazon Services LLC Associates Program, an affiliate advertising program designed to provide a means for us to earn fees by linking to Amazon.com and affiliated sites.