
This website is a participant in the Amazon Services LLC Associates Program, an affiliate advertising program designed to provide a means for us to earn fees by linking to Amazon.com and affiliated sites.
What is a Smart Sketcher Projector? It’s an innovative drawing toy that projects images for kids to trace and learn. This device transforms screen time into creative, hands-on skill building. It is the perfect tool for nurturing young artists and making learning to draw fun.
The main benefit is solving the “I don’t know what to draw” problem. It provides endless inspiration and guided practice, building confidence with every sketch. Children gain fine motor skills and artistic fundamentals without frustration.
This complete guide will show you how it works, its key features, and expert tips for maximum fun. You’ll learn how to choose the best model and unlock its full educational potential for your child’s creative development.
Best Smart Sketcher Projectors for Kids – Detailed Comparison
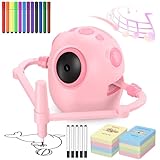
Smart Sketcher Projector 2.0 – Best Overall Choice
The Smart Sketcher Projector 2.0 is our top pick for its versatility and content library. It projects thousands of images from its included guidebooks and allows for freehand drawing on any surface. With adjustable focus and simple controls, it’s ideal for children ages 5 and up to build lasting artistic confidence.

- A LEARN TO DRAW EXPERIENCE: This drawing projector is the ultimate tool for…
- APP ENABLED FOR ENDLESS FUN: Seamlessly connect to smartphones and tablets…
- EXPANDED CONTENT LIBRARY: Right out of the box, enjoy a diverse selection…
Smart Sketcher Projector & Studio Set – Best for Creative Play
This comprehensive set includes the projector plus a full art studio with markers, paper, and stencils. It’s the perfect all-in-one creative station that keeps everything organized. This bundle is the best option for parents wanting an immediate, mess-contained play experience that encourages hours of focused drawing fun.

- COMPLETE BUNDLE: Includes the smART Sketcher 2.0 Projector, Under the Sea…
- EDUCATIONAL & DEVELOPMENTAL VALUE: Boosts fine motor skills, hand-eye…
- PERFECT FOR KIDS AGES 5+: Encourages creativity, independence, and hands-on…
SmartSketch Animator – Best for Tech-Savvy Kids
For kids who love animation, the SmartSketch Animator (Model 2000) takes creativity further. It projects images frame-by-frame to teach basic animation principles and storytelling. This model is ideal for older kids (7+) ready to move beyond static drawings and explore bringing their sketches to life with simple stop-motion techniques.
- Inspire Creativity and Learning Drawing Robot – Our interactive learning…
- 150 Drawing Cards – The girls smart sketcher no-projector for kids bundle…
- BPA Free – Unlike kids no-projector drawing robot products with light, it…
How the Smart Sketcher Projector Works: A Step-by-Step Guide
Understanding the Smart Sketcher Projector’s operation is simple. This device uses a safe LED light to project pre-drawn images onto paper. Children can then trace these images, learning proportions and shapes effortlessly. It turns complex drawings into achievable, confidence-building activities.
Core Components and Setup Process
Every kit includes the projector unit, image discs or guidebooks, and a power adapter. Some sets also contain paper, markers, and stencils. Setting it up is a quick three-step process that kids can often manage themselves.
- Insert an Image Slide: Choose a drawing from the included guidebook or cartridge and place it into the projector’s slot.
- Position and Focus: Place paper on a flat surface, position the projector above it, and use the dial to sharpen the projected image.
- Trace and Create: Turn on the LED light, trace the projected lines with a pencil or marker, and then color your masterpiece.
Key Educational Benefits for Child Development
This is more than just a toy. The Smart Sketcher is a powerful educational tool that builds foundational skills through play. It directly supports several key areas of childhood development in an engaging way.
- Fine Motor Skills: Tracing precise lines improves hand-eye coordination and dexterity, preparing kids for writing.
- Visual-Spatial Reasoning: Kids learn about perspective, scale, and how shapes combine to form objects.
- Confidence & Persistence: It removes the frustration of “I can’t draw,” allowing for guaranteed success that encourages further practice.
Choosing the Right Drawing Projector: Key Features to Compare
Not all kids’ projectors are created equal. Selecting the best model depends on your child’s age, interests, and your goals. This comparison focuses on the most impactful features for long-term use and enjoyment. Understanding these elements ensures you get the best value and perfect fit.
Content Library and Age Appropriateness
The available images define the creative possibilities. A robust library keeps the device engaging for years. Age recommendations are crucial for safety and skill matching.
- For Ages 4-6: Look for simple shapes, animals, and basic objects. These models often have chunkier, easy-to-insert slides and very simple controls.
- For Ages 7+: Opt for projectors with complex scenes, characters, and educational content (like maps or dinosaurs). Advanced models may include animation features.
Essential Features vs. Nice-to-Have Extras
Focus on core functionality first. Then, consider add-ons that enhance the experience. This table breaks down what truly matters.
| Essential Feature | Why It Matters |
|---|---|
| Adjustable Focus Dial | Allows for crisp images on different paper sizes and distances, critical for accuracy. |
| Multiple Image Discs/Books | Prevents boredom. A larger included library offers more variety and long-term value. |
| Durable Construction | Withstands drops and handling. Look for sturdy plastic and secure battery compartments. |
| Bonus Feature | Added Benefit |
| Built-in Storage | Keeps all slides, paper, and markers organized in one place, reducing clutter. |
| Free-Draw Mode | Projects a blank light circle, allowing for original drawing without a guide. |
Creative Activities and Pro Tips for Maximum Fun
Unlock the full potential of your Smart Sketcher Projector with these engaging ideas. Move beyond simple tracing to foster true creativity and skill development. These activities are designed to extend playtime and provide educational value long after the initial novelty fades.
Advanced Drawing Games and Challenges
Elevate the experience with structured games that teach artistic concepts. These challenges encourage problem-solving and original thinking. They transform the projector from a tracing tool into a springboard for imagination.
- Create a Comic Strip: Project and trace a character multiple times. Change small details in each frame (expression, pose) to tell a sequential story.
- The Mixed-Up Beast Challenge: Combine parts from different slides—like a lion’s head on a dinosaur body—to invent unique creatures.
- Scene Expansion: Trace a central projected object, then turn off the projector. Challenge your child to draw a detailed background around it from their own mind.
Maintenance and Troubleshooting Guide
Proper care ensures your projector lasts for years. Most common issues have simple fixes. Follow these steps to keep the device in perfect working order.
- Keep Lenses Clean: Use a soft, dry microfiber cloth to gently wipe the projection lens and the image slides. Avoid liquids.
- Ensure Clear Projection: If the image is blurry, check the focus dial and ensure the projector is positioned perpendicular to the paper.
- Solve Power Issues: If the light is dim or won’t turn on, first check/replace the batteries. For plug-in models, verify the outlet and connection.
Smart Sketcher Projector Safety and Parental FAQs
Safety and practical concerns are top priorities for parents considering this toy. This section addresses the most common questions with clear, actionable answers. Understanding these points ensures a safe, positive, and hassle-free experience for your young artist.
Is the Smart Sketcher Projector Safe for Children’s Eyes?
Yes, when used as directed. The projector uses a standard, cool LED light, not a laser. It is designed to be eye-safe for children. However, following basic guidelines is essential for responsible use.
- No Direct Viewing: Instruct children never to look directly into the projection lens while it is on.
- Use in Lit Rooms: The projector works best in normal room lighting, eliminating the need for a dark environment that could strain eyes.
- Follow Age Ratings: Adhere to the manufacturer’s recommended age (typically 4+ or 5+), which considers both safety and developmental appropriateness.
Maximizing Value and Long-Term Use
A common concern is whether children will outgrow the toy quickly. With the right approach, the Smart Sketcher can remain engaging for years. The key is to view it as a developmental tool, not a one-time novelty.
| Child’s Stage | How to Use the Projector | Skill Developed |
|---|---|---|
| Beginner (Ages 4-5) | Simple tracing, color recognition, holding markers. | Fine motor control, color naming, following lines. |
| Intermediate (Ages 6-7) | Complex scenes, adding original details, storytelling. | Composition, creativity, narrative skills. |
| Advanced (Ages 8+) | Using tracings as bases for original art, animation projects. | Advanced drawing techniques, planning, patience. |
Smart Sketcher Projector vs. Traditional Drawing Methods
How does a drawing projector truly compare to classic art supplies? This analysis highlights the unique advantages and ideal use cases for each approach. Understanding this helps parents integrate the projector effectively into a balanced creative toolkit for their child.
Comparative Benefits: Guided vs. Freeform Creativity
Both methods develop different but complementary skills. The projector excels at building foundational confidence and technique. Traditional drawing fosters unimpeded imagination and personal expression from a blank page.
| Aspect | Smart Sketcher Projector | Traditional Drawing (Crayons, Markers) |
|---|---|---|
| Primary Benefit | Guarantees success; teaches proportion and observation. | Encourages pure, unstructured imagination and originality. |
| Skill Focus | Fine motor control, hand-eye coordination, visual-spatial reasoning. | Creative thinking, problem-solving, unique self-expression. |
| Best For | Beginners, hesitant artists, skill-building sessions, focused practice. | Confident creators, open-ended play, storytelling, emotional expression. |
Integrating the Projector into a Holistic Art Education
The most effective strategy uses the projector as a stepping stone. It should complement, not replace, free drawing. This phased approach maximizes developmental benefits.
- Skill Acquisition Phase: Use the projector to learn specific shapes, animals, or objects. Focus on the mechanics of drawing them well.
- Hybrid Creation Phase: Trace a base image, then turn off the projector. Add original backgrounds, colors, and new elements from imagination.
- Confident Application Phase: Use the skills practiced (like drawing a dog) to create original art on blank paper without the projector’s aid.
Where to Buy and What to Look For
Finding the right Smart Sketcher Projector involves knowing where to shop and what to check before purchasing. This guide covers reputable retailers, price considerations, and essential post-purchase steps. A smart buying decision ensures you get a genuine product with full support.
Trusted Retailers and Price Comparison Tips
Purchase from authorized sellers to guarantee authenticity and warranty coverage. Prices can vary significantly based on the model and included accessories. Being a savvy shopper can lead to great value.
- Major Online Retailers: Amazon, Walmart, and Target offer wide selection, customer reviews, and frequent sales. Check for “Shipped and Sold by” the retailer.
- Specialty Toy Stores: Stores like Toys “R” Us provide expert staff and the ability to see the product in person before buying.
- Manufacturer’s Website: Buying directly from the Smart Sketcher site ensures you get the latest model and any exclusive bundles.
Verifying Authenticity and Understanding Warranties
Protect your investment by ensuring you receive an official product. Understanding the warranty terms provides peace of mind for potential issues.
- Check Packaging and Logos: Authentic products feature clear “Smart Sketcher” branding, official logos, and high-quality packaging. Be wary of vague or misspelled names.
- Review the Warranty Card: Most projectors come with a limited manufacturer’s warranty (often 90 days to 1 year). Register your product if required to activate coverage.
- Save Your Receipt: Keep your purchase receipt digitally and physically. It is required for any warranty service or returns.
Expert Tips for Extending Play and Learning
Maximize your investment with these advanced strategies from educators and experienced parents. These tips go beyond the manual to foster sustained engagement and deeper educational outcomes. The goal is to keep the experience fresh and developmentally challenging.
Creating Custom Image Slides for Personalized Fun
While official slides are great, personalization boosts connection. You can easily create custom projection slides using household items. This activity itself becomes a fun, collaborative project.
- Use Transparency Sheets: Draw simple designs with a permanent marker on clear acetate sheets (used for overhead projectors). These work perfectly in the slide slot.
- Trace Family Photos: Place a family photo or a picture of your pet under a transparency sheet. Trace the outlines to create a personalized drawing slide.
- Involve Your Child: Let them dictate a story or describe a creature. You draw it on the sheet, then they can project and trace their own idea.
Themed Learning Weeks and Project-Based Play
Structure play around weekly themes to integrate the projector with broader learning. This approach connects art to science, history, and literacy in a tangible way.
| Weekly Theme | Projector Activity | Extended Learning Activity |
|---|---|---|
| Dinosaurs | Trace different dinosaur species from slides. | Read a dinosaur book, then draw a habitat for the traced dinosaur. |
| Space Exploration | Project and draw planets, rockets, and astronauts. | Use black paper and chalk to create a starry background for the drawings. |
| Community Helpers | Trace a firefighter, doctor, or teacher. | Write a short story or thank-you note about what that helper does. |
Conclusion: Unlocking Creative Confidence with a Smart Sketcher Projector
The Smart Sketcher Projector is a powerful tool that transforms learning to draw. It builds fine motor skills and artistic confidence through guided, frustration-free success. This device makes creativity accessible and enjoyable for children of all skill levels.
The key takeaway is to use it as a springboard for imagination, not a replacement for it. Integrate tracing with free drawing for balanced development. Choose a model that matches your child’s current age and interests.
Ready to inspire your young artist? Review our product recommendations and expert tips to begin. Select the right Smart Sketcher model for your family’s creative journey today.
Watch with joy as simple tracing evolves into original masterpieces and a lifelong love for art.
Frequently Asked Questions about Smart Sketcher Projectors
What is the recommended age for a Smart Sketcher Projector?
The manufacturer recommends most models for children ages 5 and up. This age rating ensures kids have the fine motor skills to hold markers and the patience to follow tracing activities. Some simpler models may be suitable for mature 4-year-olds with supervision.
Always check the specific product packaging for its official age range. The content complexity in the image slides is designed to match the developmental stage of the target age group for optimal engagement and learning.
How do you use a Smart Sketcher Projector step by step?
First, insert a chosen image slide into the projector’s slot. Next, position the projector over your paper and use the focus dial to sharpen the projected image. Finally, turn on the LED light and trace the outline with a pencil or marker.
For best results, use the device in a normally lit room on a flat, stable surface. Encourage your child to press lightly while tracing so they can easily erase and correct lines before adding permanent color.
Can you create your own slides for a Smart Sketcher?
Yes, you can create custom slides using clear acetate sheets. Draw your design with a permanent black marker on the transparency. These DIY slides will work in the projector’s tray just like the official ones.
This is a fantastic way to personalize the experience. You can trace family photos, favorite book characters, or letters and numbers for educational practice, greatly expanding the device’s creative library.
What should I do if my Smart Sketcher projector is blurry?
A blurry image is almost always a focus or positioning issue. Carefully turn the focus dial on the side of the projector while looking at the paper. Ensure the projector is sitting perfectly flat and perpendicular to your drawing surface.
Also, check that the image slide is fully and correctly inserted into the slot. If problems persist, gently clean the projection lens and the slide itself with a dry, soft microfiber cloth to remove any dust or fingerprints.
Is the Smart Sketcher Projector better than freehand drawing?
It’s not “better,” but rather a complementary tool with different benefits. The projector excels at building confidence, teaching proportion, and developing fine motor skills through guided success. It removes the initial intimidation of a blank page.
Freehand drawing is crucial for fostering pure imagination and self-expression. The best approach is to use both: the projector for skill-building sessions and blank paper for unrestricted creative storytelling.
How do I extend the life of my Smart Sketcher Projector?
Proper maintenance is key. Always use fresh batteries or the correct adapter to prevent power issues. Store the projector and all slides in a cool, dry place away from direct sunlight to prevent warping.
Handle the image slides by the edges to avoid smudges. Most importantly, supervise young children to prevent rough handling or attempts to insert foreign objects into the slide slot, which can damage the internal mechanism.
What is the best Smart Sketcher model for a 7-year-old?
For a 7-year-old, consider the Smart Sketcher Projector 2.0 or the SmartSketch Animator. These models offer more complex images and advanced features suitable for their developing skills. They move beyond basic shapes to full scenes and characters.
The Animator model is particularly engaging as it introduces basic animation concepts. Look for sets that include a wide variety of slides to match their growing interests, such as animals, vehicles, or fantasy themes.
Can the Smart Sketcher help a child who dislikes drawing?
Absolutely. It is specifically designed for hesitant or reluctant young artists. By guaranteeing a recognizable result, it builds confidence and reduces the fear of failure. The activity feels more like a fun, achievable game than a challenging task.
Start with very simple, high-interest images and focus on the playful process of tracing, not the final product. This positive, low-pressure introduction can often spark an interest that leads to a newfound enjoyment of art.
4K Projector with HDR10+: Ultimate Guide to Stunning Home Theater Visuals in 2026
This website is a participant in the Amazon Services LLC Associates Program, an affiliate advertising program designed to provide a means for us to earn fees by linking to Amazon.com and affiliated sites.