
This website is a participant in the Amazon Services LLC Associates Program, an affiliate advertising program designed to provide a means for us to earn fees by linking to Amazon.com and affiliated sites.
Buying your first projector is exciting, but many beginners make costly projector buying mistakes that ruin their experience. This complete guide reveals the most common pitfalls to help you get the best value.
You will learn expert tips for choosing brightness, resolution, and placement. Avoid these proven errors to find your perfect home cinema setup. Keep reading to save time, money, and frustration.
Best Projectors for First-Time Buyers – Detailed Comparison
BenQ TK700STi – Best Overall Choice
The BenQ TK700STi offers 3000 ANSI lumens and true 4K resolution for under $1500. It features a short-throw lens ideal for small living rooms. This is the best option for gamers needing low input lag and bright daytime viewing.

- TK700 vs TK700STi: TK700 utilizes standard throw (100″@8.2ft). TK700STi…
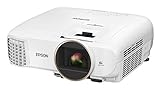
Epson Home Cinema 2150 – Best for Budget Buyers
The Epson Home Cinema 2150 delivers vibrant 1080p images with 2500 lumens of color brightness. Its built-in Android TV eliminates the need for external streaming devices. This is the recommended choice for families wanting plug-and-play simplicity.
- Bright ideal for a variety of lighting conditions, the projector has…
- Widescreen Full HD 1080p entertainment up to 11 feet (132 inches diagonal…
- Amazing dynamic contrast ratio: up to 60,000:1 for even richer detail in…
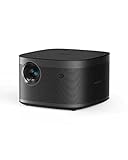
XGIMI Horizon Pro – Best Portable Option
The XGIMI Horizon Pro packs 2200 ANSI lumens and auto keystone correction into a compact body. Its built-in Harman Kardon speakers remove the need for external audio. This is ideal for apartment dwellers who move their setup frequently.
- True 4K Technology: 3840 x 2160 Pixels Standard Resolution with…
- Room-Filling Sound: Dual 8W built-in Harman Kardon speakers, DTS-HD & DTS…
- Intelligent Screen Adaption Technology: ±40 Degrees Auto Keystone…
Critical Projector Buying Mistakes That Ruin Your Experience
Most first-time buyers focus on resolution and price first. This leads to projector buying mistakes that are difficult to fix later. Understanding brightness and screen size will save you from a disappointing setup.
Ignoring Ambient Light and Brightness Needs
Buying a projector with insufficient lumens is the most common error. A dark room needs at least 1500 ANSI lumens, while a living room with windows requires 2500 or more. Brightness determines image quality more than resolution does.
- 1500-2000 lumens: Best for dedicated home theaters with blackout curtains
- 2500-3000 lumens: Suitable for living rooms with moderate ambient light
- 3000+ lumens: Required for rooms with windows or daytime viewing
Overlooking Throw Distance and Room Size
Many buyers purchase a projector that does not fit their room dimensions. A long-throw projector needs 10-15 feet of distance for a 100-inch screen. Short-throw projectors work well in small apartments where space is limited.
Measure your room before buying. Use online throw distance calculators to confirm compatibility. This simple step prevents the mistake of buying a projector that is too big or too small for your space.
Hidden Projector Buying Mistakes About Resolution and Audio
Many first-time buyers assume higher resolution always equals a better picture. This is another of the common projector buying mistakes that leads to overspending. Understanding native resolution versus supported resolution is essential for smart shopping.
Confusing Native Resolution with Compatibility
A projector may accept a 4K signal but only display it at 1080p natively. Always check the native resolution in the specifications, not the maximum supported input. Native 4K projectors cost more but deliver sharper images for large screens over 120 inches.
- Native 1080p: Ideal for screens under 100 inches and budget buyers
- Pixel-shifting 4K: Good middle ground offering near-4K clarity at lower cost
- True native 4K: Best for screens over 120 inches with premium budgets
Neglecting Built-in Audio Quality
Projector speakers are notoriously weak. Most built-in speakers produce thin, tinny sound that ruins immersion. Budgeting for external audio is a step many first-time buyers skip entirely.
A simple soundbar or a basic 2.1 speaker system dramatically improves your experience. Plan to spend at least $100 to $200 on audio alongside your projector purchase. This prevents the disappointment of a great picture paired with terrible sound.
Budget and Installation Projector Buying Mistakes to Avoid
Many first-time buyers underestimate the total cost of ownership. They only consider the projector price, ignoring mounts, screens, and cables. These projector buying mistakes blow budgets and delay setup completion.
Forgetting Essential Accessories and Installation Costs
A projector alone is useless without a proper mount, screen, and HDMI cable. A decent ceiling mount costs $30 to $80, while a quality screen adds $100 to $500. Long HDMI cables for ceiling runs can cost $20 to $60 depending on length.
- Screen vs. wall: A dedicated screen improves contrast and image quality significantly
- Mount type: Fixed mounts are cheapest; motorized drop-down mounts cost more
- Cable management: Plan for conduit or cable covers to hide wires neatly
Choosing the Wrong Screen Material for Your Room
Grey screens enhance contrast in rooms with ambient light. White screens are best for dark, dedicated home theaters. Screen gain affects brightness; higher gain is brighter but narrows viewing angles.
Ambient light rejecting (ALR) screens are excellent for living rooms but cost significantly more. Test your room’s lighting conditions before selecting screen material. This avoids the costly mistake of buying a screen that washes out in daylight.
Lamp Life and Connectivity Projector Buying Mistakes
First-time buyers often overlook how long a projector bulb lasts. They also ignore the ports needed for their devices. These projector buying mistakes lead to unexpected replacement costs and compatibility headaches.
Ignoring Lamp Life and Replacement Costs
Most projector lamps last between 2,000 and 5,000 hours in standard mode. A replacement bulb can cost $100 to $300 depending on the model. Laser projectors last 20,000 to 30,000 hours but cost more upfront.
- Standard lamp: Lower initial cost but higher long-term maintenance expense
- LED projector: 20,000+ hour lifespan with no bulb replacements needed
- Laser projector: Best for heavy users wanting zero maintenance for years
Overlooking HDMI Ports and Streaming Capabilities
Modern devices require at least two HDMI ports for convenience. Many budget projectors offer only one port, forcing constant cable swapping. HDMI 2.0 or 2.1 is essential for 4K content and low-latency gaming.
Built-in smart features like Android TV or Fire TV eliminate the need for external streaming sticks. Check if the projector supports your preferred streaming apps natively. This prevents the frustration of buying a projector that cannot connect to your soundbar or game console.
Warranty and Return Policy Projector Buying Mistakes
Many first-time buyers skip reading the fine print on warranties. They assume all projectors come with the same protection. These projector buying mistakes can cost hundreds of dollars if the unit fails early.
Overlooking Dead Pixel Policies and Warranty Length
Most manufacturers allow a certain number of dead pixels before offering a replacement. A policy allowing 5-10 dead pixels is common, even on new projectors. Check the dead pixel policy before buying to avoid disappointment with a flawed unit.
- Standard warranty: Typically 1 to 2 years for parts and labor
- Extended warranty: Some brands offer 3-year plans for an additional fee
- Dead pixel tolerance: Ask the seller how many dead pixels are acceptable
Skipping Return Window and Restocking Fees
Projectors are complex devices that may not meet your expectations. Many retailers charge restocking fees of 10% to 25% on returned projectors. The return window is often only 14 to 30 days from purchase.
Always buy from sellers with a clear, generous return policy. Test your projector thoroughly within the first week to identify any issues. This simple step prevents being stuck with a projector that does not suit your room or preferences.
Contrast Ratio and Black Level Projector Buying Mistakes
First-time buyers often fixate on brightness while ignoring contrast. A bright projector with poor black levels produces washed-out, flat images. These projector buying mistakes ruin the cinematic experience you are trying to create.
Misunderstanding Contrast Ratio Specifications
Manufacturers advertise dynamic contrast ratios that are misleading. A spec saying 1,000,000:1 is not a real-world measurement. Native contrast ratio is the true indicator of image depth and black level quality.
- DLP projectors: Typically offer 2,000:1 to 3,000:1 native contrast
- LCD projectors: Provide 3,000:1 to 5,000:1 native contrast for deeper blacks
- LCoS projectors: Deliver 10,000:1 or higher for premium home theater
Ignoring How Room Lighting Affects Black Levels
Even a projector with excellent native contrast looks poor in a bright room. Ambient light reflects off the screen and washes out dark scenes. Light control is more important than contrast ratio for black level performance.
Paint your walls a dark, matte color to improve perceived contrast. Use blackout curtains to eliminate window light during viewing. This simple room preparation dramatically improves your projector’s image quality without spending more money on hardware.
Keystone Correction and Lens Shift Projector Buying Mistakes
First-time buyers often rely heavily on digital keystone correction. They assume it fixes any placement issue without image quality loss. These projector buying mistakes degrade picture sharpness and introduce visible artifacts.
Relying Too Much on Digital Keystone Correction
Digital keystone correction compresses and distorts the image to fix trapezoid shapes. This process reduces resolution and creates pixelated edges. Optical lens shift is vastly superior as it moves the lens without degrading image quality.
- Digital keystone: Convenient but lowers sharpness and introduces artifacts
- Vertical lens shift: Allows moving the image up or down without quality loss
- Horizontal lens shift: Enables sideways placement flexibility for off-center setups
Ignoring Proper Projector Placement Requirements
Many buyers mount their projector without considering perfect alignment. A small misalignment requires heavy keystone correction that ruins the picture. Proper placement eliminates the need for digital adjustments entirely.
Center the projector lens exactly perpendicular to the screen center. Use a laser level to ensure the projector is perfectly horizontal. This careful setup prevents the common mistake of relying on digital fixes that compromise image quality.
Conclusion: Avoid Projector Buying Mistakes for the Perfect Setup
Avoiding these common projector buying mistakes ensures you get the best value and performance. Focus on brightness, native resolution, and room compatibility before making your purchase.
Plan your budget to include accessories, audio, and proper installation. Take time to measure your room and verify throw distance. Your perfect home theater is achievable with the right preparation.
Use this guide as your checklist when shopping. You now have the knowledge to make a confident, informed decision. Start your projector journey today and enjoy cinema-quality entertainment at home.
Frequently Asked Questions About Projector Buying Mistakes
What is the most common projector buying mistake first-time buyers make?
The most common mistake is ignoring ambient light and buying a projector with insufficient brightness. A dark room needs at least 1500 lumens, while a living room needs 2500 or more. This error leads to washed-out images that are unwatchable during daytime.
Many buyers also forget to measure their room for proper throw distance. Always check brightness specifications and room dimensions before purchasing. These two factors determine 80% of your viewing satisfaction.
How do I choose the right brightness for my projector?
Match brightness to your room’s lighting conditions and screen size. For a dedicated dark room, 1500 to 2000 ANSI lumens is sufficient. For living rooms with windows, choose 2500 to 3000 lumens for clear daytime viewing.
Larger screens require more brightness to maintain image quality. A 120-inch screen needs about 30% more lumens than a 100-inch screen. Use online brightness calculators to find your exact requirement.
What is the difference between native resolution and supported resolution?
Native resolution is the actual number of pixels the projector displays internally. Supported resolution means the projector can accept that signal but will downscale it. A projector may claim 4K support but only display 1080p natively.
Always check the native resolution in the specifications, not the marketing claims. Native 4K projectors cost more but deliver sharper images on large screens. For screens under 100 inches, native 1080p is often sufficient.
Should I buy a laser projector or a lamp-based projector?
Laser projectors last 20,000 to 30,000 hours with no bulb replacements needed. They cost more upfront but save money on maintenance over time. Lamp-based projectors are cheaper initially but require $100 to $300 bulb replacements every 2,000 to 5,000 hours.
Choose a laser projector if you watch more than 4 hours daily. Choose a lamp projector if you have a tight budget and watch occasionally. LED projectors offer a middle ground with 20,000-hour lifespans at moderate prices.
What is keystone correction and why should I avoid using it?
Keystone correction digitally distorts the image to fix trapezoid shapes caused by angled placement. This process reduces resolution, creates pixelated edges, and introduces visible artifacts. Optical lens shift is the preferred alternative for image adjustment.
Proper projector placement eliminates the need for keystone correction entirely. Center the lens perpendicular to the screen and use a laser level. This simple step preserves your projector’s full image quality and sharpness.
How much should I budget for projector accessories and installation?
Budget an additional 30% to 40% of the projector’s price for essential accessories. This includes a ceiling mount ($30 to $80), a screen ($100 to $500), and HDMI cables ($20 to $60). A basic soundbar adds another $100 to $200 to your total.
Professional installation costs $100 to $300 depending on complexity. Do not forget cable management solutions like conduit or covers. Planning your full budget upfront prevents the mistake of an incomplete setup.
What is contrast ratio and why does it matter for projectors?
Contrast ratio measures the difference between the brightest white and darkest black a projector can display. Higher native contrast ratios produce deeper blacks and more lifelike images. Ignore dynamic contrast claims and focus on native contrast specifications.
DLP projectors offer 2,000:1 to 3,000:1 native contrast, while LCD models reach 5,000:1. LCoS projectors deliver 10,000:1 or higher for premium home theater. Room lighting significantly affects perceived contrast, so control ambient light for best results.
What is the best way to set up a projector for the first time?
Start by measuring your room and calculating the correct throw distance. Mount the projector perfectly level and perpendicular to the screen center. Connect all devices using high-speed HDMI cables rated for your resolution.
Test the image during daytime and nighttime to verify brightness is adequate. Adjust focus and zoom for a sharp, properly sized picture. Finally, calibrate color settings using a test pattern for optimal image quality.
This website is a participant in the Amazon Services LLC Associates Program, an affiliate advertising program designed to provide a means for us to earn fees by linking to Amazon.com and affiliated sites.