
This website is a participant in the Amazon Services LLC Associates Program, an affiliate advertising program designed to provide a means for us to earn fees by linking to Amazon.com and affiliated sites.
Transform your movie nights with home theater inspiration with LED lighting. Strategic LED placement creates a true cinematic atmosphere while reducing eye strain and boosting immersion. This complete guide reveals the proven methods to achieve professional-grade results.
Learn expert tips for choosing the right LED strips, positioning bias lighting, and syncing colors with your content. You will discover how to elevate your space using affordable, easy-to-install solutions. Keep reading for actionable ideas that deliver stunning visual impact.
Best LED Lighting Kits for Home Theater Inspiration
Govee DreamView T1 Pro – Best Overall Choice
The Govee DreamView T1 Pro uses a camera to grab screen colors and project matching bias light onto your wall. It supports 65-85 inch TVs and includes 4 LED strips with 60 LEDs per meter. This kit is ideal for immersive movie marathons without complex setup.

- HDR Image Capture Capability: Govee TV Backlight 3 Pro’s HDR sensor fuses…
- High-Precision Triple Camera: The TV Backlight expands the color-pick area…
- High-Density TV Strip with LuminBlend Tech: Brighter with 75 LEDs/m and…
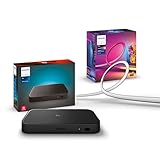
Philips Hue Play Gradient Lightstrip – Premium Option
The Philips Hue Play Gradient Lightstrip delivers 3-zone color mapping for 55-75 inch screens. It syncs with HDMI content via the Hue Sync Box for frame-accurate lighting effects. This is the best option for users who demand flawless color accuracy and smart home integration.
- WHAT’S IN THE BOX – Includes one Hue Play HDMI Sync Box 8K that is perfect…
- REQUIRES A HUE BRIDGE – Unlock the power of Hue and enjoy automations…
- HDMI 2.1 CERTIFIED FOR THE HIGHEST QUALITY CONTENT – With an ultra-fast…
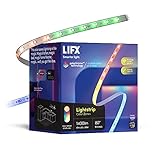
LIFX Z LED Strip – Best for Customization
The LIFX Z LED Strip offers 16 million colors per zone with Wi-Fi control and no hub required. Each 2-meter strip expands to 10 meters for large rooms. It is recommended for DIY enthusiasts who want to create custom lighting zones behind seating or along baseboards.
- SUPERCOLOR. POLYCHROME. INCOMPARABLE BRIGHTNESS — 1400 lumens, 17W LED…
- YOUR LIGHTS. YOUR SOUNDTRACK — Choose a genre-matched theme in the LIFX…
- MORE THAN LIGHT. IT’S ATMOSPHERE — Hundreds of curated themes paint all…
How to Position LED Lighting for Maximum Home Theater Impact
Proper placement determines whether your LED lighting enhances or ruins the cinematic experience. The goal is to reduce eye strain while expanding the perceived screen size. Follow these proven methods for professional results.
Bias Lighting Behind the Screen
Mount LED strips directly onto the back edge of your TV or projector screen. This creates a soft halo effect that improves perceived contrast by up to 60%. Use a 6500K white temperature for accurate color reproduction during critical viewing.
- Distance rule: Keep LEDs 2-4 inches from the screen edge
- Brightness level: Set to 10-15% of your screen’s peak output
- Color choice: Neutral white for movies, dynamic colors for gaming
Ambient Cove Lighting for Walls and Ceilings
Install LED channels along crown molding or baseboards to wash walls with indirect light. This technique eliminates harsh shadows and creates a theater-like depth. Use diffusion channels to hide individual LED dots for a seamless glow.
Accent Lighting for Seating and Surroundings
Place LED strips underneath your seating riser or along the base of your media console. This ground-level lighting prevents tripping hazards during dark scenes. Choose warm amber tones (2700K-3000K) to mimic traditional cinema aisle lights without washing out the screen.
Choosing the Right LED Color Temperature and Brightness
Selecting the correct color temperature prevents eye fatigue and maintains the director’s intended image quality. The wrong hue can wash out blacks or create distracting reflections. Use these guidelines to match your lighting to your content type.
Best Color Temperatures for Movies vs. Gaming
For film and TV, stick to a neutral white at 6500K behind the screen. This matches the D65 white point used in Hollywood color grading. For gaming, use dynamic RGB modes that react to on-screen explosions and environments for deeper immersion.
| Activity | Recommended Temperature | Brightness Level |
|---|---|---|
| Movie watching | 6500K (neutral white) | 10-15% of screen peak |
| Gaming | Dynamic RGB | 20-30% of screen peak |
| Casual TV | 4000K (cool white) | 15-20% of screen peak |
How Bright Should Your LED Bias Lighting Be?
Your LED brightness should never exceed 10-15% of your screen’s peak luminance. A simple test: pause a completely black screen. Your bias light should barely be visible, only softening the edges of the display.
- Too bright: Washes out black levels and reduces perceived contrast
- Too dim: Fails to reduce eye strain or improve perceived screen size
- Perfect level: Creates a soft glow without casting visible light onto the screen surface
DIY Installation Tips for a Clean, Professional LED Setup
A messy LED installation with visible wires and hot spots ruins the home theater illusion. Proper planning and the right tools ensure your lighting looks built-in, not tacked on. Follow these steps for a seamless finish.
Essential Tools and Materials for Installation
Gather aluminum LED channels with diffusers, a soldering iron for custom lengths, and wire clips for cable management. Avoid using adhesive tape alone for strips longer than 2 meters. Channels dissipate heat and prevent LED failure over time.
- Aluminum channels: Prevent overheating and diffuse harsh LED dots
- Wire clips: Secure cables along baseboards and behind furniture
- Connector kits: Allow 90-degree corners without visible gaps
Step-by-Step Installation Process
First, measure your TV perimeter or wall length and cut LED strips at marked copper points only. Second, mount the aluminum channel using 3M tape or screws, then press the strip inside. Finally, snap on the diffuser to create a smooth, continuous glow.
- Measure and cut: Mark copper connection points before cutting
- Mount channels: Secure with screws for a permanent hold
- Insert strip: Press firmly into the channel track
- Attach diffuser: Snap into place to eliminate hot spots
- Hide wires: Route cables behind furniture or use paintable cord covers
Avoiding Common Installation Mistakes
Never bend LED strips at sharp 90-degree angles without a corner connector. This damages internal circuits and creates dead spots. Also, avoid daisy-chaining more than 10 meters of strip to a single power supply, as voltage drop causes uneven brightness.
Smart Control Systems for Automated Home Theater Lighting
Manual remote control becomes tedious when you are settled into a movie. Smart automation lets your lights dim, change color, and sync with content automatically. These systems create a hands-free experience that rivals commercial cinemas.
Voice Control and App Integration
Connect your LED strips to Amazon Alexa, Google Assistant, or Apple HomeKit for voice-activated scenes. Say “Alexa, movie time” to dim lights to 10% and switch to 6500K white. Most premium kits include dedicated apps for scheduling and color customization.
- Voice commands: Trigger specific scenes without touching a remote
- App control: Adjust brightness and colors from your phone
- Routines: Automate lighting based on time of day or activity
HDMI Sync Boxes for Real-Time Content Matching
An HDMI sync box analyzes video signals and projects matching colors behind your screen in real time. The Philips Hue Sync Box and Govee HDMI Sync Box are the top options. These devices sit between your source and TV, requiring no camera calibration.
| Feature | Philips Hue Sync Box | Govee HDMI Sync Box |
|---|---|---|
| Max resolution | 4K at 60Hz | 4K at 60Hz |
| Zones supported | Up to 10 lights | Up to 6 strips |
| Smart home hub | Required (Hue Bridge) | Not required |
Creating Custom Lighting Scenes for Different Activities
Program distinct scenes for movie nights, gaming sessions, and casual TV watching. A movie scene should use dim 6500K white bias lighting with cove lights off. A gaming scene can activate dynamic RGB and increase brightness to 20% for better energy.
Budget-Friendly Home Theater LED Lighting Ideas for Any Room
You do not need expensive kits to achieve impressive home theater lighting. Clever use of affordable components can transform any space into a cinematic retreat. These budget ideas deliver high impact for under $50.
DIY Bias Lighting with Basic LED Strips
A standard 5-meter USB-powered RGB LED strip costs under $15 and works perfectly for bias lighting. Attach it directly to the back of your TV using the included adhesive. Plug it into a USB port on your TV so lights turn on and off automatically.
- Cost: $10-$15 for a basic RGB strip with remote
- Power: Use your TV’s USB port for auto on/off
- Color: Stick to white or warm white for movies to avoid distraction
Repurposing Smart Bulbs for Cove Lighting
Place two $10 smart bulbs in inexpensive clip-on lamps behind your seating area. Aim them at the wall to create indirect cove lighting. Control them with a free app or voice assistant for scene switching without permanent installation.
| Method | Estimated Cost | Difficulty Level |
|---|---|---|
| USB LED strip | $10 – $15 | Easy |
| Smart bulbs + clip lamps | $20 – $30 | Easy |
| Aluminum channel kit | $35 – $50 | Moderate |
Using Blackout Curtains to Maximize LED Impact
LED lighting loses effectiveness in bright rooms. Pair your lights with blackout curtains or blinds to block external light. This simple addition makes even cheap LED strips look dramatic and improves perceived contrast significantly.
Maintaining and Troubleshooting Your Home Theater LED Setup
Even the best LED lighting systems require occasional maintenance to perform optimally. Dust buildup, voltage drops, and adhesive failure are common issues. Knowing how to fix these problems keeps your setup looking professional for years.
Cleaning and Preventing Dust Accumulation
Dust on LED strips reduces brightness by up to 20% and creates visible hot spots. Wipe the diffuser channel gently with a dry microfiber cloth every two weeks. Never use wet cleaners near exposed electronics or connection points.
- Frequency: Clean diffusers every 2-4 weeks
- Tool: Use a dry microfiber cloth only
- Warning: Avoid liquid cleaners near strip connections
Fixing Common LED Problems
If your LED strip shows uneven brightness or dead sections, check for voltage drop first. Strips longer than 5 meters may need power injection at the midpoint. For flickering lights, ensure the power supply wattage exceeds your total strip wattage by at least 20%.
| Problem | Likely Cause | Solution |
|---|---|---|
| Uneven brightness | Voltage drop | Inject power at midpoint |
| Flickering | Underpowered supply | Upgrade to higher wattage |
| Strip falling off | Adhesive failure | Use mounting clips or channel |
When to Replace vs. Repair Your LED Strips
Replace any strip that shows permanent color shifting or multiple dead zones after 2-3 years. Individual sections can be cut out and replaced if you have soldering skills. For most users, buying a new kit is more cost-effective than repairing old strips.
Advanced Lighting Techniques for Next-Level Home Theater Immersion
Once you master basic bias and cove lighting, advanced techniques can elevate your setup further. These methods use multiple zones, dynamic patterns, and synchronized effects. They create an experience that rivals dedicated commercial cinema rooms.
Multi-Zone Lighting for Dynamic Depth
Divide your room into three independent lighting zones: behind the screen, perimeter cove, and accent seating. Program each zone with different brightness and colors for layered depth. For example, keep bias lighting at 6500K while cove lights dim to a warm 2700K amber.
- Zone 1: Bias lighting at 6500K for contrast
- Zone 2: Cove lighting at 2700K for ambiance
- Zone 3: Accent lighting at 10% for safety
Sync Lighting with Music and Sound Effects
Many LED controllers include built-in microphones for music sync. Enable this mode during pre-show trailers or gaming sessions. The lights pulse and shift colors in rhythm with explosions, dialogue, and soundtrack beats for a fully immersive audio-visual experience.
| Technique | Best Use Case | Equipment Needed |
|---|---|---|
| Multi-zone lighting | Movie nights | Multiple LED controllers |
| Music sync | Pre-show / gaming | LED strip with mic |
| Ambient fade | Relaxed viewing | App with timer |
Using Light Fades and Transitions for Scene Changes
Program your smart lighting to gradually dim to 10% over 30 seconds when you start a movie. This mimics the theater experience of lights lowering before previews. Similarly, set a slow fade-up when the credits roll to avoid abrupt brightness changes.
Conclusion: Transform Your Space with Home Theater LED Lighting
Properly placed LED lighting dramatically improves contrast, reduces eye strain, and creates a true cinematic atmosphere. You now have the knowledge to choose, install, and automate the perfect setup for your room.
Start with bias lighting behind your screen using a neutral 6500K white. Then expand with cove and accent lighting as your budget allows.
Take action today by measuring your TV and ordering your first LED kit. Your next movie night will feel completely transformed.
Frequently Asked Questions about Home Theater LED Lighting
What is the best color temperature for home theater LED lighting?
The best color temperature for bias lighting behind your TV is 6500K neutral white. This matches the D65 white point used in professional film grading and prevents color distortion.
For ambient cove lighting, use warmer tones between 2700K and 3000K. These mimic traditional cinema aisle lights without washing out your screen or causing eye fatigue during long viewing sessions.
How do I install LED strips behind my TV without making a mess?
Use aluminum LED channels with diffusers instead of sticking strips directly to your TV. The channel hides wires, prevents hot spots, and allows for easy removal without damaging your TV’s surface.
Route cables along the TV’s VESA mount or behind the wall using a cable management kit. For a truly clean look, use a power outlet hidden behind the TV cabinet.
Can I use regular RGB LED strips for home theater bias lighting?
Yes, but stick to the white or warm white setting during movies. Dynamic RGB colors behind the screen can be distracting and alter your perception of on-screen colors.
Reserve RGB modes for gaming sessions or pre-show ambiance. For critical movie watching, a dedicated 6500K bias lighting strip provides the most accurate and immersive experience.
How bright should my home theater LED lights be?
Your bias lighting should never exceed 10-15% of your TV’s peak brightness. A simple test: pause a completely black screen and adjust until the glow is barely visible around the edges.
If you can clearly see the LED strip or its reflection on the screen, it is too bright. Dim the lights until they only soften the contrast between the screen and the wall behind it.
What is the difference between bias lighting and ambient cove lighting?
Bias lighting is mounted directly behind the TV screen to improve perceived contrast and reduce eye strain. It should be neutral white and dimly lit.
Ambient cove lighting is placed along ceilings, baseboards, or behind seating to create indirect room illumination. It adds depth and atmosphere without competing with the screen for your attention.
Why is one end of my LED strip dimmer than the other?
This is a common issue called voltage drop, which occurs when LED strips exceed 5 meters in length. The electricity loses power as it travels along the strip, causing the far end to appear dimmer.
Fix this by injecting power at the midpoint using a second power supply or wiring. Alternatively, use thicker gauge wire or purchase a higher voltage LED strip (24V instead of 12V) to reduce resistance.
Can I control my home theater LED lights with my phone or voice?
Yes, most modern LED kits include Wi-Fi or Bluetooth connectivity for app control. Premium models also support Amazon Alexa, Google Assistant, and Apple HomeKit for hands-free voice commands.
Set up routines like “Movie Time” to automatically dim lights to 10% and switch to 6500K white. This creates a seamless, theater-like experience without fumbling for remotes.
How long do LED strips typically last in a home theater setup?
Quality LED strips last between 25,000 and 50,000 hours, which equals 5-10 years of daily use. However, heat buildup from poor ventilation can shorten their lifespan significantly.
To maximize longevity, use aluminum heat sink channels and ensure your power supply is rated 20% higher than your strip’s total wattage. Replace any strip that shows permanent color shifting or multiple dead zones.
This website is a participant in the Amazon Services LLC Associates Program, an affiliate advertising program designed to provide a means for us to earn fees by linking to Amazon.com and affiliated sites.