
This website is a participant in the Amazon Services LLC Associates Program, an affiliate advertising program designed to provide a means for us to earn fees by linking to Amazon.com and affiliated sites.
Learning how to make a large bulletin board for classroom spaces doesn’t have to be expensive or complicated. A custom DIY board provides the perfect canvas for displaying student work and essential learning materials.
This complete guide reveals expert tips and proven methods for building a sturdy, oversized display board on a budget. Discover the best materials, simple assembly techniques, and design strategies to transform your classroom walls today.
Best Materials and Tools for Your Large Classroom Bulletin Board
Elmer’s Foam Board (36″ x 48″) – Best Overall Base
This lightweight yet rigid foam board provides the perfect foundation for a large bulletin board. It is easy to cut with a utility knife and holds staples securely. The smooth surface accepts paint, fabric, or paper for a custom classroom look.

- 【Product Update 】Oversized foam boards allow for creative expression…
- 【Outstanding Quality】With excellent thermal insulation properties, it…
- 【Detail Experience】This product boasts a bright white surface with high…
Fiskars 12-Inch SureCut Paper Trimmer – Best for Precision
Cutting border paper and backing fabric requires straight, clean edges. This Fiskars trimmer handles materials up to 12 inches wide with a durable steel blade. Its self-sharpening design ensures consistent cuts for professional-looking classroom displays every time.
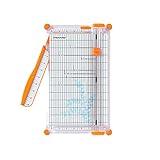
- Ideal for cutting a wide variety of crafting materials.
- SureCut wire cut-line makes it easy to see where blade will cut for…
- Patented TripleTrack System interlocks blade and rail for cuts that are…
Command Large Picture Hanging Strips (16-Pack) – Best for No-Damage Installation
Renters and teachers needing damage-free mounting will love these heavy-duty strips. Each strip holds up to 16 pounds, making them ideal for securing your large board to cinderblock or painted walls. They remove cleanly without leaving sticky residue or holes.
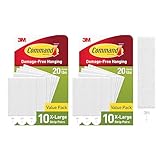
- INCLUDES – 20 Pairs of 20 lb White Command Heavyweight Picture Hanging…
- DAMAGE-FREE DECORATING- Say goodbye to holes, marks, or sticky residue on…
- NO TOOLS REQUIRED- Hang heavy duty picture frames, large wall art, big…
Step-by-Step Guide to Building Your Large Classroom Bulletin Board
Creating a custom oversized board is straightforward with the right plan. Follow these proven steps to build a durable display that fits your classroom perfectly.
Measure Your Wall Space and Gather Materials
Start by measuring the exact wall area where the board will hang. Standard sizes range from 4×6 feet to 6×8 feet for maximum impact. You will need a ½-inch plywood sheet, foam insulation board, batting, fabric, and a heavy-duty staple gun.
Cut and Assemble the Base Layers
Cut the plywood to your measured dimensions using a circular saw. Next, cut the foam insulation board to match exactly, creating a soft pinning surface. Stack the foam on top of the plywood and secure both layers together using construction adhesive.
- Plywood base: Provides rigid structural support for heavy displays
- Foam layer: Allows easy pin insertion and removal without damage
- Adhesive bond: Prevents shifting during fabric wrapping and daily use
Wrap the Board with Fabric and Trim
Lay your chosen fabric face down on a clean floor, then center the board on top. Pull the fabric taut over the edges and staple it firmly to the plywood back, starting from the center of each side and working outward. Finish by adding decorative border trim to cover the raw edges.
Pro tip: Use burlap or polyester felt for durability, as these fabrics resist fading and fraying over time. This method creates a professional-looking board that lasts for years.
Creative Design Ideas for Your Classroom Bulletin Board
Once your large board is built, the real fun begins with decorating. A well-designed display captures student attention and reinforces learning objectives effectively.
Choose a Functional Layout for Daily Use
Divide your oversized board into clear zones for different purposes. Reserve the top section for the daily schedule and announcements. Use the middle area for student work displays, and keep the bottom section for interactive elements like a word wall or question of the day.
- Top zone (20%): Calendar, objectives, and daily reminders
- Middle zone (50%): Rotating student projects and thematic units
- Bottom zone (30%): Hands-on activities like pocket charts or magnets
Incorporate Interactive and Thematic Elements
Make your board a living teaching tool by adding removable components. Use Velcro dots to swap out vocabulary cards quickly. Create a “brainstorming corner” where students can post sticky note ideas on a specific topic each week.
Select Durable and Reusable Decorations
Laminate your borders, letters, and cutouts to extend their lifespan across multiple school years. Neutral background colors like black, gray, or dark blue allow you to change seasonal themes without replacing the entire fabric. This saves time and money in the long run.
Pro tip: Use a hot glue gun for attaching small embellishments like ribbon or buttons, as it holds securely but peels off fabric easily when needed.
Mounting and Maintaining Your Large Classroom Bulletin Board
Proper installation ensures your heavy board stays safe and secure on the wall. Regular maintenance keeps it looking fresh and functional throughout the school year.
Choose the Right Mounting Method for Your Wall Type
Different classroom walls require specific hardware for safe installation. For cinderblock walls, use masonry anchors and concrete screws for a firm hold. Drywall requires heavy-duty toggle bolts that distribute weight across a wider surface area.
- Cinderblock: Tapcon screws with plastic anchors (holds up to 50 lbs)
- Drywall: Toggle bolts rated for at least 25 lbs per fastener
- Wood studs: 2-inch wood screws driven directly into the stud
Install the Board Safely and Level
Mark your stud or anchor locations using a stud finder and level. Drill pilot holes to prevent wall damage, then secure the board using two brackets on the top edge. Always use a second person to lift and hold the board while you fasten it.
Maintain Your Board for Long-Term Use
Keep your board looking new with simple weekly care. Vacuum the fabric surface using a brush attachment to remove dust and chalk debris. Rotate displayed items every two weeks to prevent fabric indentation and fading from sunlight.
Pro tip: Keep a small repair kit nearby containing extra staples, fabric scraps, and border trim. This allows you to fix minor tears or loose edges immediately without disrupting classroom activities.
Budget-Friendly Alternatives for Your Large Classroom Bulletin Board
Not every teacher has a large budget for classroom supplies. These cost-effective alternatives still deliver a professional, functional display without breaking the bank.
Use Cardboard Tri-Fold Boards as a Temporary Solution
Heavy-duty tri-fold presentation boards work well for smaller classrooms or rented spaces. Tape three boards together side-by-side to create a wider surface. Cover them with bulletin board paper or fabric for a unified look that matches your classroom theme.
Repurpose Old Window Shades or Vinyl Tablecloths
Old vinyl window shades provide a free, durable backing for pinning lightweight items. Simply mount the shade flat against the wall using command strips. Vinyl tablecloths from dollar stores also work as colorful, wipeable surfaces that resist stains and moisture.
- Window shades: Free from home, easy to cut, and naturally smooth
- Vinyl tablecloths: Under $5, available in many patterns, easy to clean
- Pegboard panels: Under $15 at hardware stores, allows hooks for 3D displays
Build a Frame from PVC Pipe for a Lightweight Option
Create a portable bulletin board using PVC pipe and connectors. Build a simple rectangular frame, then stretch fabric tightly across it and secure with zip ties. This option is lightweight, easy to store, and can be disassembled for summer break storage.
Time-Saving Tips for Quick Bulletin Board Updates
Teachers are busy, so efficiency matters when refreshing your large classroom display. These strategies help you swap out content in minutes, not hours.
Create a Rotating Template System
Design a reusable base layout that stays the same all year. Use permanent borders, headers, and background fabric. Only swap out the center content, such as student work or seasonal vocabulary, to save significant setup time each month.
- Permanent borders: Laminate and staple once; they last for years
- Magnetic sections: Use magnetic paint or strips for instant swaps
- Pocket charts: Slide new cards in and out without any stapling
Pre-Prepare All Materials Before Class
Cut and laminate all letters, shapes, and borders in one sitting at the start of each term. Store them in labeled zipper bags sorted by theme or month. This eliminates the need to search for supplies or cut pieces during your planning period.
Use Adhesive Hooks and Clips for Quick Changes
Attach small command hooks or binder clips to your board’s top edge. Hang lightweight posters, student work, or anchor charts from these hooks using string or clothespins. This method allows you to swap displays in under 30 seconds without removing a single staple.
Common Mistakes to Avoid When Making a Large Bulletin Board
Even experienced teachers make errors when building oversized classroom displays. Avoiding these pitfalls saves time, money, and frustration during your project.
Using the Wrong Fabric or Backing Material
Thin cotton fabric wrinkles easily and sags under the weight of heavy staples. Choose polyester felt or upholstery fabric instead, as these materials hold their shape and resist tearing. Avoid paper backing entirely for large boards, as it rips quickly when students pin items.
Skipping the Plywood Support Layer
Foam board alone cannot support the weight of a large display. Without a sturdy plywood base, the board will bow, crack, or pull away from the wall. Always use ½-inch plywood as your foundation, even if it adds a few dollars to your budget.
- Mistake: Using only foam board for the base
- Result: Board warps within weeks and becomes unusable
- Solution: Invest in plywood for long-term durability
Forgetting to Level the Board During Installation
A crooked bulletin board looks unprofessional and distracts students. Always use a bubble level before marking your drill holes. Measure twice and check alignment from both the top and bottom edges to ensure a perfectly straight installation.
Overloading the Board with Heavy Items
Large boards can hold many items, but weight limits still apply. Avoid attaching heavy objects like three-ring binders or thick books directly to the fabric. Use small shelves or magnetic strips for heavier displays to prevent the board from sagging or pulling off the wall.
Adapting Your Large Bulletin Board for Different Grade Levels
Your oversized classroom board should match the developmental needs of your students. Adjusting the design for specific age groups maximizes its educational impact and engagement.
Preschool and Kindergarten: Focus on Visuals and Interaction
Young learners thrive on bright colors and tactile elements. Use large, clear fonts and bold images that are easy to see from across the room. Include felt pieces, magnetic letters, and pockets for hands-on exploration during free play time.
- Visual aids: Use real photographs instead of clip art for better recognition
- Interactive zones: Add a “weather wheel” or “attendance chart” children can manipulate
- Height matters: Keep interactive elements low enough for small hands to reach
Elementary Grades: Organize Curriculum and Student Work
Create dedicated sections for subject-specific content like math vocabulary, spelling words, and science vocabulary. Rotate student artwork and writing samples weekly to build classroom community and pride. Use pocket charts for daily schedules and classroom jobs.
Middle and High School: Prioritize Information and Collaboration
Older students benefit from organized reference materials and collaborative spaces. Dedicate one section to upcoming deadlines, test dates, and rubrics. Reserve another area for student-generated content like debate topics, project brainstorming, or peer feedback sticky notes.
Conclusion: Build Your Perfect Large Classroom Bulletin Board Today
Learning how to make a large bulletin board for classroom use is a rewarding DIY project that transforms your learning space. With the right materials, simple assembly steps, and creative design ideas, you can create a durable display that serves your students all year.
Start by gathering your supplies and measuring your wall space this weekend. Remember to choose sturdy materials and involve your students in the decorating process for maximum engagement.
Your perfect classroom bulletin board is just one project away. Build it with confidence and watch your classroom come to life.
Frequently Asked Questions about How to Make a Large Bulletin Board for Classroom
What is the best material to use for a large classroom bulletin board?
The best base material is ½-inch plywood topped with foam insulation board. This combination provides sturdy support for heavy displays while allowing easy pin insertion. For the cover, choose polyester felt or upholstery fabric, as these resist sagging and tearing better than cotton or paper.
Avoid using foam board alone for large sizes, as it warps quickly under the weight of staples and student work. The plywood-foam sandwich method creates a professional board that lasts for many school years.
How do I mount a heavy bulletin board to a cinderblock wall?
Use masonry anchors and Tapcon screws specifically designed for concrete or cinderblock. Drill pilot holes using a hammer drill with a masonry bit, then insert the plastic anchors. Drive the screws through your board’s mounting brackets directly into the anchors for a secure hold.
Always use at least four anchors spaced evenly across the top edge. For extra stability on very large boards, add two more anchors along the bottom edge to prevent the board from tilting forward.
What size should I make my classroom bulletin board?
Standard classroom bulletin boards range from 4 feet by 6 feet to 6 feet by 8 feet. Measure your available wall space, leaving at least 6 inches of clearance on each side and from the ceiling. Consider your students’ height when determining the bottom edge placement.
A board that is too large can overwhelm a small classroom, while one that is too small may not display enough content. Aim for a size that covers roughly 60-70% of your available wall area for the best visual balance.
How do I prevent my bulletin board fabric from sagging over time?
Start by pulling the fabric extremely taut before stapling, working from the center of each side outward. Use a staple gun with ¼-inch staples every two inches along the edges. Choose heavyweight fabric like polyester felt or duck cloth, which naturally resists stretching.
If sagging occurs after installation, remove the staples along one edge, re-tighten the fabric, and re-staple. Adding a thin layer of quilt batting between the foam and fabric also helps maintain a smooth, padded surface.
Can I make a large bulletin board without using power tools?
Yes, you can create a no-tools bulletin board using foam presentation boards and command strips. Tape three or four tri-fold boards together to create your desired size, then cover them with fabric. Mount the finished board using heavy-duty command picture hanging strips rated for your board’s weight.
This option works best for renters or teachers who cannot drill into walls. However, it is less durable than a plywood board and may need replacement after one or two school years.
How do I keep my bulletin board looking fresh all year long?
Establish a monthly rotation schedule for changing out student work and seasonal decorations. Use laminating pouches for borders, letters, and cutouts so they can be reused year after year. Vacuum the fabric surface monthly with a brush attachment to remove dust and chalk residue.
Assign a student helper to straighten items and remove outdated content each Friday. This small weekly maintenance routine prevents the board from becoming cluttered and overwhelming for students.
What is the best way to display student work on a large bulletin board?
Use clothespins, binder clips, or magnetic clips instead of staples for easy rotation. Create a uniform look by trimming all student work to the same size before displaying. Arrange pieces in a grid pattern for a clean, organized appearance that is easy for students to scan.
Rotate student work weekly to ensure every child has a turn in the spotlight. Use name labels or small tags to give credit, which builds student pride and ownership over their displayed work.
How do I remove staples from a bulletin board without damaging the fabric?
Use a staple remover tool or flat-head screwdriver to gently pry staples loose. Work slowly and pull straight outward to avoid tearing the fabric. For stubborn staples, grip them with needle-nose pliers and wiggle gently until they release.
If the fabric becomes damaged from repeated stapling, patch small holes with fabric glue or cover them with decorative elements like buttons or stickers. Replace the entire fabric cover every two to three years for a fresh look.
Can a Projector Get a Virus?why you need to know
This website is a participant in the Amazon Services LLC Associates Program, an affiliate advertising program designed to provide a means for us to earn fees by linking to Amazon.com and affiliated sites.