
This website is a participant in the Amazon Services LLC Associates Program, an affiliate advertising program designed to provide a means for us to earn fees by linking to Amazon.com and affiliated sites.
Not all projectors can do rear projection, and using the wrong one can lead to poor image quality or technical failure.
Rear projection, where the projector is placed behind the screen, offers a clean, cable-free viewing setup often used in events, home theaters, and digital signage. But to make it work, your projector must support certain features—primarily image flipping and high brightness.
Rear projection may seem like a simple flip of positioning, but it’s more nuanced. Did you know that rear projection screens are specially designed to diffuse light toward the viewer while minimizing glare? Without the right equipment, your image may appear washed out, reversed, or misaligned.
Best for Rear Projection: Top 3 Projectors That Excel in Rear Setup
If you’re specifically interested in rear projection, not all projectors will perform equally. Below are three highly recommended models that stand out for rear projection setups, along with a few related alternatives to consider.
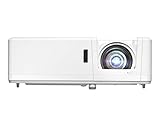
Epson Home Cinema 3800
Why we picked it:
This projector supports rear projection mode, offers 3,000 lumens of brightness, and produces rich colors—ideal for controlled or moderately lit spaces.

- 4K PRO-UHD (1) Projection technology — a new type of 4K home theater…
- True 3-chip projector design — Advanced 3LCD technology displays…
- 4K resolution processing — pixel-shifting technology precisely controls…
BenQ TH671ST Short Throw Projector
Why we picked it:
With its short-throw capabilities and rear projection support, this model delivers large images even in tight spaces—perfect for indoor events or classrooms.

- UNPARALLELED PICTURE QUALITY: TV Projector, comes with Native Full HD 1080p…
- GEARED TOWARDS GAMING: Ultra-fast low input lag and a refresh rate that…
- WOW YOUR FRIENDS: Take the action to the big screen by projecting a…
Optoma GT1090HDR Laser Projector
Why we picked it:
Its laser light source ensures long-term brightness and clarity. It supports rear projection and is durable for high-use commercial and home environments.
- DEPENDABLE LASER LIGHT SOURCE: DuraCore laser light source eliminates lamp…
- SHORT THROW LENS: Experience a large 120″ image projected from 4′-4″ away…
- 4K HDR INPUT: HDR10 & HLG technologies enable brigher whites and deeper…
Other Related Rear Projection-Friendly Models:

- LG LASER Projector 300″ 4K UHD (3840 x 2160) Smart Dual Laser CineBeam…
- 97% dci-p3 with dual laser
- 2700 ansi lumens brightness and 2,000,000:1 contrast

- SUPERSIZED MOVIES AND GAMES: High brightness 3500 Lumens 1080p projector…
- EASY SETUP: 1.3x optical zoom, and vertical keystone
- CINEMATIC COLORS: Exclusive Color technology offers a wide color gamut for…
These options are known for flexibility, mounting versatility, and brightness needed in rear projection setups.

- Dual HDMI inputs (with HDCP) ensures quick switching between presentations
- 4000:1 Contrast Ratio creating extremely detailed images
- Four audio inputs make it easy to add sound to enhance every presentation
What Is Rear Projection and How Does It Work?
Rear projection is a display method where the projector is positioned behind a special translucent screen, projecting the image toward the audience from the rear side. Unlike traditional front projection setups, the light doesn’t come directly toward viewers—it travels through the screen and is diffused toward them.
This method has been used for decades in professional presentations, museum exhibits, trade shows, and even home theaters where front projection would create visual clutter or shadow interference.
To understand how rear projection works, consider the following elements:
- Translucent Screens: These are made from materials that evenly distribute light, allowing clear visibility from the front.
- Projector Positioning: The projector needs to be placed accurately behind the screen and aligned to avoid distortion or keystone effects.
- Image Flip Capability: Most projectors that support rear projection offer a setting to horizontally flip the image so that it appears correctly to the audience.
Key Benefits of Rear Projection:
- No shadows from people walking in front of the screen
- Cleaner, more professional appearance (cables hidden)
- More flexibility in tight or high-traffic spaces
Potential Challenges:
- Requires more space behind the screen
- Often needs a brighter projector due to light absorption by the screen
- Not all screens or projectors support this configuration
Can All Projectors Do Rear Projection?
The short answer is: no, not all projectors support rear projection. While most modern projectors offer this feature, there are critical factors that determine whether a projector is compatible with rear projection setups.
Key Requirements for Rear Projection:
- Image Flipping/Mirroring Capability:
A projector must have a built-in option to flip the image horizontally (sometimes vertically, too). This ensures that the projected content appears correctly when viewed from the front side of a rear-projection screen. - Sufficient Brightness:
Rear projection screens absorb more light than traditional screens. Projectors must be bright enough—typically at least 2,500 lumens—to ensure the image remains vivid and clear. - Throw Ratio Compatibility:
Not all throw ratios are suitable for rear projection. Short throw or ultra-short throw projectors work well when space behind the screen is limited. Long throw projectors may need too much space to function effectively. - Cooling & Ventilation:
Rear projection setups may require enclosed housing or ceiling mounting. Projectors must have adequate ventilation design for these placements.
Projector Types That Usually Support Rear Projection:
- Business or commercial-grade projectors
- Home theater projectors with advanced mounting options
- Interactive classroom projectors
- Laser projectors with mirrored imaging features
Which Ones Typically Don’t?
- Budget mini projectors or pico projectors
- Older analog models
- Fixed-mount projectors without orientation controls
In summary, while many projectors today offer rear projection features, it’s crucial to confirm specifications before purchase or installation.
How to Set Up a Rear Projection System Correctly
Setting up a rear projection system may seem complex, but with the right equipment and positioning, it can deliver a professional and immersive experience. Follow these steps to ensure your setup is optimized.
Step-by-Step Rear Projection Setup:
- Choose the Right Screen:
Use a rear projection screen made from materials like gray or white diffusion fabric. These screens are designed to transmit and diffuse light for front viewing. - Position the Projector Properly:
Place the projector behind the screen, aligning it to the center. Use a projector stand or ceiling mount depending on your environment. - Adjust Throw Distance:
Measure the throw distance according to the projector’s specifications. If using a short-throw projector, you may only need 2–4 feet of space. - Enable Rear Projection Mode:
In your projector’s settings, switch the mode to rear projection (rear/front ceiling). This flips the image horizontally so it appears correct to viewers. - Focus and Keystone Correction:
Use manual or auto-focus and keystone correction to adjust the picture shape, especially if the projector is at an angle. - Control Ambient Light:
Although rear projection handles light better than front projection, it’s still best to dim the environment or use blackout curtains if indoors.
Tips for Better Results:
- Use a dark or enclosed space behind the screen to prevent light leakage.
- Keep the projector on a stable, vibration-free surface.
- Calibrate the color and brightness to suit the screen material.
By following these best practices, your rear projection setup can rival the quality of more traditional systems—with added benefits like a clean aesthetic and better space usage.
Front Projection vs. Rear Projection: Key Differences Explained
Understanding the differences between front and rear projection is essential when deciding which setup best suits your environment, budget, and use case.
Positioning and Layout
- Front Projection:
The projector is placed in front of the screen, facing the audience. It’s the most common setup for home theaters and classrooms. - Rear Projection:
The projector is placed behind a translucent screen. This setup hides the equipment and is ideal for events, exhibits, and professional settings.
Space Requirements
- Front Projection:
Requires more space in front of the screen and can lead to shadow interruptions if people walk in front. - Rear Projection:
Needs adequate room behind the screen for the projector, which can be a limitation in small spaces.
Image Quality and Brightness
- Front Projection:
Brighter in low-light conditions but may suffer from reflections and ambient light interference. - Rear Projection:
More immune to ambient light and viewer shadows, but needs a brighter projector to compensate for screen absorption.
Aesthetic and Functionality
- Front Projection:
Easier to install and often more affordable. - Rear Projection:
Offers a clean and seamless look since cables and devices remain hidden behind the screen.
When to Use Each:
| Use Case | Recommended Type |
|---|---|
| Home Theater (Dark Room) | Front Projection |
| Trade Show Booth | Rear Projection |
| Outdoor Event | Front or Rear (Varies) |
| Museum Display | Rear Projection |
| Business Presentation | Front Projection |
Choosing the right projection method comes down to environment, screen material, projector capabilities, and personal preference.
Common Mistakes to Avoid When Using Rear Projection
Even with the right projector and screen, improper setup can lead to poor image quality, alignment issues, or even equipment damage. Here are the most common rear projection mistakes—and how to avoid them.
Using the Wrong Screen Material
Standard front-projection screens or plain white sheets don’t diffuse light correctly for rear projection. Always use a dedicated rear projection screen for optimal clarity and color.
Not Enabling Rear Projection Mode
Many users forget to flip the image in settings. This leads to mirrored text and reversed visuals. Always switch the display mode to “Rear” or “Rear Ceiling” in the projector menu.
Placing the Projector Too Far (or Too Close)
Incorrect throw distance can cause focus problems or image cropping. Refer to the projector’s throw ratio guide to determine ideal positioning behind the screen.
Ignoring Ambient Light
While rear projection performs better under ambient light than front projection, too much light behind the screen can still degrade the image. Use curtains or barriers to block excess light.
Poor Cooling/Ventilation Behind the Screen
Rear projection setups often place the projector in an enclosed space. Without adequate ventilation, overheating can occur, shortening the projector’s lifespan. Always maintain airflow.
Uneven Surface Behind the Screen
If your projector isn’t level, it will cause keystone distortion or blur. Use a stable tripod or ceiling mount to ensure alignment.
By avoiding these pitfalls, your rear projection setup can function efficiently and provide stunning visuals with minimal maintenance.
Conclusion
While rear projection offers a sleek, shadow-free, and professional display solution, it’s important to note that not all projectors support this feature. Key elements such as image-flipping capability, adequate brightness, and proper throw distance must be considered before attempting a rear projection setup.
Whether you’re planning a home theater, event booth, or business presentation, choosing the right equipment and avoiding common mistakes will ensure a smooth experience. Models like the Epson Home Cinema 3800, BenQ TH671ST, and Optoma GT1090HDR are excellent choices designed to handle the specific demands of rear projection.
Take time to plan your setup, verify your projector’s specs, and invest in the right screen. A well-executed rear projection system can elevate your viewing environment to a whole new level of clarity and professionalism.
Frequently Asked Questions About Rear Projection and Projector Compatibility
Can any projector be used for rear projection?
No, not all projectors support rear projection. To be compatible, a projector must have a rear projection mode, allowing it to horizontally flip the image. Without this feature, your visuals will appear reversed on the screen. Always check the specifications or user manual before attempting rear projection.
How do I know if my projector supports rear projection?
Go to the projector’s menu settings and look for a display option such as “Projection Mode” or “Image Orientation.” Compatible options often include settings like Front, Front Ceiling, Rear, and Rear Ceiling. If “Rear” is listed, your projector can be used in a rear projection setup.
Do I need a special screen for rear projection?
Yes. Rear projection requires translucent or semi-transparent screens that allow light to pass through and be diffused toward the audience. Using a regular white front-projection screen or wall will result in poor image quality.
Is rear projection better than front projection?
It depends on your environment. Rear projection offers cleaner visuals, eliminates shadows, and hides equipment, making it ideal for trade shows and professional setups. However, front projection is more space-efficient and budget-friendly for typical home use.
What throw ratio works best for rear projection?
Short throw or ultra-short throw projectors are ideal for rear projection, especially in small or confined spaces. These projectors can produce large images from a short distance, reducing the space needed behind the screen.
Can a Projector Get a Virus?7 reasons why?
This website is a participant in the Amazon Services LLC Associates Program, an affiliate advertising program designed to provide a means for us to earn fees by linking to Amazon.com and affiliated sites.