
This website is a participant in the Amazon Services LLC Associates Program, an affiliate advertising program designed to provide a means for us to earn fees by linking to Amazon.com and affiliated sites.
The ideal distance for placing a projector from your golf simulator screen is typically 6 to 14 feet, depending on your projector’s throw ratio and room size.
Setting up a golf simulator is an exciting experience—but get the projector distance wrong, and your immersive game becomes a frustrating one. Whether you’re a casual golfer or setting up a professional indoor simulator, understanding the correct throw distance is crucial for image clarity, proper scaling, and an obstruction-free swing zone.
Many golfers make the mistake of placing their projector too close, causing distorted images, or too far, leading to poor brightness and visibility. Knowing how far your projector should be from your screen can transform your simulator setup from “meh” to mind-blowing.
Best for Golf Simulators: Top 3 Projectors for Optimal Distance & Performance
Looking for the perfect projector to match your golf simulator setup? Here are our top three recommendations that strike the ideal balance between throw distance, brightness, and resolution.
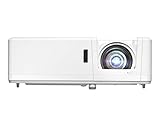
BenQ LU935ST Short Throw Laser Projector
Why we picked it:
This projector offers a 0.81–0.89 short throw ratio, making it ideal for tight golf simulator setups without casting shadows. It delivers crisp WUXGA (1920×1200) resolution and 5,500 lumens brightness for clear visuals even in well-lit garages or studios.

Optoma GT1090HDR Short Throw Laser Projector
Why we picked it:
This is a budget-friendly short throw laser projector with a 0.50:1 throw ratio, making it easy to mount just inches away from the screen. It features Full HD 1080p resolution and HDR compatibility—perfect for dynamic image detail.
- DEPENDABLE LASER LIGHT SOURCE: DuraCore laser light source eliminates lamp…
- SHORT THROW LENS: Experience a large 120″ image projected from 4′-4″ away…
- 4K HDR INPUT: HDR10 & HLG technologies enable brigher whites and deeper…
Epson Pro EX9240 3LCD Projector
Why we picked it:
With a slightly longer throw ratio of 1.2–1.5:1, this projector works great for medium-sized rooms. The 4,000 lumens brightness and 3LCD color technology provide stunning color accuracy and edge-to-edge clarity.

- Amazing brightness — 4,000 lumens of color and white brightness (1) ideal…
- Stunning image quality — amazing Full HD 1080p resolution delivers crisp…
- True 3-Chip 3LCD technology — displays 100% of the RGB color signal for…
Understanding Throw Ratio and Its Impact on Projector Distance
The throw ratio is the single most important factor when determining how far your projector should be from your golf simulator screen. It tells you how wide the image will be based on the distance from the screen.
What Is Throw Ratio?
Throw ratio is defined as the distance from the projector to the screen divided by the width of the image. For example, a throw ratio of 1.0 means that to project an image 10 feet wide, the projector must be 10 feet away.
- Short throw projectors have a throw ratio of 0.4 to 1.0. They are ideal for small simulator rooms and help avoid shadows caused by your swing.
- Standard throw projectors have a throw ratio above 1.0. These are better for larger spaces where distance isn’t an issue.
How It Affects Golf Simulators
In golf simulators, the position of the projector is crucial. You want it far enough to fill the screen but close enough to avoid casting shadows or being struck by the club or ball.
Common throw distances:
- For a 10 ft wide screen and a 0.5 throw ratio: place the projector 5 feet away.
- For a 10 ft wide screen and a 1.2 throw ratio: place it 12 feet away.
Key Tip:
Always match the projector’s throw ratio to your screen size and room depth. Most golf simulator setups benefit from short-throw projectors placed 6 to 10 feet away.
Ideal Projector Placement for Different Golf Simulator Room Sizes
Your room’s dimensions directly influence how far your projector should be from your screen. Different room sizes require different projector types, throw ratios, and mounting strategies.
Small Rooms (Under 12 feet deep)
For compact rooms, a short throw projector is essential. These devices can create large images from a short distance—perfect for avoiding shadows and preserving swing space.
- Recommended throw ratio: 0.4 – 0.8
- Ideal placement: 3–7 feet from the screen
- Mounting tip: Ceiling-mount slightly behind or beside the tee area
Medium Rooms (12 to 16 feet deep)
Medium-sized spaces allow a bit more flexibility. You can choose between short throw and standard throw models, depending on the screen size and desired image clarity.
- Recommended throw ratio: 0.8 – 1.2
- Ideal placement: 6–12 feet from the screen
- Mounting tip: Offset mount to one side or centered behind the player
Large Rooms (Over 16 feet deep)
In spacious setups, a standard throw projector may offer the best image quality, especially for 4K and WUXGA resolutions.
- Recommended throw ratio: 1.2+
- Ideal placement: 12–14+ feet from the screen
- Mounting tip: Wall-mounted or ceiling-mounted at a higher elevation
Pro Tip:
Ensure there’s no obstruction between the projector and the screen—especially from clubs, nets, or ceiling beams. Consider laser projectors with lens shift for better alignment.
Ceiling Mount vs. Floor Mount: Which Is Better for Golf Simulators?
Choosing between a ceiling mount and a floor mount projector setup can make or break your golf simulator experience. Each method has its pros and cons depending on your space, budget, and safety needs.
Ceiling Mount Setup
Pros:
- Keeps the projector out of the way of flying golf balls
- Reduces the chance of casting shadows
- Maintains a clean and professional look
Cons:
- Installation can be complex and may require additional hardware
- Adjustments after mounting can be more difficult
Best for:
- Medium to large rooms
- Permanent golf simulator setups
Mounting Tips:
- Position slightly behind or to the side of the tee to avoid interference
- Use an adjustable mount with tilt and swivel for better image alignment
Floor Mount Setup
Pros:
- Easier to install and reposition
- Ideal for portable or temporary golf simulators
Cons:
- Risk of being struck by a golf club or ball
- May require a protective enclosure
Best for:
- Small or multipurpose rooms
- Budget-conscious users or renters
Mounting Tips:
- Use a protective projector enclosure
- Align the projector with the bottom edge of the screen to avoid keystone distortion
Quick Decision Guide:
- Choose ceiling mounting for a clean, permanent setup with maximum protection.
- Opt for floor mounting if you’re testing the setup, short on ceiling space, or planning to move the projector.
Common Mistakes to Avoid When Setting Projector Distance for Golf Simulators
Even with the best projector, a poor setup can ruin your golf simulator experience. Here are the most common mistakes users make—and how you can avoid them.
Ignoring the Throw Ratio
Many users buy projectors without checking if the throw ratio matches their room depth and screen size. This leads to images that are either too large or too small.
Avoid it:
Use the projector’s throw calculator or formula:
Distance = Throw Ratio × Screen Width
Placing the Projector Too Close
A projector that’s too close can:
- Cast shadows from your swing
- Create hot spots or focus issues
- Interfere with ceiling-mounted nets or enclosures
Avoid it:
Ensure the projector is at least 1–2 feet behind the tee area and aligned to avoid obstructions.
Incorrect Mounting Angle
Improper mounting can cause keystone distortion—where the image appears wider at the top or bottom.
Avoid it:
Use projectors with vertical/horizontal keystone correction or lens shift to fine-tune the image without compromising quality.
Not Accounting for Screen Size
Using a projector with the wrong image size leads to stretching or blank space on the screen.
Avoid it:
Match your projector’s native resolution and throw distance to your screen’s dimensions.
Poor Cable Management
Leaving HDMI or power cables hanging can be dangerous and unprofessional.
Avoid it:
Use cable sleeves, wall conduits, or ceiling cable trays for a clean and safe setup.
How to Calculate the Right Projector Distance for Your Golf Simulator Setup
Getting the projector distance just right involves a simple but essential calculation—and a little bit of planning based on your screen size and the projector’s specifications.
Step 1: Know Your Screen Width
Measure the width of your golf simulator impact screen in feet or inches. This will be used in the throw distance formula.
Example: A common screen width is 10 feet.
Step 2: Find the Projector’s Throw Ratio
Look for the throw ratio in your projector’s user manual or product listing. This could be fixed (e.g., 0.5:1) or a range (e.g., 0.69–0.83:1).
Step 3: Use the Throw Distance Formula
Throw Distance = Throw Ratio × Screen Width
Example:
If you have a 0.5 throw ratio and a 10-foot-wide screen:
0.5 × 10 = 5 feet — the projector should be 5 feet from the screen.
Step 4: Adjust for Ceiling Height and Player Position
- Make sure the projector is high enough to avoid interfering with your swing.
- Avoid placing it directly overhead where it may cast shadows or be hit by a club.
Step 5: Use Manufacturer Tools
Brands like BenQ, Optoma, and Epson offer online throw distance calculators. Simply input your screen size and model to get precise placement measurements.
Pro Tip: Always test the image size before permanently mounting. Place the projector on a stand first, fine-tune the distance, then mark the optimal spot for mounting.
Conclusion
Finding the right projector distance for your golf simulator screen isn’t just about image clarity—it’s about enhancing your entire experience. Whether you’re working with a compact garage or a full-size indoor studio, aligning throw ratio, screen size, and room depth is key to achieving the perfect visual setup.
Short throw projectors typically work best for golf simulators, especially when ceiling mounted behind the player to avoid shadows and ensure safety. But no matter the room size, using the correct throw distance formula can help you dial in the exact placement for optimal results.
Take time to measure, calculate, and test before committing to a permanent mount. A well-placed projector turns your simulator into a realistic, immersive golfing haven.
Frequently Asked Questions About How Far a Projector Should Be from a Golf Simulator Screen
What is the ideal projector distance for a golf simulator?
The ideal projector distance ranges from 6 to 14 feet, depending on your projector’s throw ratio and screen width. For example, with a 0.5 throw ratio and a 10-foot screen, the projector should be 5 feet away. Always use the formula:
Throw Distance = Throw Ratio × Screen Width.
Can I use a standard throw projector for my simulator?
Yes, but only if your room has sufficient depth. Standard throw projectors require more distance—often over 12 feet. They’re suitable for large golf simulator rooms but may cause shadows or image alignment issues in smaller spaces.
Is ceiling mounting better than floor mounting for simulators?
In most cases, yes. Ceiling mounting keeps the projector out of harm’s way and prevents shadows. Floor mounting is more flexible for portable setups but comes with the risk of interference with your swing or ball trajectory.
How do I avoid shadows on the screen?
To avoid shadows, place the projector:
- Behind or slightly beside the hitting zone
- Above player height (if ceiling-mounted)
- Use a short throw model so the projector sits closer to the screen
What if I want to move the simulator frequently?
Opt for a portable short throw projector and consider a floor setup with a secure enclosure. Test placement before each session to ensure the image is aligned correctly.
Are laser projectors better for golf simulators?
Yes. Laser projectors typically offer better brightness, longer lifespan, and instant on/off features. They also maintain consistent image quality over time—ideal for simulators used frequently.
4K Projector with HDR10+: Ultimate Guide to Stunning Home Theater Visuals in 2026
Can You Put HID in Halogen Projectors? (Complete Guide)
Can You Use a Projector Without a Laptop? 5 Easy Alternatives to Try Today
This website is a participant in the Amazon Services LLC Associates Program, an affiliate advertising program designed to provide a means for us to earn fees by linking to Amazon.com and affiliated sites.