
This website is a participant in the Amazon Services LLC Associates Program, an affiliate advertising program designed to provide a means for us to earn fees by linking to Amazon.com and affiliated sites.
To remove a pin from a board safely, use a pair of needle-nose pliers or a dedicated pin puller for the best leverage. This complete guide covers proven methods to extract stubborn pins without damaging your cork, fabric, or foam surface.
You will learn expert tips for pulling push pins, sewing pins, and map tacks. Continue reading to discover the right tools and techniques for a clean, frustration-free removal every time.
Best Tools for Removing Pins from a Board
X-Acto Precision Pin Puller (Model Z-12) – Best Overall Choice
This ergonomic tool features a spring-loaded jaw that grips pin heads securely without bending. Ideal for corkboards and fabric surfaces, it removes even flat-headed push pins with zero damage. Best use case: Office workers removing dozens of pins daily from presentation boards.

- Precision formed curves provide excellent leverage in prying out cotter…
- Large plastic handle
- 3-7/16-inch blade length
TEKTON Needle-Nose Pliers (Model 3581) – Best Budget Option
With long, tapered jaws and a comfortable grip, these pliers provide excellent leverage for stubborn sewing pins and map tacks. The serrated teeth prevent slipping during extraction. Best use case: Crafters and hobbyists working with fabric or foam boards at home.

- Insulated for Electrical Work – The handles are insulated to protect…
- Long, Slim Jaws for More Access – The slim jaws are 3.2 inches from the…
- Five Work Zones – The jaws have serrated surfaces, smooth surfaces…
Master Magnetics Pin Magnetizer/Demagnetizer (Model 5-AD) – Best for Bulk Removal
This dual-function tool magnetizes your existing pliers to attract metal pins, or demagnetizes them for easy release. It saves time when removing multiple pins from large bulletin boards. Best use case: Teachers and event planners clearing boards quickly before resetting displays.
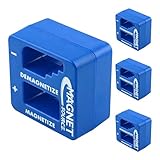
- TOOL MAGNETIZATION AND DEMAGNETIZATION: Instantly magnetize or demagnetize…
- COMPREHENSIVE TOOL COMPATIBILITY: Perfect for a wide range of items…
- EASY TO USE: No batteries or electricity is required.
How to Remove a Stubborn Pin Without Damaging Your Board
Stuck pins often leave unsightly holes or tear fabric when pulled incorrectly. The key is to apply steady, even pressure in the direction the pin entered, not at an angle. Follow these proven techniques for different pin types and board materials.
Removing Push Pins from Cork Bulletin Boards
Grip the pin head firmly with your pliers or pin puller. Pull straight out with a slow, twisting motion to loosen the cork fibers.
- For plastic push pins: Use the X-Acto Z-12 to avoid cracking the head.
- For metal push pins: Magnetize your pliers first with the Master Magnetics tool for better grip.
- If the pin is flush: Slide a thin flathead screwdriver under the head to create leverage.
Extracting Sewing Pins from Fabric or Foam Boards
Sewing pins have smaller heads and bend easily. Use needle-nose pliers to grab the shaft near the board, not the tiny head.
Pro tip: Place a piece of cardboard behind the fabric if you push the pin through accidentally. This prevents the pin from bending against the wall.
Handling Map Tacks and Flag Pins
Map tacks often have long, thin shafts that snap easily. Use the TEKTON 3581 pliers to grip the shaft as close to the board as possible.
- Grip the shaft firmly but gently.
- Rock the pin side-to-side slightly to break the seal.
- Pull straight upward in one smooth motion.
Common Mistakes When Removing Pins and How to Avoid Them
Many people damage their boards or break pins by using the wrong technique. Understanding these frequent errors will help you remove a pin from a board cleanly every time. Here are the three most common mistakes and their simple fixes.
Pulling at an Angle Instead of Straight Out
Angled pulling tears cork fibers and creates elongated holes that never close. It also bends metal pins, making them unusable.
- The fix: Always align your pliers or fingers with the pin’s entry angle.
- The result: A clean removal that leaves a tiny, nearly invisible hole.
Using Fingernails on Flat-Headed Pins
Flat push pins and map tacks offer no grip for fingernails. This often leads to broken nails or the pin slipping and scratching the board surface.
The fix: Use the X-Acto Z-12 pin puller, which slides under the head easily. For a quick DIY solution, slide the edge of a credit card under the pin head to lift it.
Forcing a Rusted or Bent Pin
Rusted pins create friction that can tear fabric boards. Bent pins are prone to snapping, leaving half the shaft embedded in the cork.
The fix: Apply a drop of WD-40 to the base of a rusted pin and wait 30 seconds. For bent pins, straighten them with pliers before attempting removal.
Key Takeaway: Pull straight, use proper tools, and never force a damaged pin. These simple adjustments prevent board damage and save time.
Ignoring Board Material Differences
Cork, fabric, foam, and wood each react differently to pin removal. Using the same method on all materials is a recipe for disaster.
| Board Material | Best Removal Tool | Key Tip |
|---|---|---|
| Cork | Pin puller or pliers | Twist slightly while pulling |
| Fabric | Needle-nose pliers | Support fabric from behind |
| Foam | Hand removal only | Pull very slowly to avoid tearing |
How to Remove a Pin from a Board Without Leaving Marks
Visible holes and fabric tears are the most frustrating results of pin removal. With the right prep work and aftercare, you can remove a pin from a board and leave it looking almost untouched. Follow these techniques for a pristine finish.
Pre-Treatment for Stubborn or Old Pins
Pins left in boards for months or years often bond with the material. Applying a small amount of heat or lubricant loosens this bond significantly.
- Heat method: Use a hairdryer on low heat for 10 seconds to soften cork fibers around the pin.
- Lubricant method: Apply a drop of rubbing alcohol to the pin base to dissolve adhesive residue.
- Result: The pin slides out with minimal resistance and zero tearing.
Post-Removal Board Repair Techniques
Even careful removal can leave small indentations. These simple fixes restore your board’s surface quickly.
- For cork boards: Rub the hole gently with your finger to redistribute fibers. The hole will close within 24 hours.
- For fabric boards: Dampen a cotton swab and smooth the fabric fibers back into place.
- For foam boards: Pinch the foam around the hole to push material back together.
Key Takeaway: Pre-treat stubborn pins with heat or alcohol, and repair small marks immediately after removal for a flawless board surface.
Preventing Marks in the First Place
The best way to avoid marks is to use the right pins for your board material. Choosing wisely saves you time and frustration later.
| Board Type | Recommended Pin | Why It Works |
|---|---|---|
| Cork | Standard push pins | Thin shaft minimizes hole size |
| Fabric | Quilting pins with glass heads | Smooth shaft prevents snags |
| Foam | Plastic T-pins | Wide head distributes pressure |
How to Remove a Pin from a Board Using Household Items
You do not always need specialized tools to remove a pin from a board effectively. Common household items work just as well when you are in a pinch. Here are three DIY methods using items you likely already own.
Using a Credit Card or Ruler for Flat Pins
Flat-headed pins and map tacks sit flush against the board surface. A thin, rigid object slides underneath to create leverage.
- Step 1: Slide the edge of a credit card under the pin head.
- Step 2: Gently pry upward while holding the board steady.
- Step 3: Once lifted, grip the pin with your fingers and pull it out.
Best for: Cork and fabric boards where you want to avoid scratching the surface with metal tools.
Using a Butter Knife for Stubborn Pins
A butter knife provides more leverage than a credit card. Its rounded edge reduces the risk of tearing fabric or gouging cork.
Pro tip: Place a small piece of cloth under the knife tip to protect the board. Insert the knife at a 15-degree angle and twist gently to lift the pin head.
Using Tweezers for Small Sewing Pins
Sewing pins have tiny heads that are difficult to grip. Standard tweezers offer precision for these delicate removals.
- Step 1: Grasp the pin shaft near the board, not the head.
- Step 2: Pull straight out with a slow, steady motion.
- Step 3: Avoid squeezing too hard to prevent bending the pin.
Key Takeaway: Credit cards, butter knives, and tweezers are effective alternatives to specialized pin removal tools. Use gentle pressure and protect your board surface.
Comparison of Household Tools vs. Specialized Tools
| Tool | Best For | Risk Level | Effectiveness |
|---|---|---|---|
| Credit Card | Flat push pins | Low | Good |
| Butter Knife | Stubborn map tacks | Medium | Very Good |
| Tweezers | Sewing pins | Low | Excellent |
| X-Acto Z-12 | All pin types | Very Low | Excellent |
How to Remove a Broken Pin from a Board Safely
Pins snap inside boards more often than you might expect. Knowing how to remove a broken pin from a board without damaging the surface is essential. Here are three reliable methods for extracting broken pieces.
Using Needle-Nose Pliers for Exposed Shafts
If part of the pin shaft remains visible above the board, needle-nose pliers are your best option. The long, narrow jaws grip the metal securely.
- Step 1: Grasp the exposed shaft as close to the board as possible.
- Step 2: Rock the pin gently side-to-side to loosen it.
- Step 3: Pull straight upward with steady, even pressure.
Best for: Cork and foam boards where the shaft remains partially exposed after snapping.
Using a Sewing Needle for Embedded Pin Heads
When the entire pin head breaks off, the shaft sits completely inside the board. A sewing needle can hook the metal from within.
Pro tip: Heat the tip of a sewing needle with a lighter for 5 seconds. Push the hot needle into the cork beside the broken shaft. The heat softens the cork, allowing you to pry the shaft out.
Using a Magnet for Metal Pin Fragments
Small metal fragments are difficult to see and grip. A strong neodymium magnet can extract them without any board contact.
- Step 1: Place the magnet directly over the broken pin location.
- Step 2: Move the magnet in slow circles to attract the fragment.
- Step 3: Lift the magnet away, bringing the fragment with it.
When to Replace Your Board Instead
Some boards suffer too much damage from broken pins to justify repair. Recognizing when to replace saves time and frustration.
| Board Condition | Repair Possible? | Recommended Action |
|---|---|---|
| Single broken pin | Yes | Extract using methods above |
| Multiple broken pins | Difficult | Replace board |
| Deep gouges or tears | No | Replace board |
| Surface holes only | Yes | Repair with filler or wait |
How to Remove a Pin from a Board Without Tools Using Your Hands
Sometimes you need to remove a pin from a board quickly without any tools nearby. Using your hands correctly prevents injury and board damage. Here is how to do it safely for different pin types.
Removing Standard Push Pins with Your Fingers
Standard push pins have large, textured heads that offer good grip. Use your thumb and index finger for maximum control.
- Step 1: Pinch the pin head firmly between your thumb and index finger.
- Step 2: Pull straight outward without twisting or rocking.
- Step 3: Keep your other hand flat against the board for stability.
Pro tip: If the pin feels stuck, rotate it gently clockwise while pulling to break the seal.
Removing Flat Map Tacks with Fingernails
Flat map tacks sit flush against the board, making them hard to grip. Your fingernails can wedge under the edge to lift them.
Warning: Avoid using long artificial nails, as they may snap. Instead, use the side of your thumbnail to slide under the tack head and pry upward gently.
Removing Sewing Pins with Pinch and Slide Technique
Sewing pins have tiny heads that slip between fingers easily. The pinch and slide method offers better control.
- Step 1: Place your thumb on the board beside the pin head.
- Step 2: Slide your index finger under the pin head from the opposite side.
- Step 3: Pinch the head between your fingers and pull straight out.
Hand Removal Success Rates by Pin Type
| Pin Type | Success Rate | Difficulty Level | Risk of Damage |
|---|---|---|---|
| Standard push pin | 95% | Easy | Low |
| Flat map tack | 60% | Moderate | Medium |
| Sewing pin | 40% | Hard | High |
| Plastic T-pin | 80% | Easy | Low |
How to Remove a Pin from a Board Made of Different Materials
Each board material reacts differently when you remove a pin from a board. Using the wrong technique can cause permanent damage. Here is how to handle cork, fabric, foam, and wood boards safely.
Removing Pins from Cork Bulletin Boards
Cork is forgiving but can crumble if you pull aggressively. The key is to minimize friction against the cork fibers.
- Best tool: X-Acto Z-12 pin puller or needle-nose pliers.
- Technique: Twist the pin slightly while pulling straight out.
- Avoid: Yanking at an angle, which creates elongated holes.
Pro tip: Rotate the pin 90 degrees before pulling to break the seal. This reduces tearing and keeps your cork board looking new for years.
Removing Pins from Fabric Presentation Boards
Fabric boards snag easily, leaving visible pulls and loose threads. Gentle handling is essential for preserving the surface.
Best tool: TEKTON 3581 needle-nose pliers with smooth jaws.
- Technique: Support the fabric from behind with your free hand.
- Avoid: Sliding tools across the fabric surface.
- Fix snags: Use a crochet hook to pull loose threads back through.
Removing Pins from Foam Core Boards
Foam boards are soft and prone to tearing. The foam compresses around the pin, creating resistance during removal.
- Best tool: Hand removal or plastic tweezers only.
- Technique: Pull extremely slowly to let the foam release naturally.
- Avoid: Metal tools that can gouge the soft surface.
Quick Reference Guide for All Board Types
| Board Material | Recommended Tool | Pull Speed | Special Care |
|---|---|---|---|
| Cork | Pin puller | Moderate | Twist before pulling |
| Fabric | Smooth pliers | Slow | Support from behind |
| Foam | Fingers only | Very slow | Avoid metal contact |
| Wood | Pliers | Fast | Fill holes after removal |
Conclusion: Master How to Remove a Pin from a Board
You now have all the methods to remove a pin from a board safely, whether you use specialized tools or simple household items. Matching your technique to your board material prevents damage and saves frustration.
Your best practice: Always pull straight out, use the right tool for the pin type, and pre-treat stubborn pins with heat or lubricant. Start with the gentlest method possible and work your way up.
Try these techniques today and keep your boards looking pristine for years to come.
Frequently Asked Questions about How to Remove a Pin from a Board
What is the best way to remove a pin from a cork board?
The best way is to use a dedicated pin puller like the X-Acto Z-12, which grips the head securely. Pull straight out while twisting the pin slightly to break the seal.
This method minimizes damage to cork fibers and prevents elongated holes. Avoid pulling at an angle, as this tears the cork and leaves visible marks.
How do I remove a pin from a fabric board without snagging?
Use needle-nose pliers with smooth jaws to grip the pin shaft near the board. Support the fabric from behind with your free hand to prevent stretching.
Pull straight out slowly and steadily. If a snag occurs, use a crochet hook to gently pull loose threads back through the fabric surface.
What should I do if a pin breaks inside the board?
If the shaft is exposed, use needle-nose pliers to grip it as close to the board as possible and pull straight out. Rock the pin gently to loosen it first.
For fully embedded fragments, heat a sewing needle tip with a lighter and push it into the cork beside the broken shaft. The heat softens the material, allowing you to pry the fragment out.
Can I remove a pin from a board using household items?
Yes, a credit card works well for flat-headed push pins. Slide the edge under the pin head and pry upward gently until you can grip it with your fingers.
A butter knife provides more leverage for stubborn map tacks. Place a cloth under the knife tip to protect the board surface from scratches.
How do I remove a rusted pin from a bulletin board?
Apply a drop of WD-40 or rubbing alcohol to the base of the rusted pin. Wait 30 seconds for the lubricant to penetrate and loosen the bond.
Then grip the pin head with pliers and pull straight out with steady pressure. The lubricant reduces friction and prevents the pin from snapping.
What is the best tool for removing map tacks from a board?
The TEKTON 3581 needle-nose pliers are ideal for map tacks due to their long, tapered jaws. They grip the thin shaft securely without bending it.
Alternatively, use the X-Acto Z-12 pin puller for flat map tacks that sit flush against the board. Both tools prevent damage to the board surface.
How do I remove a pin from a foam board without tearing it?
Use your fingers only and pull extremely slowly. Foam compresses around the pin, so rushing causes tearing. Let the foam release naturally as you pull.
Avoid metal tools entirely, as they can gouge the soft foam surface. If the pin is stubborn, apply gentle heat with a hairdryer to soften the foam first.
Why do my pins keep bending when I try to remove them?
Pins bend when pulled at an angle or when too much force is applied. Always align your pull direction with the pin’s entry angle.
If pins are consistently bending, switch to thicker pins or use pliers to grip the shaft closer to the board. This provides better leverage and reduces bending.
How can I prevent holes from showing after removing pins?
For cork boards, rub the hole gently with your finger to redistribute fibers. The hole will close naturally within 24 hours.
For fabric boards, dampen a cotton swab and smooth fibers back into place. Use thinner pins to minimize hole size in the first place.
What type of pin is easiest to remove from a board?
Standard push pins with large, textured heads are the easiest to remove. They provide excellent grip for fingers or tools and rarely snap during removal.
Plastic T-pins are also easy to remove due to their wide heads. Avoid thin sewing pins and flat map tacks if you need frequent pin changes.
Can a Projector Get a Virus?why you need to know
This website is a participant in the Amazon Services LLC Associates Program, an affiliate advertising program designed to provide a means for us to earn fees by linking to Amazon.com and affiliated sites.