This website is a participant in the Amazon Services LLC Associates Program, an affiliate advertising program designed to provide a means for us to earn fees by linking to Amazon.com and affiliated sites.
How do you wire halos on projector headlights? You wire halo rings by connecting their positive and negative leads to a suitable power source, such as parking lights, daytime running lights, or an independent switch, while ensuring all connections are properly insulated and protected.
Halo projector headlights have become one of the most popular automotive lighting upgrades because they combine enhanced style with improved visibility. Whether you’re installing LED angel eyes on a daily driver or customizing a show car, understanding the correct wiring process is essential for safety and long-term reliability.
Many enthusiasts assume halo installation is complicated, but with the right tools, a wiring diagram, and patience, it can be a manageable DIY project. The key is identifying the appropriate power source, creating secure electrical connections, and testing the system before final assembly.
In this guide, you’ll learn exactly how to wire halos on projector headlights, the tools you’ll need, common mistakes to avoid, and the best products to simplify the installation process.
Best for Wiring Halos on Projector Headlights
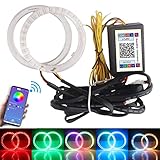
XKGlow LED Halo Kit
Why we picked it:
XKGlow offers high-quality waterproof halo rings with detailed instructions, durable wiring components, and reliable brightness, making installation easier for beginners and experienced installers alike.

- 2pc 7″ RGB LED XKchrome Bluetooth App Controlled Kit.
- Smartphone Bluetooth 4.0 app controlled via the Xkchrome App
- 16 million vivid colors. Capture live colors with your camera.
Morimoto XSB LED Halo Rings
Why we picked it:
Morimoto halos are known for premium construction, excellent light output, and compatibility with numerous projector headlight setups for long-lasting performance.
- Voltage: DC 12V, Lumen: 780LM, Led Type: 3535 led chips, Color: RGB, Size…
- Multiple Function: There are up to 210 preset modes and could adjust the…
- Smart phone APP Bluetooth Controlled, iPhone and Android compatible…
OPT7 Aura Pro LED Halo Kit
Why we picked it:
OPT7 provides Bluetooth-enabled customization, vibrant colors, and user-friendly wiring harnesses that simplify installation while delivering impressive visual effects.

- Built to Last: Aura LED light bar is constructed with IP67 waterproof…
- OPT7 GLOW APP: OPT7 to bring you our exclusive full-featured Bluetooth APP…
- Seamless Dual Control: Discover the premier lighting experience with our…
Tools and Materials Needed to Wire Halo Projector Headlights
Before starting the installation, gathering the proper tools and materials will save time and reduce frustration. Working with automotive electrical systems requires precision, and using the correct equipment helps ensure safe, durable connections.
Essential tools include a wire stripper, crimping tool, digital multimeter, screwdrivers, socket set, and heat gun for shrink tubing. These tools allow you to identify power sources, prepare wires, and secure electrical connections properly.
You’ll also need installation materials. While some halo kits include everything required, many projects benefit from additional supplies.
Recommended Materials:
- Halo projector headlight kit
- Wire strippers
- Crimp connectors
- Heat shrink tubing
- Electrical tape
- Add-a-fuse adapters
- Zip ties
- Digital multimeter
- Silicone sealant (if reopening headlight housings)
Using waterproof connectors is especially important because headlights are exposed to moisture, road debris, and changing temperatures. Inferior connections can corrode over time and lead to flickering halos or complete failure.
Before disconnecting or modifying any factory wiring, consult your vehicle’s wiring diagram. This helps identify the correct parking light circuit or accessory power source and minimizes the risk of damaging sensitive electrical components.
Preparing thoroughly before installation often determines whether the project becomes a smooth afternoon upgrade or an all-day troubleshooting exercise.
Choosing the correct power source is one of the most important steps when learning how to wire halos on projector headlights. Even the highest-quality halo kit can experience flickering, premature failure, or battery drain if connected incorrectly. Taking the time to identify the right circuit ensures both reliability and safety.
Most halo rings feature two wires: a positive (+) wire and a negative (–) ground wire. The negative wire is usually connected to a clean chassis ground or an existing factory ground point. The positive wire, however, can be connected in several ways depending on how you want the halos to operate.
Common Halo Power Source Options
Parking Light Circuit
This is the most popular wiring method. The halos illuminate whenever the parking lights or headlights are switched on.
Advantages:
- Factory-like operation
- Simple installation
- No additional switches required
- Legal in many areas when wired properly
Daytime Running Light (DRL) Circuit
Some drivers prefer halos to function as daytime running lights.
Advantages:
- Increased daytime visibility
- Modern appearance
- Automatic operation while driving
Considerations:
- Verify that the circuit provides stable voltage.
- Ensure compliance with local lighting regulations.
Ignition-Switched Accessory Power
Connecting halos to an accessory circuit allows them to activate only when the ignition is on.
Benefits:
- Prevents accidental battery drain
- Offers automatic operation
- Reduces the risk of leaving lights on
Independent Switch
For maximum control, install a dedicated switch inside the cabin.
Advantages:
- Turn halos on or off whenever desired
- Useful for show vehicles
- Allows customization without affecting factory lighting
How to Find the Correct Wire
A digital multimeter is invaluable during this step.
Follow these basic checks:
- Set the multimeter to DC voltage mode.
- Turn on the lighting function you intend to use.
- Probe suspected wires carefully.
- Confirm that the circuit supplies approximately 12 volts when activated.
- Verify that voltage disappears when the function is turned off.
Avoid guessing based solely on wire color. Manufacturers often change wiring colors between vehicle generations and trim levels.
Safety Tips When Tapping Into Factory Wiring
- Disconnect the negative battery terminal before making connections.
- Use add-a-fuse adapters whenever possible instead of cutting factory wires.
- Protect all exposed connections with heat shrink tubing.
- Secure loose wiring away from moving parts and high-heat components.
- Double-check polarity before applying power.
Proper power source identification lays the foundation for a successful halo installation. Once you know exactly where your halos will receive power, the actual wiring process becomes much more straightforward and dependable.
Step-by-Step Guide: How to Wire Halos on Projector Headlights
Once you’ve identified the correct power source, it’s time to complete the installation. Wiring halos on projector headlights may seem intimidating at first, but breaking the process into manageable steps makes it much easier. Work patiently and avoid rushing, as careful installation reduces the likelihood of future electrical problems.
Step 1: Disconnect the Vehicle Battery
Safety should always come first.
Before handling any wiring, disconnect the negative terminal of the battery. This prevents accidental short circuits, blown fuses, and potential damage to your vehicle’s electrical system.
Safety Checklist:
- Turn the ignition completely off.
- Remove the key from the ignition.
- Disconnect the negative battery cable.
- Keep metal tools away from battery terminals.
Step 2: Remove the Headlight Assemblies
Accessing the projector headlights usually requires removing the front headlight assemblies.
Depending on your vehicle, you may need to remove:
- Plastic clips
- Retaining bolts
- Front grille components
- Sections of the bumper cover
Place all hardware in a container to prevent losing small parts during the installation.
Step 3: Route the Halo Wiring
Locate the halo wires extending from the projector housing.
Carefully route these wires toward the chosen power source while avoiding areas exposed to:
- Sharp metal edges
- Engine heat
- Cooling fans
- Moving belts and pulleys
Use zip ties to secure the wiring harness neatly along existing factory wiring paths.
Step 4: Connect the Ground Wire
The halo’s negative wire should be attached to a reliable ground point.
Good grounding locations include:
- Factory grounding bolts
- Bare metal chassis points
- Existing grounding studs
Before tightening the connection, remove any paint or corrosion that could interfere with electrical conductivity.
Step 5: Connect the Positive Wire
Next, connect the halo’s positive wire to your selected power source.
Common methods include:
Using an Add-a-Fuse Adapter
- Remove the appropriate fuse.
- Insert the adapter.
- Install the original fuse and the recommended halo fuse.
- Crimp the halo positive wire securely.
Tapping Into the Parking Light Circuit
- Verify the correct wire using a multimeter.
- Use waterproof connectors or soldered joints.
- Insulate the connection with heat shrink tubing.
Installing a Dedicated Switch
- Route wiring through a firewall grommet.
- Mount the switch inside the cabin.
- Connect according to the switch manufacturer’s instructions.
Step 6: Test the Halo Operation
Before reinstalling the headlights, perform a full system test.
Check that:
- Both halo rings illuminate evenly.
- The halos activate under the intended conditions.
- No flickering occurs.
- Factory headlights still function properly.
- No warning lights appear on the dashboard.
If something doesn’t work correctly, recheck polarity and inspect each connection before proceeding.
Step 7: Final Assembly
Once testing confirms everything works properly, complete the installation.
- Reinstall the headlight assemblies.
- Tighten all mounting hardware.
- Secure loose wiring with zip ties.
- Reconnect the battery terminal.
- Perform one final operational check.
Taking the extra time to organize and protect your wiring helps ensure your halo projector headlights continue operating reliably for years.
Common Installation Mistakes to Avoid
Even experienced DIY installers can make simple errors.
Avoid these common mistakes:
- Skipping battery disconnection.
- Guessing wire functions without testing.
- Leaving exposed connections uncovered.
- Routing wires near hot engine components.
- Using poor-quality connectors.
- Forgetting to test before reassembly.
Following a systematic installation process not only improves the appearance of your vehicle but also provides peace of mind knowing the job was completed correctly.
Suggested Visuals:
- Image: Step-by-step halo wiring installation on projector headlights.
- Alt Text: “DIY process showing how to wire halos on projector headlights.”
- Infographic: Seven-step halo installation workflow.
- Diagram: Basic positive and ground halo wiring layout.
Troubleshooting Common Halo Wiring Problems and How to Fix Them
Even when you follow installation instructions carefully, halo projector headlights can occasionally develop issues after wiring. The good news is that most problems have simple solutions. Understanding how to diagnose common faults can save you time, money, and unnecessary replacement of perfectly good components.
Halo Rings Won’t Turn On
If the halos fail to illuminate completely, start with the basics.
First, inspect the fuse protecting the circuit. A blown fuse is one of the most common causes of power loss. Next, use a digital multimeter to verify that the positive wire is receiving approximately 12 volts when the circuit is activated.
Check the following:
- Battery terminal is properly reconnected.
- Ground connection is secure.
- Fuse is intact.
- Positive wire is connected to the correct circuit.
- Connectors are fully seated.
If voltage is present but the halos remain dark, the LED driver or halo ring itself may be defective.
Halo Lights Flicker
Flickering halos often indicate an unstable electrical connection.
Common causes include:
- Loose crimp connectors
- Poor grounding points
- Corroded terminals
- Inadequate wire gauge
- Moisture entering the connection
To fix flickering, tighten all connections and replace low-quality connectors with waterproof crimp fittings or soldered joints protected by heat shrink tubing.
Only One Halo Works
When one halo functions normally while the other does not, compare both sides of the installation.
Inspect for:
- Pinched wires
- Broken connectors
- Reversed polarity
- Damaged LED drivers
- Incomplete ground connections
Swapping components from one side to the other can help isolate whether the problem lies with the wiring or the halo itself.
Halos Stay On After the Vehicle Is Off
This issue usually occurs when the positive wire is connected to a constant 12-volt source rather than a switched circuit.
Solutions include:
- Moving the connection to an ignition-switched fuse.
- Wiring the halos to the parking light circuit.
- Installing a relay controlled by accessory power.
- Adding a manual switch.
Correcting the power source prevents unwanted battery drain.
Dashboard Warning Lights Appear
Modern vehicles often monitor lighting circuits closely. Improper modifications can trigger warning indicators.
Possible fixes include:
- Using CAN bus-compatible halo kits.
- Installing load resistors if recommended by the manufacturer.
- Avoiding direct interference with factory headlight wiring.
- Consulting vehicle-specific wiring diagrams.
Never ignore persistent warning lights, as they may indicate a deeper electrical issue.
Moisture Causes Intermittent Problems
Headlights are constantly exposed to rain, humidity, and temperature fluctuations. Poorly sealed connections can allow water intrusion.
Prevent moisture-related failures by:
- Using waterproof connectors.
- Applying heat shrink tubing.
- Sealing openings with automotive-grade silicone.
- Inspecting wiring periodically for corrosion.
Quick Troubleshooting Checklist
Before replacing parts, verify these items:
- Check the fuse.
- Confirm battery voltage.
- Test the ground connection.
- Verify polarity.
- Inspect all connectors.
- Test for 12-volt power using a multimeter.
- Examine the halo rings for physical damage.
Most halo wiring problems stem from connection issues rather than faulty products. By approaching troubleshooting methodically, you can quickly restore proper operation and enjoy the custom appearance and functionality of your projector headlights.
Conclusion
Learning how to wire halos on projector headlights is a rewarding DIY project that can dramatically enhance both the appearance and functionality of your vehicle. By selecting the appropriate power source, using quality wiring materials, and following a structured installation process, you can achieve professional-looking results without the expense of a custom shop.
Remember that safety and attention to detail are essential throughout the project. Always disconnect the battery before working on electrical components, verify circuits with a multimeter, and protect every connection from moisture and vibration. Taking these extra precautions helps prevent common issues such as flickering lights, blown fuses, and battery drain.
With patience and proper preparation, your halo projector headlights can provide years of reliable performance and a distinctive custom look.
Frequently Asked Questions About How to Wire Halos on Projector Headlights
Can I wire halo rings directly to the battery?
Technically, yes, but it is not recommended. Connecting halos directly to the battery can cause them to remain on continuously, potentially draining the battery when the vehicle is parked. It’s better to use an ignition-switched fuse, parking light circuit, or relay-controlled power source so the halos only operate when intended.
Do I need a relay to wire halo projector headlights?
Not always. Many LED halo kits draw very little power and can safely operate through a parking light or accessory circuit. However, a relay can improve reliability, protect factory wiring, and provide a cleaner installation, especially when multiple lighting accessories are installed.
What happens if I reverse the halo wiring polarity?
Most LED halos will simply fail to illuminate if the positive and negative wires are reversed. In many cases, correcting the polarity restores normal operation. Always verify wire orientation before final assembly.
Can I use halo rings as daytime running lights?
Yes. Many vehicle owners wire halos to the DRL or ignition-switched circuit so they function during the day. Before doing so, confirm that the chosen circuit provides stable voltage and complies with local vehicle lighting regulations.
Why are my halo lights flickering?
Flickering is usually caused by loose connections, poor grounding, inadequate connectors, moisture intrusion, or voltage fluctuations. Inspect all wiring carefully and secure connections using waterproof connectors and heat shrink tubing.
Is professional installation necessary?
No. If you have basic automotive electrical knowledge, the proper tools, and patience, wiring halos on projector headlights is a manageable DIY project. However, if you’re uncomfortable working with vehicle wiring or own a vehicle with complex CAN bus systems, professional installation may be the safer option.
How long does it take to wire halos on projector headlights?
Installation time varies depending on the vehicle and whether the headlight housings require opening. Most DIY installers can complete the job within two to four hours, while more complex setups may take longer.
By understanding these common concerns before starting, you’ll be better prepared to complete a successful halo headlight installation with confidence and avoid many of the mistakes first-time installers often encounter.
Can a Projector Get a Virus?why you need to know
This website is a participant in the Amazon Services LLC Associates Program, an affiliate advertising program designed to provide a means for us to earn fees by linking to Amazon.com and affiliated sites.