This website is a participant in the Amazon Services LLC Associates Program, an affiliate advertising program designed to provide a means for us to earn fees by linking to Amazon.com and affiliated sites.
The Elysian Aurora Projector is a premium smart lighting device. It recreates the mesmerizing beauty of the aurora borealis in your home. This device projects dynamic, colorful light shows onto your walls and ceiling.
It solves the problem of bland, static ambient lighting. Instead, you get a constantly moving, immersive visual experience. It’s perfect for relaxation, meditation, or creating a unique party atmosphere.
This complete guide will show you how to master your projector. You’ll learn setup steps, advanced features, and proven methods for stunning effects. Get ready to transform any room into a celestial sanctuary.
Best Aurora Projectors for Immersive Lighting – Detailed Comparison
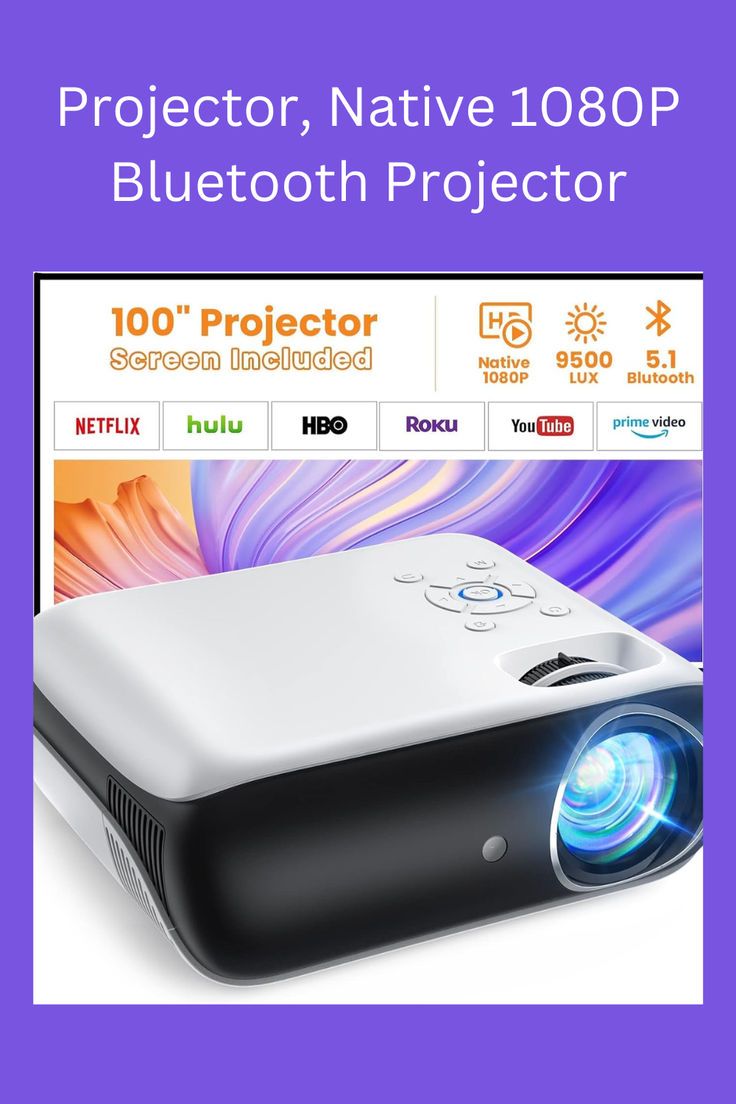
Elysian Aurora Pro X9 – Best Overall Choice
The Elysian Aurora Pro X9 features 16 million colors and 8 dynamic scene modes. Its high-definition lens creates sharp, vibrant aurora patterns that fill large rooms. This model includes Bluetooth speaker sync and a programmable timer. It’s the best option for users seeking premium features and reliability.
- Google TV with licensed Netflix: Just power on and instantly stream the…
- Dolby Vision & IMAX Enhanced* Certified: Experience the ultimate home…
- Remarkable Visual Experience: Enjoy unparalleled brightness at 2300 ISO…
Galaxy Sky Master 360 – Best for Ceiling Coverage
Ideal for bedroom relaxation, the Galaxy Sky Master 360 offers a true 360-degree projection field. Its unique dual-lens system creates a seamless dome of light. This model includes white noise sounds and a remote control. It’s the recommended choice for maximum immersion and sleep aid functionality.

- Dual power options: Either use with the provided USB Charging cord Included…
- Sleep — this star projector lamp is a great night light for your kids…
- Star projector night lighting —the baby room decor light is not only give…
Lumia Borealis Mini – Best Budget-Friendly Pick
The compact Lumia Borealis Mini delivers stunning visuals at an accessible price point. It projects authentic green and purple aurora waves with adjustable speed. This portable model is USB-powered and perfect for small spaces. It’s the ideal starter projector for creating a calming ambiance.

- 【2025 Upgrade Mini Projector】 Mini projector supports 1080P Full HD…
- 【Smallest and Portable Mini Projector】Weighing just 0.52 kg and sized…
- 【Multiple Devices Connection and Wide Application】 Equipped with HDMI…
How to Set Up Your Elysian Aurora Projector for Optimal Results
Proper setup is crucial for maximizing your aurora borealis experience. This guide walks you through placement, connection, and calibration. Follow these steps to transform your room quickly and effectively.
Choosing the Perfect Projector Placement
Location dramatically impacts the quality of your light show. The ideal spot is a stable, flat surface opposite a clear wall or ceiling. Avoid placing it near bright lights or windows for the most vivid colors.
- For Wall Displays: Position the projector 3-6 feet from a blank wall. Ensure the lens is pointing straight ahead for an even, wide projection field.
- For Ceiling Effects: Place the unit on a low table or the floor. Angle it upwards slightly to flood the entire ceiling with dynamic colors.
- Critical Tip: Keep the projector on a stable, vibration-free surface. This prevents the delicate, moving patterns from becoming blurry or distorted.
Connection and Initial Configuration Steps
Modern aurora projectors like the Elysian offer multiple control methods. Start with a simple power connection, then explore advanced features. Here is a basic step-by-step process.
- Plug the power adapter into the unit and connect it to an outlet.
- Power on the device using the physical button on the projector.
- Download the companion mobile app (if available) and connect via Wi-Fi or Bluetooth.
- Use the remote control or app to select your first light scene.
Calibrating Colors and Motion Settings
Fine-tuning transforms a good display into a breathtaking one. Adjust these core settings to match your room’s ambiance and your personal preference.
Use the remote or app to navigate the settings menu. Focus on three main adjustments for a custom look.
- Color Saturation: Increase for vibrant, intense auroras. Decrease for softer, more pastel-like waves.
- Motion Speed: A slower speed is ideal for relaxation. A faster speed creates dynamic energy for social gatherings.
- Brightness Level: Adjust based on room darkness. Lower brightness in a dark bedroom, increase it in a living room with some ambient light.
Advanced Features and Creative Uses for Your Aurora Light
Modern projectors offer more than just pretty lights. Unlocking advanced functions elevates your experience from visual to fully immersive. Discover how to use these features for relaxation, entertainment, and ambiance.
Syncing Music and Sound for a Multi-Sensory Experience
Many high-end models feature audio-reactive technology. This allows the light patterns to pulse and change with your music. It transforms your projector into a dynamic centerpiece for parties.
To activate music sync, use the dedicated mode on your remote or app. The projector’s microphone or direct audio input will pick up the sound. You will see the colors and motion intensity respond to the beat and volume.
- For Parties: Play upbeat music for fast, vibrant light changes that energize the room.
- For Relaxation: Pair with ambient soundscapes or white noise. The lights will flow gently with the calming audio.
- Pro Tip: Position the projector closer to your speaker for more accurate sound detection and a stronger sync effect.
Programming Custom Schedules and Timers
Automation adds convenience and enhances your daily routine. Use the timer function to make your aurora projector a seamless part of your life. This is perfect for sleep aids or welcoming you home.
| Use Case | Recommended Timer Setting | Benefit |
|---|---|---|
| Sleep Aid | Set for 30-60 minutes at bedtime | Gentle lights lull you to sleep, then turn off automatically. |
| Morning Wake-up | Schedule to turn on 15 mins before alarm | A soft, natural light transition eases you awake. |
| Ambiance Control | Program for evenings or specific days | Ensures perfect mood lighting without manual switching. |
Creative Applications Beyond the Bedroom
Think outside the bedroom for your aurora borealis projector. Its versatile lighting can enhance various spaces and activities. Here are innovative ways to use it.
- Home Theater Enhancement: Use a slow, deep blue/green scene as bias lighting behind your TV to reduce eye strain.
- Meditation & Yoga Space: Create a serene atmosphere with slow-moving purple and indigo waves to aid focus.
- Photography & Video Backdrop: Use the dynamic colors as a unique, ever-changing background for creative portraits.
Maintenance, Troubleshooting, and Care Guide
Proper care ensures your projector delivers stunning aurora displays for years. This section covers essential maintenance and solves common technical issues. Follow these tips to protect your investment and ensure optimal performance.
Routine Cleaning and Lens Care
Dust and fingerprints are the main enemies of a clear projection. A dirty lens will scatter light and create blurry, dim patterns. Establish a simple cleaning routine to maintain image quality.
- Power Off & Cool Down: Always turn off and unplug the device. Let it cool completely before cleaning.
- Dust Removal: Use a soft, dry microfiber cloth or a camera lens brush. Gently wipe the exterior and lens housing to remove loose dust.
- Lens Cleaning: For smudges, apply a small amount of lens cleaning solution to a microfiber cloth. Wipe the lens gently in a circular motion from the center outward.
Solving Common Aurora Projector Problems
If your device isn’t working perfectly, a simple fix often exists. Refer to this troubleshooting table for quick solutions to frequent issues.
| Problem | Likely Cause | Solution |
|---|---|---|
| Dim or Faint Projection | High ambient room light; dirty lens. | Use in a darker room. Gently clean the lens as described above. |
| Blurry Image | Projector is out of focus; placed too close/far from wall. | Adjust the focus ring (if present). Reposition the unit 4-8 feet from the surface. |
| Device Won’t Power On | Loose power connection; faulty outlet. | Check all cable connections. Try a different power outlet or USB port. |
| Remote/App Not Connecting | Low battery; Bluetooth/Wi-Fi interference. | Replace remote batteries. Ensure the projector is in pairing mode and close to your phone. |
Maximizing LED Lifespan and Longevity
The LED light source is the heart of your projector. These diodes have a long lifespan but benefit from smart usage habits. Protect your device’s longevity with these practices.
- Avoid Overheating: Ensure at least 4 inches of clearance around the vents. Never cover the projector while it’s operating.
- Use Timers: Leverage the auto-off timer function. This prevents the LEDs from running unnecessarily for extended periods when you fall asleep.
- Power Surge Protection: Plug your projector into a surge protector. This guards the sensitive electronics from voltage spikes that can damage internal components.
Elysian Aurora Projector vs. Competitors: Key Buying Considerations
Choosing the right aurora projector requires comparing key specifications and value. This section breaks down what makes the Elysian series stand out. Use these insights to make an informed purchase decision for your needs.
Critical Specifications Comparison Table
Technical details directly impact your visual experience. Compare these core features across premium models to understand performance differences. Focus on the specs that matter most for your intended use.
| Feature | Elysian Aurora Pro X9 | Galaxy Sky Master 360 | Lumia Borealis Mini |
|---|---|---|---|
| Projection Angle | 180 degrees | 360 degrees | 120 degrees |
| Color Range | 16 million colors | 8 preset scenes | 7 color modes |
| Control Methods | App, Remote, Voice | Remote, Basic App | Remote Only |
| Music Sync | Yes (Advanced) | Yes (Basic) | No |
| Best For | Tech enthusiasts & customization | Full-room immersion | Budget & simplicity |
Identifying the Right Model for Your Needs
Your primary use case should guide your choice. Different models excel in specific environments and scenarios. Match the projector’s strengths to your personal goals.
- For Smart Home Integration: Choose the Elysian Pro X9. Its app and voice control (Google Home/Alexa) allow seamless automation within your existing ecosystem.
- For a Bedroom Sleep Aid: The Galaxy Sky Master 360 is ideal. Its 360-degree dome effect and included white noise create a fully immersive, calming cocoon.
- For a Child’s Room or First-Time User: The Lumia Borealis Mini is perfect. It’s affordable, simple to operate, and safe with its cool-running, low-power LEDs.
Where to Buy and Warranty Insights
Purchase source affects price, support, and authenticity. Authorized retailers provide peace of mind and protect your consumer rights. Always verify the seller before completing your purchase.
Buy directly from the manufacturer’s website or authorized partners like Amazon. Check for a minimum 1-year warranty covering parts and labor. Read the return policy carefully, especially for online purchases.
Be wary of third-party sellers on generic marketplaces. They may offer lower prices but could sell refurbished units as new or provide no valid warranty. Your investment deserves protected.
Expert Tips for Stunning Aurora Borealis Projections
Mastering your device unlocks its full artistic potential. These professional techniques go beyond the manual. Learn how to craft truly breathtaking, gallery-quality light displays in your own home.
Optimizing Your Room’s Environment
The room itself is your canvas. Preparing the space is as important as the projector settings. Small adjustments to your environment make a dramatic difference in visual impact.
- Wall Color & Texture: Smooth, light-colored walls (white, light gray) provide the best reflective surface. They produce brighter, more accurate colors than dark or textured walls.
- Ambient Light Control: Total darkness is ideal. Use blackout curtains and turn off all other lights, including LEDs on electronics, for maximum contrast and saturation.
- Strategic Decor: Place mirrors or glossy objects strategically in the projection path. They can create captivating secondary reflections and multiply the aurora effect.
Crafting Custom Color Palettes and Scenes
Move beyond presets to design your own signature looks. If your model allows custom color input, use these combinations for specific moods. This turns your projector into a personalized ambiance tool.
| Desired Mood | Recommended Color Palette | Motion Speed |
|---|---|---|
| Calm & Serene | Deep Indigo, Soft Purple, Mint Green | Very Slow, Fluid Waves |
| Energizing & Uplifting | Violet, Magenta, Cyan | Medium, Pulsing Rhythm |
| Arctic Authenticity | Emerald Green, Sapphire Blue, Hint of Pink | Slow Drift with Occasional Fast Flares |
Pro-Level Setup for Photography and Video
Your aurora projector can be a powerful tool for content creators. Follow this process to capture stunning photos and videos of the light show without frustrating glare or blur.
- Stabilize Your Camera: Use a tripod. Long exposure shots are necessary in low light, and any hand movement will cause blur.
- Manual Camera Settings: Set a low ISO (200-800), a slow shutter speed (1-4 seconds), and a mid-range aperture (f/5.6-f/8). This captures the light’s movement cleanly.
- Frame Your Shot: Include a human subject or interesting silhouette in the foreground. This adds scale and depth, making the aurora feel vast and immersive.
Safety, Energy Efficiency, and Smart Home Integration
Responsible use ensures your lighting is both spectacular and sensible. Modern projectors are designed with safety and efficiency in mind. Learn how to use them smartly within your connected home.
Important Safety Guidelines for Home Use
While LED projectors are generally safe, following basic precautions is essential. This protects both the device and your household. Always prioritize safety over aesthetics.
- Overheating Prevention: Never block the ventilation ports. Ensure the projector has several inches of clear space on all sides for proper airflow during operation.
- Child and Pet Safety: Keep cords secured and out of walkways. Place the unit on a stable surface where it cannot be easily knocked over.
- Electrical Safety: Use only the manufacturer-provided power adapter. Do not use if the cord or housing is damaged. Unplug the device during extended periods of non-use.
Understanding Power Consumption and Efficiency
Aurora projectors are surprisingly energy-efficient lighting solutions. Their LED technology uses minimal power compared to traditional ambient lights. You can enjoy long sessions without a significant impact on your electricity bill.
Most home aurora projectors consume between 5 to 15 watts of power. For comparison, a standard 60-watt incandescent bulb uses 4-12 times more energy. Using the auto-off timer further maximizes this efficiency.
You can calculate approximate operating cost. If used for 3 hours nightly at an average rate of $0.13 per kWh, a 10-watt projector costs less than $1.50 to run for an entire year.
Connecting to Your Smart Home Ecosystem
High-end models like the Elysian Pro X9 offer full smart home compatibility. This allows for voice control and automated routines. Integration turns your projector from a manual device into an intelligent part of your home.
Connection typically involves adding the device through its dedicated app. Then, you can link it to platforms like Google Home or Amazon Alexa. Once connected, the possibilities expand.
- Voice Commands: “Hey Google, turn on the Northern Lights in the bedroom.” or “Alexa, set the aurora projector to blue.”
- Automated Routines: Create a “Good Night” scene that dims the lights, turns on the projector, and starts white noise simultaneously.
- Geofencing: Set the projector to turn on automatically when your phone arrives home in the evening, welcoming you with a calming scene.
Accessories and Upgrades to Enhance Your Experience
The right accessories can transform and elevate your aurora projection setup. These add-ons solve common limitations and unlock new creative possibilities. Explore products designed to complement your main device perfectly.
Essential Add-ons for Improved Functionality
Some purchases dramatically improve convenience or performance. These are not required but are highly recommended for serious users. They address the most common user requests and pain points.
- Universal Smart Plug: Adds voice/timer control to projectors without built-in smart features. It also provides an extra layer of surge protection for your device.
- Premium Tripod or Mount: Allows for precise, elevated placement not possible on a nightstand. This is crucial for achieving perfect ceiling coverage in rooms with high ceilings.
- Extended Warranty: For premium models, an extended warranty offers peace of mind. It covers repairs beyond the standard period, protecting your investment from unforeseen issues.
Creative Modifications and DIY Hacks
With simple materials, you can customize the light’s shape and diffusion. These creative projects are low-cost and highly effective. They allow you to personalize the visual output to your exact taste.
- Create Custom Gobos: Cut simple shapes (stars, clouds) from black poster board. Attach them in front of the lens to project silhouettes within the aurora.
- Add a Diffuser Filter: Place a thin sheet of frosted acrylic or vellum paper over the lens. This softens the light beams for a more ethereal, dreamlike quality.
- Build a Reflection Tunnel:</str ong> Line a cardboard tube with aluminum foil. Angle it to bounce and channel the light to a specific spot on the wall or ceiling.
Recommended Media for Synced Experiences
Pairing your projector with the right audio or video content creates powerful synergy. Curated playlists and videos are designed to match the rhythm and mood of the lights. This creates a fully coordinated multi-sensory environment.
Search for these specific types of content on streaming platforms to use with your projector’s music sync mode or for standalone ambiance.
- Audio: Long-form ambient music, binaural beats for sleep, or atmospheric synthwave playlists.
- Video: Slow-motion nature footage (forests, oceans) or abstract visualizer videos on YouTube. Mute the video and play your own audio for a custom mix.
- Apps: Use dedicated light control apps (if compatible) that generate colors from your music library in more advanced ways than the built-in microphone.
Conclusion: Transform Your Space with the Elysian Aurora Projector
The Elysian Aurora Projector offers more than just light. It provides a portal to immersive relaxation, dynamic entertainment, and personalized ambiance. This guide has shown you how to unlock its full potential.
The key takeaway is to start simple and experiment. Master placement and basic scenes first. Then, explore advanced features like music sync and smart home routines to create your perfect atmosphere.
Now, it’s your turn to create. Set up your projector, try a custom color palette, and experience the magic. Share your stunning setups and creative discoveries with other enthusiasts online.
Your personal northern lights display awaits. Enjoy the journey into a world of breathtaking, ever-changing color.
Frequently Asked Questions about Aurora Projectors
What is an aurora borealis projector and how does it work?
An aurora projector is a smart lighting device that mimics the Northern Lights. It uses colored LEDs and rotating optical lenses to project dynamic, flowing light patterns. These patterns move across your walls and ceiling, creating an immersive celestial display.
The device combines light, motion, and color theory. Internal mechanisms gently shift colored filters and lenses. This projects ever-changing waves and curtains of light that realistically simulate the natural aurora phenomenon.
How do I get the clearest image from my Elysian projector?
For the clearest image, focus on placement and surface quality. Position the projector 4-8 feet from a smooth, light-colored wall. Ensure the lens is clean and the unit is perfectly level on a stable surface.
Adjust the focus ring (if your model has one) until the edges of the light patterns are sharp. Using the device in a completely dark room will also dramatically increase contrast and clarity, making the colors appear more vivid and defined.
Can I leave my aurora light projector on all night?
While most projectors are designed for extended use, it’s not recommended to leave them on unattended for 8+ hours. The internal components can overheat, potentially shortening the LED lifespan. Always ensure proper ventilation.
Instead, use the built-in timer function. Set it for 30-90 minutes to help you fall asleep. The projector will turn off automatically, conserving energy and ensuring safe operation while you rest peacefully.
What is the best aurora projector for a child’s bedroom?
The best projector for a child’s room prioritizes safety, simplicity, and gentle features. Look for models with cool-running LEDs, a durable casing, and a simple remote. A built-in timer and night light function are major pluses.
Models like the Lumia Borealis Mini are excellent choices. They offer calming, pre-set scenes without complex menus. Avoid units with very bright, strobe-like effects and ensure all cords are kept securely out of reach.
Why is my projector’s image blurry or out of focus?
A blurry image is usually caused by incorrect distance or a dirty lens. If the projector is too close or too far from the wall, the light cannot focus properly. Refer to your manual for the optimal projection distance.
Secondly, gently clean the lens with a microfiber cloth. Dust and fingerprints scatter light. If your model has a manual focus ring, adjust it slowly while watching the wall until the patterns become sharp and clear.
How do I sync my music with the light patterns?
First, ensure your projector has a music sync mode (check for a microphone icon or audio input). Activate this mode using the remote or app. Then, play music from a nearby speaker or connect an audio cable directly to the projector.
The device’s internal microphone or audio processor will detect the sound’s rhythm and volume. The lights will then pulse, change color, or shift speed in real-time to match the beat, creating a synchronized audio-visual experience.
What’s the difference between a basic and a premium aurora projector?
The main differences are control, customization, and smart features. Basic models offer a few preset scenes controlled by a simple remote. Premium models provide millions of colors, custom scene creation, and app/voice control.
Premium projectors like the Elysian Pro X9 also feature wider projection angles, higher-quality lenses, and music sync technology. They integrate with smart home systems, allowing for automation and more sophisticated ambiance creation.
Are these projectors energy-efficient and expensive to run?
Yes, aurora projectors are highly energy-efficient. They use low-power LED technology, typically consuming between 5 to 15 watts. This is significantly less than a standard household light bulb.
Running a 10-watt projector for 3 hours a night costs just pennies per week. Using the auto-off timer further maximizes efficiency. You can enjoy stunning displays without worrying about a noticeable increase on your electricity bill.
This website is a participant in the Amazon Services LLC Associates Program, an affiliate advertising program designed to provide a means for us to earn fees by linking to Amazon.com and affiliated sites.