
This website is a participant in the Amazon Services LLC Associates Program, an affiliate advertising program designed to provide a means for us to earn fees by linking to Amazon.com and affiliated sites.
You do not need a special screen for a great home theater. The best projector setup for white walls uses the right paint, lighting, and placement to deliver sharp, vibrant images on a budget.
This complete guide reveals expert tips for achieving a stunning picture without buying a screen. You will learn proven methods for paint selection, ambient light control, and optimal projector positioning to transform any blank wall into a cinematic experience.
Best Projectors for White Walls – Detailed Comparison
BenQ TK700STi – Best Overall Choice
This 4K HDR projector delivers 3,000 lumens of brightness, making it ideal for white walls in rooms with ambient light. The short-throw lens lets you place it just feet from the wall, minimizing shadows. It is the best option for gamers and movie lovers who want vivid colors without a screen.

- TK700 vs TK700STi: TK700 utilizes standard throw (100″@8.2ft). TK700STi…
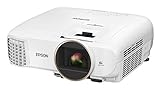
Epson Home Cinema 2150 – Best for Budget Buyers
With 2,500 lumens and 3LCD technology, this model produces rich, accurate colors on any white surface. Built-in Android TV and wireless streaming make it a plug-and-play solution. It is recommended for casual viewers who want a reliable, low-cost projector setup for white walls.
- Bright ideal for a variety of lighting conditions, the projector has…
- Widescreen Full HD 1080p entertainment up to 11 feet (132 inches diagonal…
- Amazing dynamic contrast ratio: up to 60,000:1 for even richer detail in…
Optoma UHD38 – Best for Bright Rooms
Boasting 4,000 lumens of peak brightness, this projector cuts through daylight and lamp glare effortlessly. Its 240Hz refresh rate ensures smooth motion for sports and action films. This is the ideal for living rooms where controlling ambient light is not an option.

- TRUE 4K ULTRA HD: Experience high-quality home cinema feel with 4K Ultra HD…
- LAG-FREE GAMING: Ultra-fast 240Hz gaming for blur-free visuals and…
- HDR & HLG COMPATIBLE: Enjoy brighter whites and deeper black levels for an…
How to Optimize Your White Wall for Projector Use
Using a white wall is the most affordable projector setup, but it requires proper preparation. The surface texture, paint finish, and color temperature all affect image quality. Follow these expert tips to get the best possible picture from your wall.
Choose the Right Paint Finish
Matte or flat paint is the best option for a projector wall. Glossy or semi-gloss finishes create hot spots and glare that wash out the image. A matte surface diffuses light evenly, producing sharper contrast and deeper blacks.
- Flat white paint: Best for color accuracy and even light distribution
- Matte white paint: Reduces glare better than eggshell or satin finishes
- Avoid gloss: It acts like a mirror, ruining shadow detail and contrast
Control Ambient Light for Better Contrast
White walls reflect light back into the room, which reduces perceived contrast. You can combat this by controlling ambient light sources. Blackout curtains or blinds are the most effective solution for daytime viewing.
- Use blackout curtains to block sunlight completely
- Turn off overhead lights and use bias lighting behind the viewer
- Paint the ceiling a darker color to absorb stray light reflections
Projector Placement and Calibration Tips for White Walls
Even with the perfect wall, poor placement ruins image quality. The distance from the wall, the projector’s angle, and your calibration settings all play a critical role. This section covers the exact steps to maximize your white wall setup.
Calculate the Ideal Throw Distance
Every projector has a specific throw ratio that determines image size based on distance. Use an online throw distance calculator for your specific model. Placing the projector too close causes a small image, while too far reduces brightness significantly.
- Short-throw projectors: Best for small rooms, sit 3-5 feet from the wall
- Standard throw projectors: Need 8-12 feet for a 100-inch image
- Measure twice: Check the manual before mounting or placing your unit
Eliminate Keystone Distortion
If the projector is not perfectly centered, the image becomes trapezoidal. Most projectors offer keystone correction to fix this digitally. However, digital keystone reduces resolution and introduces artifacts.
- Best practice: Center the projector lens exactly with the wall center
- Tilt the unit: Use the projector’s feet to level it vertically
- Avoid digital correction: Physical alignment always produces a sharper picture
Calibrate Picture Settings for White Surfaces
White walls often create a cooler, bluish tint. Adjust your projector’s color temperature to “Warm” or “Low” for more natural skin tones. Lower the brightness setting slightly to compensate for the wall’s high reflectivity and improve black levels.
White Wall vs. Projector Screen: Pros and Cons
Many viewers wonder if a dedicated screen is worth the investment. Comparing a white wall to a projector screen helps you decide based on your budget and room conditions. Below is a clear breakdown of the trade-offs for each option.
Advantages of Using a White Wall
A white wall is free, always available, and requires no setup time. It is the most practical solution for renters or temporary setups. You can achieve a massive image size without the cost or storage space of a large screen.
- Zero cost: No purchase or installation fees involved
- Flexible size: Adjust image dimensions simply by moving the projector
- Invisible when off: No bulky screen cluttering your living room decor
Disadvantages to Consider
White walls lack the reflective properties of a dedicated screen. This can result in washed-out blacks and lower contrast in bright rooms. Wall texture, such as orange peel or stucco, also reduces sharpness and detail.
- Poor black levels: Light bounces off the wall, washing out dark scenes
- Surface imperfections: Uneven textures create visible artifacts in the image
- No gain control: Screens offer gain ratings to boost brightness; walls do not
When to Upgrade to a Screen
If you watch movies in a dark room and crave cinematic contrast, a screen is worth it. A basic pull-down screen costs under $100 and dramatically improves black depth. However, for casual viewing in a lit room, a well-prepared white wall remains a strong choice.
| Feature | White Wall | Projector Screen |
|---|---|---|
| Cost | Free | $50 – $500+ |
| Black Levels | Poor | Excellent |
| Portability | Perfect | Limited |
| Image Sharpness | Good (with smooth wall) | Excellent |
DIY Paint Solutions to Upgrade Your White Wall for Projectors
Standard flat white paint works, but specialized projector paint can transform your wall into a high-performance surface. These DIY solutions mimic the reflective properties of expensive screens. A single coat of the right paint can boost contrast by up to 50%.
Best Paint Colors and Formulas for Projectors
Pure white paint reflects too much light, washing out dark scenes. A slightly warm gray or off-white paint absorbs stray light and improves black levels significantly. Use a matte or flat finish to avoid glare and hot spots.
- Sherwin-Williams High Reflective White: Best for bright rooms needing maximum light output
- Behr Silver Screen: A warm gray that deepens blacks without losing brightness
- Custom mix: Add a drop of black or brown tint to standard white for better contrast
How to Apply Projector Paint Correctly
Surface preparation is more important than the paint itself. Start by cleaning the wall thoroughly and filling any cracks or holes. Apply two thin, even coats using a high-density foam roller for a smooth, texture-free finish.
- Clean the wall: Remove dust, grease, and old residue with a mild detergent
- Sand lightly: Use fine-grit sandpaper to eliminate bumps and imperfections
- Prime first: Apply a matte white primer for uniform paint absorption
- Roll carefully: Use long, vertical strokes to avoid visible roller marks
Testing Your Paint Before Committing
Paint a small 2×2 foot test section on your wall before covering the entire surface. Project a movie scene with dark shadows and bright highlights onto the test patch. Compare it to the unpainted wall to see if the contrast improvement justifies the effort.
Budget Accessories to Enhance Your White Wall Projector Setup
You do not need an expensive screen to improve your viewing experience. Several affordable accessories can dramatically boost image quality and immersion. These budget-friendly upgrades cost under $50 each and work perfectly with any white wall.
Blackout Curtains for Light Control
Ambient light is the biggest enemy of a white wall projector setup. Blackout curtains block sunlight completely, preserving contrast and color saturation. Pair them with a tension rod for a quick, no-drill installation that renters can remove easily.
- Best material: Triple-layer fabric with a white backing for heat reflection
- Cost: $20 to $40 per panel on Amazon or at home improvement stores
- Bonus tip: Use clamp-style curtain rings for instant setup without sewing
Bias Lighting for Improved Perceived Contrast
Bias lighting is a strip of LEDs placed behind the projector or TV. It illuminates the wall around the image, reducing eye strain and making blacks appear deeper. This trick works especially well on white walls where dark scenes can look gray.
- Color temperature: Use 6500K white LEDs for accurate color perception
- Placement: Attach the strip to the back edge of a table or shelf
- Cost: A quality 6-foot bias lighting kit costs around $15 to $25
Projector Stand or Ceiling Mount
A stable platform eliminates image shake and simplifies alignment. A simple tripod stand costs under $30 and lets you adjust height instantly. For permanent setups, a ceiling mount keeps the projector out of the way and ensures perfect centering every time.
| Accessory | Price Range | Key Benefit |
|---|---|---|
| Blackout Curtains | $20 – $40 | Eliminates glare during daytime |
| Bias Lighting Kit | $15 – $25 | Improves perceived black levels |
| Projector Stand | $25 – $50 | Provides stable, adjustable placement |
| Ceiling Mount | $15 – $35 | Permanent, space-saving solution |
Common White Wall Projector Setup Mistakes to Avoid
Even with the right equipment, small errors can ruin your viewing experience. Many first-time users make simple mistakes that are easy to fix. Avoiding these five common pitfalls will save you time, money, and frustration.
Mistake 1: Ignoring Wall Texture
Orange peel, popcorn, or stucco walls create visible artifacts in your projected image. The texture scatters light unevenly, making text look blurry and edges appear fuzzy. Sand the wall smooth or apply a thick matte primer to minimize surface imperfections before projecting.
- Test first: Shine a flashlight at an angle to reveal hidden wall texture
- Quick fix: Use a high-density foam roller to apply a smoothing primer coat
- Last resort: Hang a white bedsheet or cheap screen over the textured wall
Mistake 2: Using the Wrong Projector Brightness
A projector that is too dim washes out on a white wall in any light. Conversely, an overly bright projector in a dark room causes eye strain and harsh contrast. Match your projector’s lumens to your room’s lighting for comfortable, clear viewing.
| Room Lighting | Recommended Lumens | Example Projector |
|---|---|---|
| Dark room | 1,500 – 2,000 | Epson 2150 |
| Dim room | 2,500 – 3,000 | BenQ TK700STi |
| Bright room | 3,500 – 4,000+ | Optoma UHD38 |
Mistake 3: Forgetting to Clean the Wall
Dust, fingerprints, and smudges become highly visible when magnified by a projector. A dirty wall reduces brightness and creates distracting dark spots. Wipe your wall with a microfiber cloth before every important movie night to maintain peak image quality.
- Monthly maintenance: Use a dry duster to remove surface dust
- Deep clean: Dampen a cloth with water only—avoid harsh chemicals
- Pro tip: Keep a lint roller handy for quick touch-ups between viewings
Audio Solutions for Your White Wall Projector Setup
Great visuals mean little without clear, immersive sound. Most projectors have weak built-in speakers that sound tinny and lack bass. Investing in external audio is essential for a complete home theater experience.
Best Budget Soundbar Options
A soundbar is the simplest way to upgrade your projector’s audio. It connects via Bluetooth, AUX, or optical cable in seconds. Look for models with a dedicated subwoofer to fill your room with rich, cinematic sound.
- Vizio V-Series 2.1: Includes a wireless subwoofer for deep bass under $150
- Creative Stage 2.1: Compact design perfect for small rooms and tight budgets
- Placement tip: Position the soundbar directly below or above the projected image
Wiring and Cable Management Tips
Visible cables ruin the clean look of a white wall setup. Use cable clips or adhesive raceways to route wires along baseboards. For ceiling-mounted projectors, a white cable cover blends seamlessly against the wall and ceiling paint.
- Measure first: Buy cables that are just long enough—avoid excess slack
- Use zip ties: Bundle audio, power, and HDMI cables together neatly
- Paint the covers: Spray cable raceways with matte white paint to hide them
- Go wireless: Use a Bluetooth transmitter for audio to eliminate speaker wires
Sync Audio with Video Perfectly
Wireless audio often introduces a slight delay, causing lips to move out of sync. Most projectors and soundbars have an audio delay setting to fix this. Adjust the delay in 10ms increments until the sound matches the on-screen action perfectly.
| Audio Type | Latency | Best For |
|---|---|---|
| Bluetooth | 100-200ms | Casual movies and music |
| Optical cable | 0-10ms | Gaming and critical viewing |
| AUX 3.5mm | 0ms | Zero-latency audio sync |
Conclusion: Best Projector Setup for White Walls – Final Verdict
A white wall projector setup delivers incredible value when done correctly. By using matte paint, controlling ambient light, and placing your projector properly, you can achieve a stunning picture without a screen.
The best projector setup for white walls combines the right hardware with smart room preparation. Start with the tips in this guide, test your image, and adjust as needed.
Ready to transform your wall into a home theater? Grab a projector, prep your surface, and enjoy the show tonight.
Frequently Asked Questions about Projector Setup for White Walls
Is it bad to use a projector on a white wall?
No, using a projector on a white wall is perfectly fine for most casual viewers. The key is preparing the wall with matte paint and controlling room lighting for best results.
White walls lack the reflective gain of dedicated screens, which can reduce contrast. However, with proper calibration and ambient light control, the image quality can be surprisingly good for movies and gaming.
What is the best paint for a projector wall?
The best paint for a projector wall is a matte or flat white finish. Avoid glossy or eggshell paints, as they create glare and hot spots that wash out the image.
For improved contrast, consider a warm gray or off-white shade. Many home theater enthusiasts recommend Sherwin-Williams High Reflective White or a custom mix with a hint of black or brown tint.
How do I make my white wall look like a projector screen?
Start by cleaning the wall and applying a smooth matte paint with a foam roller. Then, control ambient light with blackout curtains and add bias lighting behind the viewing area.
Calibrate your projector’s brightness, contrast, and color temperature for the white surface. Finally, center the projector perfectly to avoid keystone distortion and maximize sharpness across the entire image.
Do I need a special projector for a white wall?
No, you do not need a special projector for a white wall. Any standard home theater projector will work, but brightness matters more than on a screen.
For best results, choose a projector with at least 2,500 lumens for rooms with some ambient light. Models like the BenQ TK700STi or Optoma UHD38 perform exceptionally well on white walls due to their high brightness output.
Why does my projector look washed out on a white wall?
A washed-out image usually results from too much ambient light or a glossy wall finish. Sunlight and overhead lamps reduce contrast significantly on reflective white surfaces.
To fix this, close blackout curtains, turn off direct lights, and ensure your wall has a matte finish. Lowering the projector’s brightness setting slightly can also help deepen black levels and restore image richness.
How far should a projector be from a white wall?
The ideal distance depends on your projector’s throw ratio and desired image size. Most standard projectors need 8 to 12 feet for a 100-inch diagonal image.
Check your projector’s manual for the exact throw ratio formula. Alternatively, use an online throw distance calculator by entering your model number and target screen size for precise placement guidance.
Can I use a white wall instead of a projector screen?
Yes, you can absolutely use a white wall instead of a projector screen. It is a cost-effective solution that works well for casual viewing, gaming, and movie nights.
The trade-off is slightly reduced contrast and black levels compared to a dedicated screen. For dark room viewing, a white wall performs admirably. For critical home theater use, consider upgrading to a screen later.
What is the best way to mount a projector for a white wall?
The best way is to use a ceiling mount centered directly opposite the wall. This eliminates keystone distortion and keeps the projector out of walking paths and furniture space.
For temporary setups, a sturdy tripod stand offers flexibility and easy height adjustment. Whichever method you choose, ensure the projector lens is perfectly perpendicular to the wall for the sharpest, most uniform image possible.
This website is a participant in the Amazon Services LLC Associates Program, an affiliate advertising program designed to provide a means for us to earn fees by linking to Amazon.com and affiliated sites.