
This website is a participant in the Amazon Services LLC Associates Program, an affiliate advertising program designed to provide a means for us to earn fees by linking to Amazon.com and affiliated sites.
An overhead projector stand for sewing holds a projector above your cutting table, allowing you to display digital sewing patterns directly onto fabric for accurate cutting and marking. This setup, commonly called projector sewing, eliminates the need to print, assemble, and tape together multiple pattern pages.
Choosing the right stand is essential because even slight projector movement or an incorrect mounting angle can distort pattern measurements. Whether you have a dedicated sewing room, a small crafting space, or a temporary sewing station, the right mounting solution can make your workflow considerably easier.
There are several options to consider, including adjustable floor stands, photography light stands with boom arms, and ceiling-mounted projector brackets. Each offers different advantages depending on your ceiling height, cutting table dimensions, projector weight, and whether you need a permanent or portable arrangement.
In this guide, we explore suitable overhead projector stands for sewing, important features to consider, and practical setup tips for projecting sewing patterns accurately.
Best for Projector Sewing and Fabric Pattern Projection
The best overhead projector stand for sewing should provide a stable mounting position, sufficient height, and precise angle adjustments. Here are three options worth considering for different sewing-room arrangements.
NEEWER Aluminum Light Stand with Built-In Boom Arm
Best portable option

- 【9.8ft Air Cushioned Light Stand】 With upgraded air cushion design, sturdy metal build, the 9.8ft height adjustable light stand provides exceptionally stable…
- 【5.1ft Extendable Boom Arm】 The stand comes with a 35″/89cm to 61″/155cm extendable boom arm. Connect the arm to the stand via the middle joint, then freely…
This photography light stand reaches approximately 9.7 feet (3 metres) in its vertical configuration and includes a boom arm. Its maximum load capacity is 6.6 pounds (3 kg). B&H Photo Video
Why I picked it ?
Its adjustable boom arm offers flexible positioning above sewing tables, making it suitable for portable projector setups, provided you use a compatible mounting adapter and secure the counterweight.
VIVO Adjustable Projector Ceiling and Wall Mount MOUNT-VP06B
Best permanent installation
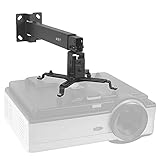
- Solid Steel Construction makes this universal ceiling and wall projector mount able to support up to 44 pounds. Enjoy optimal viewing angles with peace of mind…
- Universal Mounting Design enables this bracket to fit the majority of projector brands on the market with mounting hole distance ranging from 8.9” to 12.4”.
This steel projector mount supports projectors weighing up to 44 pounds and provides adjustable extension, tilt, and swivel. It can be installed on a suitable ceiling or wall. desk solutions, screen mounting, and more
Why I picked it ?
Its sturdy steel construction and adjustable positioning make it a practical choice for dedicated sewing rooms where maintaining consistent projector alignment helps preserve accurate digital sewing pattern measurements.
VIVO Tall Extending Projector Ceiling Mount MOUNT-VP03W
Best for higher mounting positions

- Universal Extending Projector Ceiling Mount: Built for universal mounting, this product fits the majority of projectors on the market and is an excellent addition to…
- Compatibility: This projector mount is not compatible with the following projector models: Epson LS1100, 3010, 3200, 3700, 3800, 8350, 8500UB, 4010, Mitsubishi…
This extending ceiling mount offers an adjustable mounting distance of approximately 33.5–58 inches and supports projectors weighing up to 29.7 pounds. It also features tilt, swivel, and rotation adjustments. desk solutions, screen mounting, and more
Why I picked it ?
Its extended mounting pole provides additional positioning flexibility for sewing spaces with higher ceilings, helping users position compatible projectors above larger cutting tables without sacrificing mounting stability.
Related Products for a Complete Sewing Projector Setup
Consider adding these accessories:
- Large self-healing cutting mat: Protects your work surface when cutting fabric with rotary cutters.
- 45mm rotary cutter: Helps cut fabric accurately along projected pattern outlines.
- Sewing pattern weights: Keep fabric from shifting while cutting.
- Digital measuring tape: Helps verify projected pattern dimensions.
- HDMI cable: Provides a reliable connection between your projector and laptop.
- Spirit level: Helps ensure the projector is parallel to the cutting surface.
Important buying consideration: These products are different types of mounting solutions, not interchangeable stands. Check projector weight, mounting-hole compatibility, available height, and whether the projector manufacturer permits downward-facing installation before purchasing.
How an Overhead Projector Stand Works for Sewing
An overhead projector stand for sewing positions a projector above a flat cutting surface so that digital sewing patterns appear directly on fabric. Instead of printing traditional paper patterns, sewing enthusiasts can use projector technology to display pattern pieces at their actual dimensions.
The stand keeps the projector securely positioned while directing its image downward onto the cutting table. This arrangement allows you to trace pattern outlines, identify notches, locate markings, and cut fabric without assembling multiple printed pages.
How the Setup Works
A typical projector sewing arrangement consists of four main components:
- Projector: Displays digital sewing patterns from a laptop, tablet, or compatible device.
- Projector stand: Holds the projector at the required height and angle.
- Cutting table: Provides a flat surface for laying out fabric.
- Pattern software: Displays digital patterns, often in PDF format, at the correct scale.
Once everything is connected, you open your sewing pattern on the computer and adjust the projector position until the pattern fits your cutting area.
Why the Stand Matters
The projector stand plays an important role in maintaining image stability and pattern accuracy. A poorly secured projector can shift during cutting, causing projected pattern lines to move away from their intended positions.
An adjustable stand also makes it easier to accommodate different cutting table sizes and projector models. Some sewing enthusiasts prefer photography stands with boom arms because they offer flexibility, while others choose ceiling-mounted brackets for permanent installations.
However, the projector must remain correctly aligned with the cutting surface. Always verify the displayed measurement using a calibration square before cutting fabric.
With the right overhead projector stand, digital pattern projection can make sewing preparation faster, reduce paper waste, and simplify working with complex sewing patterns.
Best Types of Overhead Projector Stands for Sewing
Choosing the right overhead projector stand for sewing depends on your available space, projector model, cutting table size, and whether you want a permanent or portable installation. Several mounting options can help you achieve a stable projection surface.
Ceiling-Mounted Projector Stand
A ceiling-mounted projector stand is ideal for a dedicated sewing room. It keeps the projector securely above the cutting table, saves floor space, and provides a consistent projection position.

- Versatile Application: PUTORSEN projector ceiling mount is compatible with most manual or spectrum projector screens, Also can be used to hold a video camera…
- Height Adjustable: The arm extends 14.17″- 21.65″ from the ceiling to allow ideal placement for customized viewing
Once installed and calibrated, you generally won’t need to reposition the projector between sewing projects.
Adjustable Floor Stand With a Boom Arm
An adjustable floor stand offers flexibility for sewists who cannot drill holes into their ceilings. Its extended arm can position a lightweight projector above the cutting surface.

- Tripod Mic Stand with Adjustable Height & Telescoping Boom.
- Designed to Hold Your Preferred Shure Mic for a Wide Variety of Applications.
Look for a sturdy base, adjustable height, secure locking mechanisms, and a compatible projector attachment. Adding suitable counterweights can also reduce the risk of tipping.
Wall-Mounted Projector Arm
A wall-mounted projector arm provides another practical solution for small sewing rooms. It attaches to a suitable wall structure and extends over the cutting table.

- Versatile Compatibility:Designed to hold a manual phoropter and a chart projector.
- Easy Installation:Despite not coming with a manual, installation is straightforward.
This option saves floor space while allowing some positioning adjustments.
DIY Wooden Projector Stand
A DIY wooden frame can be customized to match your cutting table dimensions and projector height. However, it must be properly braced and designed to support the projector’s weight safely.

- No-Drill Fit: Hang it over a headboard or sofa back as a no-drill projector stand wall mount. The clamp-style base helps renters, dorm rooms, and apartments create a…
- Bedside Viewing: Use it as a projector holder next to the bed or couch. Adjustable support helps aim a mini projector for relaxed viewing, while the raised tray…
Choosing between these options: Ceiling mounts are generally best for permanent installations, while boom stands suit temporary sewing stations. Wall arms and DIY frames offer alternatives when space or installation requirements make other options impractical.
Important Features to Look for When Buying an Overhead Projector Stand for Sewing
Selecting the right overhead projector stand for sewing involves more than finding a structure that can hold your projector. You need a mounting solution that provides stability, adequate height, flexible positioning, and reliable alignment for accurate sewing pattern projection.
Here are the most important features to consider.
Adjustable Height
Height determines how much of your cutting table the projector can cover. Choose a stand that extends high enough to display your desired pattern area without requiring an excessively wide projection distance.
Weight Capacity
Check the stand’s maximum supported weight before purchasing. Your projector, mounting adapter, and any additional accessories should remain comfortably within the manufacturer’s stated load limit.
Stability and Construction
A stable stand prevents unwanted movement while you work. Look for sturdy metal construction, reinforced joints, locking mechanisms, and a wide base if you’re choosing a freestanding model.
Adjustable Angle and Rotation
An adjustable mounting head makes it easier to position the projector directly above your cutting surface. Tilt and rotation adjustments are particularly useful when correcting alignment.
Compatibility With Your Projector
Not every projector uses the same mounting system. Check whether the stand supports your projector’s mounting holes, screw size, weight, and orientation requirements.
Easy Installation and Cable Management
Choose a stand that is straightforward to install and adjust. Cable clips, extension brackets, and secure cable routing help prevent wires from interfering with your sewing activities.
Correct Projector Height and Throw Distance
The projector’s throw ratio determines how far it needs to sit from the cutting surface to produce your desired image size. Measure the distance between the projector lens and cutting table before selecting a stand.
For example, a projector with a 1.2:1 throw ratio needs approximately 1.2 metres of throw distance to produce a one-metre-wide image. Pattern Tiler+1
Pro tip: Prioritize stability and correct alignment over decorative features. A properly secured stand makes it easier to maintain consistent pattern dimensions and avoid repeated calibration.
How to Set Up an Overhead Projector Stand for Sewing
Setting up an overhead projector stand for sewing requires careful positioning to ensure digital sewing patterns appear at their correct dimensions. Whether you’re using a ceiling mount, adjustable floor stand, or DIY wooden frame, proper installation helps prevent image distortion and unwanted movement.
Follow these steps to create a functional projector sewing station.
Step 1: Choose the Right Location
Start by selecting a flat, stable cutting table with enough room for your fabric and sewing materials. Ensure the surrounding area provides sufficient space for the projector stand without obstructing your movement.
Step 2: Install the Projector Stand
Secure your chosen stand according to the manufacturer’s instructions. If you’re installing a ceiling or wall mount, attach it to an appropriate structural support rather than relying on unsupported drywall.
For freestanding stands, extend the legs fully and lock all adjustment points.
Step 3: Attach the Projector
Mount your projector using a compatible bracket or adapter. Check that all screws are properly tightened and that the projector is securely supported.
Step 4: Connect Your Computer
Connect your laptop to the projector using HDMI, USB-C, or another supported connection. Open your digital sewing pattern using compatible PDF or pattern-viewing software.
Step 5: Adjust the Projection
Position the projector so that its image covers the desired cutting area. Adjust the height, focus, and alignment until the pattern appears clear and rectangular.
Step 6: Calibrate the Pattern
Display a calibration square with a known measurement, such as 10 cm by 10 cm. Measure the projected square using a ruler and adjust the software scaling until both dimensions match.
Step 7: Test Before Cutting
Place inexpensive fabric or paper beneath the projection and check the pattern outlines, notches, and measurements. Once everything matches, you can begin cutting your actual fabric.
Important: Recheck calibration whenever you change the projector position, zoom, resolution, or software scaling. This helps maintain accurate sewing measurements.
Common Problems With Overhead Projector Stands for Sewing and How to Fix Them
Although an overhead projector stand for sewing can make digital pattern cutting easier, incorrect installation or positioning can create problems. Understanding common issues and their solutions helps maintain projection accuracy and keeps your sewing workspace safe.
Projector Stand Wobbles or Moves
A loose stand can cause projected sewing patterns to shift while you’re working. This problem commonly occurs with lightweight photography stands, loose adjustment knobs, or uneven flooring.
How to fix it:
- Tighten all locking knobs and mounting screws.
- Position the stand on a level surface.
- Use appropriate counterweights when recommended.
- Avoid extending the boom arm beyond its safe operating range.
Projected Sewing Patterns Look Distorted
A distorted image can make pattern pieces appear stretched, slanted, or uneven. This usually happens when the projector is not positioned correctly above the cutting table.
How to fix it:
Adjust the projector until its lens is perpendicular to the cutting surface. Use available keystone correction carefully, but avoid relying on excessive digital correction because it can affect image quality.
Projected Patterns Are Too Small
Sometimes the projector cannot cover the entire cutting area because it is positioned too close to the table.
How to fix it:
Check the projector’s throw ratio and increase its mounting distance when necessary. Alternatively, consider a short-throw projector designed for larger images at shorter distances.
Projector Keeps Losing Focus
A projector that moves slightly or vibrates can produce blurry pattern outlines. Dust on the lens or incorrect focusing can also reduce image clarity.
How to fix it:
- Clean the projector lens using an appropriate microfiber cloth.
- Adjust the focus ring or electronic focus setting.
- Tighten the projector mounting connection.
- Check that the stand is not vibrating.
Cables Get in the Way
Loose HDMI and power cables can interfere with your sewing activities or accidentally pull the projector out of alignment.
How to fix it:
Use cable clips, ties, or cable sleeves to organize wires along the stand or wall. Keep cables away from cutting tools, moving equipment, and walking areas.
Projector Stand Cannot Reach the Required Height
Some stands are too short to provide the necessary projection size over a large cutting table.
How to fix it:
Measure your required projection distance before buying a replacement. Consider an adjustable ceiling mount, extension pole, or appropriately rated boom stand.
Final tip: Always inspect your projector stand before each sewing session. Check its mounting points, locking mechanisms, and stability to prevent accidents and maintain consistent pattern alignment.
Conclusion
An overhead projector stand for sewing can transform your sewing workspace by making digital pattern projection easier, faster, and more convenient. Whether you choose a ceiling-mounted bracket, adjustable photography stand, wall-mounted arm, or DIY wooden frame, the most important considerations are stability, mounting compatibility, adjustable height, and correct projector alignment.
Before purchasing, measure your cutting table, check your projector’s throw distance, and verify the stand’s weight capacity. Remember to calibrate your projected sewing patterns before cutting fabric to avoid sizing mistakes.
With the right mounting arrangement, you can reduce paper pattern preparation, minimize waste, and enjoy a more organized sewing experience. Invest in a reliable stand that suits your workspace and sewing needs.
Frequently Asked Questions About Overhead Projector Stands for Sewing
What is the best overhead projector stand for sewing?
The best overhead projector stand depends on your sewing space and projector model. A ceiling-mounted projector bracket is suitable for permanent sewing rooms, while an adjustable photography stand with a boom arm offers flexibility for temporary setups. Choose a model with sufficient height, stability, and weight capacity.
Can I use a regular projector stand for sewing?
Yes. Regular projector stands can work for sewing if they position the projector securely above your cutting table. However, check whether the mounting arrangement supports downward-facing projection and provides the necessary height and throw distance.
How high should a projector be mounted above a sewing table?
There is no universal mounting height because projectors have different throw ratios and lens specifications. Measure your cutting table and calculate the distance required to produce your desired projection size. Always check the manufacturer’s specifications.
Can I use a photography light stand for projector sewing?
Yes. A sturdy photography light stand with a compatible boom arm can support some lightweight projectors. However, verify the maximum load capacity, mounting compatibility, counterweight requirements, and stability before installation.
Do I need a special projector for sewing patterns?
You do not necessarily need a specialized sewing projector. Many standard digital projectors can display PDF sewing patterns. However, choose one with suitable resolution, brightness, throw ratio, and focusing capabilities for your workspace.
How do I make sure projected sewing patterns are accurate?
Display a calibration square with known dimensions, such as 10 cm by 10 cm, and measure its projected size. Adjust the software scaling until the measurements match. Recalibrate whenever you change the projector position or image settings.
Is a ceiling-mounted projector stand better than a floor stand?
A ceiling-mounted stand is generally better for permanent sewing stations because it saves floor space and maintains a consistent projector position. Floor stands are more suitable for portable arrangements, rented spaces, or sewists who frequently rearrange their workspaces.
Can I make a DIY overhead projector stand?
Yes. You can build a custom wooden or metal frame to position your projector above your cutting table. Ensure the structure is properly reinforced, securely anchored, and designed to support the projector’s weight without wobbling.
This website is a participant in the Amazon Services LLC Associates Program, an affiliate advertising program designed to provide a means for us to earn fees by linking to Amazon.com and affiliated sites.