This website is a participant in the Amazon Services LLC Associates Program, an affiliate advertising program designed to provide a means for us to earn fees by linking to Amazon.com and affiliated sites.
Yes, you can create a 3D image using two standard projectors, but it requires proper alignment, special filters, and compatible content to work effectively.
3D projection might seem like something reserved for cinemas, but with the right setup, you can replicate a similar experience at home or in a classroom. The concept relies on projecting two slightly different images—one for each eye—just like how human vision naturally perceives depth.
However, using two standard projectors is not as simple as pointing them at a wall. You need precise calibration, proper color filtering (like anaglyph or polarized systems), and synchronized video playback. Without these, the result may look blurry or completely flat.
Best for Creating 3D Projection at Home
Here are three top projector options that work well for DIY 3D setups:
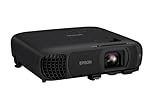
Epson Home Cinema 1080
A reliable projector with strong brightness and color accuracy. It works well for dual-projector setups because it maintains consistent image quality across both units.
- Outstanding Image Size — Up to 300”—4x the size of a 75” flat panel…
- Amazing Brightness — 4,100 lumens of color brightness (IDMS rated) and…
- Exceptional Image Quality — Advanced 3-Chip 3LCD technology displays…
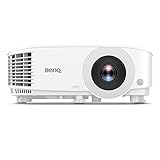
BenQ TH585
This projector offers low input lag and sharp resolution, making it ideal for synchronized playback. Its brightness helps compensate for light loss from 3D filters.
- NEW 2023 MODEL: Upgraded 3800 ANSI Lumens paired with an improved…
- 1080P RESOLUTION: 1080p Full HD image quality with 3800 ANSI lumen for…
- LOW LATENCY: 16ms (1080p@60Hz) low input lag and microsecond DMD fast…
Optoma HD146X
Known for high contrast and vivid visuals. It performs well in darker environments, which is essential for improving 3D depth perception.

- CINEMATIC PICTURE QUALITY: Enjoy crisp, high-definition images with a…
- PERFECT IMAGE ALIGNMENT: With the latest technology from Texas Instruments…
- FAST RESPONSE TIME: Enhanced Gaming Mode enables lightning-fast response…
Related Products:
- Passive 3D polarized glasses
- Red-cyan anaglyph glasses
- Dual HDMI splitter or sync software
How 3D Projection Works with Two Projectors
3D projection using two standard projectors works by mimicking how human eyes perceive depth. Each eye sees a slightly different image, and the brain combines them to create a three-dimensional effect.
In a dual-projector setup, one projector displays the “left-eye” image, while the other displays the “right-eye” image. These images are layered on the same screen but filtered so each eye only sees its intended image.
There are two common methods used:
- Anaglyph 3D (Red/Cyan):
- Uses colored filters
- Affordable and easy to set up
- Lower image quality
- Polarized 3D:
- Uses polarized lenses and filters
- Better image quality
- Requires a special projection screen
For the system to work correctly, both projectors must:
- Display perfectly aligned images
- Be synchronized frame-by-frame
- Maintain identical brightness and color settings
Even slight misalignment can ruin the 3D illusion. This is why mounting and calibration are critical steps in the process.
Additionally, your content must be in a 3D-compatible format, such as side-by-side or over-under video. Standard videos won’t produce a 3D effect without conversion.
Step-by-Step Setup Guide for Dual Projector 3D
Setting up a 3D system with two standard projectors requires careful positioning, the right accessories, and precise calibration. Follow these steps to achieve a clear 3D effect.
Position the Projectors
Start by placing both projectors side-by-side or stacked vertically.
- Ensure both lenses are aligned with the center of the screen
- Use a stable mount to prevent movement
- Keep the projection distance identical for both units
Proper positioning ensures the images overlap perfectly.
Align the Images
Turn on both projectors and display the same test image.
- Adjust keystone and zoom settings
- Fine-tune lens shift (if available)
- Overlap images until they appear as one
Even a slight offset can cause ghosting or double images.
Add 3D Filters
Choose your 3D method and install filters accordingly:
- Anaglyph setup:
- Attach red filter to one projector
- Attach cyan filter to the other
- Polarized setup:
- Use matching polarizing filters
- Pair with a compatible projection screen
Filters ensure each eye sees the correct image.
Synchronize Video Output
Both projectors must display separate video streams simultaneously.
- Use a dual-output PC or media server
- Play side-by-side or dual-stream 3D content
- Assign each projector to left/right eye content
Test with 3D Glasses
Put on your 3D glasses and observe the image.
- Adjust brightness and contrast
- Re-align if depth looks incorrect
- Test with different clips for accuracy
Common Problems and How to Fix Them in Dual Projector 3D Setup
Even with the right equipment, dual-projector 3D setups can run into issues. Most problems come down to alignment, synchronization, or light filtering. The good news is that they’re usually fixable with a few adjustments.
Blurry or Double Images (Ghosting)
This happens when the two projections are not perfectly aligned.
Fix:
- Re-adjust lens alignment and focus on both projectors
- Use grid test patterns to fine-tune overlap
- Ensure both projectors are at the same angle and height
Precise alignment is critical for a clean 3D effect.
Weak or Flat 3D Effect
If the image looks flat, the depth illusion is not working properly.
Fix:
- Confirm you are using true 3D content (side-by-side or dual-stream)
- Check that each projector is displaying the correct eye’s image
- Use proper 3D glasses that match your filter type
Depth depends on correct image separation and viewing.
Dim Image Brightness
Filters (especially polarized or anaglyph) reduce brightness significantly.
Fix:
- Increase projector brightness settings
- Use a darker room environment
- Choose high-lumen projectors for better results
Lighting conditions play a big role in 3D clarity.
Color Distortion (Especially with Anaglyph)
Anaglyph 3D often causes unnatural colors due to red/cyan filtering.
Fix:
- Adjust color balance and contrast settings
- Use software optimized for anaglyph playback
- Consider switching to polarized 3D for better color accuracy
Sync Issues Between Projectors
If frames are not synchronized, the image may flicker or feel uncomfortable.
Fix:
- Use a single computer with dual outputs
- Avoid using separate media players
- Use software that supports synchronized playback
Best Practices to Improve 3D Projection Quality
Achieving a high-quality 3D image with two standard projectors goes beyond basic setup. Small optimizations can dramatically improve depth, clarity, and viewer comfort.
Use Identical Projectors
Consistency is key in dual projection.
- Choose the same model for both units
- Match brightness (lumens), resolution, and color profiles
- Avoid mixing different brands or technologies
This ensures both images blend seamlessly into one.
Optimize Your Screen Surface
Your projection surface directly affects image quality.
- Use a matte white screen for anaglyph setups
- Use a silver or polarized screen for polarized 3D
- Avoid textured or reflective walls
A proper screen preserves brightness and polarization.
Control Ambient Lighting
Lighting can weaken the 3D illusion.
- Use the setup in a dark or dim room
- Block external light sources like windows
- Avoid overhead lights hitting the screen
Lower light improves contrast and perceived depth.
Calibrate Color and Brightness
Each projector must output nearly identical visuals.
- Adjust brightness, contrast, and gamma settings
- Use calibration tools or test patterns
- Match white balance across both devices
Balanced visuals reduce eye strain and improve immersion.
Use High-Quality 3D Content
Not all 3D videos are created equal.
- Choose high-resolution (1080p or higher) 3D files
- Use formats like side-by-side or frame-packed
- Avoid low-quality conversions
Better source content leads to sharper, more convincing depth.
Fine-Tune Viewer Positioning
Where you sit matters in 3D viewing.
- Sit centered to the screen for best results
- Maintain a comfortable viewing distance
- Ensure glasses are worn correctly
Conclusion
Creating a 3D image with two standard projectors is absolutely possible, but it requires precision, the right equipment, and careful calibration. By aligning both projectors correctly, using proper filters, and ensuring synchronized playback, you can achieve an impressive depth effect similar to cinema-style 3D.
While challenges like ghosting, dim brightness, and color distortion can occur, they are manageable with the right fixes and best practices. Investing in identical projectors, optimizing your viewing environment, and using high-quality 3D content will significantly improve your results.
Frequently Asked Questions About Can You Make a 3D Image with 2 Standard Projectors
Do you need special projectors for 3D, or will any work?
You don’t necessarily need special 3D projectors. Standard projectors can work if you use two units together, along with filters and proper setup. However, higher brightness and resolution will improve results.
Can I use one projector instead of two for 3D?
Yes, but only if the projector supports built-in 3D technology. A single standard projector without 3D capability cannot create true depth on its own without additional hardware.
What type of 3D glasses should I use?
It depends on your setup:
- Use red/cyan glasses for anaglyph systems
- Use polarized glasses for polarized setups
Matching the glasses with your filters is essential for correct image separation.
Why does my 3D image look blurry or doubled?
This is usually caused by misalignment or poor synchronization. Even small positioning errors can result in ghosting. Adjust alignment and ensure both projectors are perfectly synced.
Is polarized 3D better than anaglyph 3D?
Yes, polarized 3D generally offers better color accuracy and less eye strain. However, it requires a հատուկ screen and can be more expensive to set up compared to anaglyph.
Can I watch regular videos in 3D using this setup?
Not directly. You need 3D-formatted content (like side-by-side videos) or software that converts 2D content into simulated 3D, though results may vary.
How much space do I need for a dual projector setup?
You’ll need enough room to position both projectors at equal distances from the screen. A medium-sized room with controlled lighting works best for optimal results.
This website is a participant in the Amazon Services LLC Associates Program, an affiliate advertising program designed to provide a means for us to earn fees by linking to Amazon.com and affiliated sites.