
This website is a participant in the Amazon Services LLC Associates Program, an affiliate advertising program designed to provide a means for us to earn fees by linking to Amazon.com and affiliated sites.
Looping a video on a projector is as simple as enabling the repeat or loop playback option on your projector, media player, USB device, or connected streaming device. Whether you’re displaying advertisements at an event, creating an exhibition display, running a church presentation, or setting up a digital signage system, continuous playback ensures your content runs smoothly without manual intervention.
Imagine preparing for an important event only to realize that someone has to restart the video every few minutes. Fortunately, most modern projectors and playback devices include built-in looping features that eliminate this hassle.
The exact method depends on how your video is being played. Some projectors can loop videos directly from a USB drive, while others require external devices such as laptops, streaming sticks, or media players. Understanding the right approach for your setup can save time and prevent interruptions.
Best for Looping Videos on Projectors
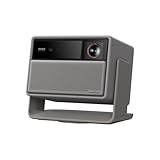
Epson EpiqVision Mini EF12
Reason: Its built-in Android TV system allows easy installation of media apps that support continuous playback, making it ideal for presentations, events, and home entertainment.

- Stunning Picture Quality up to 150″ — Delivers an immersive viewing…
- Sound by Yamaha — Custom-designed audiophile speaker system offers a…
- Built-In Android TV (1) — Latest Android TV interface with a…
BenQ GV30 Portable Projector
Reason: The portable design, integrated smart features, and USB media playback capabilities make looping videos straightforward without additional equipment.

- LAIDBACK MOVIE EXPERIENCE: Flexible wide projection angle, autofocus…
- BIG AND CLEAR CINEMATIC PICTURE: 720p HD Resolution & 300 ANSI Lumens with…
- 2.1 CHANNEL AUDIO WITH EXTRA BASS: 2.1 Channel Bluetooth Speaker with Extra…
XGIMI Horizon Pro
Reason: This projector combines excellent image quality with Android TV functionality, offering reliable looping through apps, USB playback, and external devices.
- RGB Triple Laser Brilliance: Dive into color-rich, lifelike visuals with…
- Pro-Level Gaming Features: Play big with 200″ visuals, 1ms response, 240Hz…
- Lossless Optics: Flexible lens shift and optical zoom give you more freedom…
How to Loop Video Directly from a Projector USB Port
One of the easiest ways to loop a video on a projector is by playing it directly from a USB flash drive. Many modern projectors include built-in media players that can continuously repeat video files without requiring a laptop or additional hardware. This method is especially useful for trade shows, retail displays, classrooms, museums, churches, and event venues where unattended playback is necessary.
Before getting started, confirm that your projector supports USB video playback. Check the user manual or navigate through the projector’s menu to locate media playback options. Keep in mind that supported video formats vary by manufacturer. Commonly accepted formats include MP4, AVI, MOV, and MKV.
Steps to Loop a Video from a USB Drive
- Save the video file onto a compatible USB flash drive.
- Insert the USB drive into the projector’s USB port.
- Turn on the projector and select the USB or Media source input.
- Open the projector’s media browser.
- Locate and select the video you want to play.
- Access the playback settings menu.
- Enable the option labeled:
- Repeat
- Loop
- Repeat One
- Continuous Playback
- Start the video and verify that it restarts automatically after finishing.
Tips for Reliable USB Playback
- Format the USB drive using FAT32 or exFAT if recommended by the manufacturer.
- Use high-quality USB drives to prevent playback interruptions.
- Test the loop function before your event begins.
- Keep a backup copy of the video on another USB drive.
- Ensure the projector firmware is updated to improve compatibility.
How to Loop Video on a Projector Using a Laptop or Computer
Using a laptop or desktop computer is one of the most flexible and reliable ways to loop a video on a projector. This method works with virtually any projector that supports HDMI, VGA, or wireless screen mirroring. It is particularly useful for business presentations, wedding slideshows, church announcements, digital signage, and educational displays because you have greater control over playback settings.
The biggest advantage of using a computer is the availability of media players that include built-in repeat functions. Applications such as VLC Media Player, Windows Media Player, and QuickTime Player allow videos to restart automatically without requiring constant supervision.
Step-by-Step Guide to Loop a Video from a Computer
Method 1: Using VLC Media Player
VLC Media Player is widely regarded as one of the easiest tools for continuous playback.
- Connect your laptop to the projector using an HDMI or VGA cable.
- Turn on the projector and select the correct input source.
- Open VLC Media Player on your computer.
- Click Media > Open File and select your video.
- Locate the Loop button at the bottom of the playback controls.
- Click the button until the “Repeat One” mode is enabled.
- Start the video and verify that it restarts automatically.
Method 2: Using Windows Media Player
If VLC is unavailable, Windows Media Player can also handle repeated playback.
- Open the video file in Windows Media Player.
- Click the Repeat icon in the playback controls.
- Ensure the repeat mode remains active.
- Project your screen to the connected projector.
- Allow the video to run continuously.
Method 3: Using QuickTime on Mac
Mac users can achieve the same result using QuickTime Player.
- Open the video in QuickTime Player.
- Select View from the menu bar.
- Click Loop.
- Connect your Mac to the projector using the appropriate adapter or HDMI cable.
- Begin playback.
Benefits of Using a Computer for Video Looping
- Supports nearly all video formats.
- Offers advanced playback controls.
- Makes last-minute edits or replacements simple.
- Allows scheduling and playlist creation.
- Provides better troubleshooting options.
Troubleshooting Common Issues
If looping does not work properly:
- Confirm that repeat mode is enabled.
- Check cable connections.
- Update your media player software.
- Close unnecessary background applications.
- Test the video file for corruption.
How to Loop Video on a Projector Using Streaming Devices and External Media Players
Streaming devices and dedicated media players offer one of the most convenient ways to loop videos on a projector, especially when you need a compact setup without relying on a laptop. They are commonly used in retail stores, exhibitions, hotel lobbies, waiting rooms, churches, and event venues where videos need to run continuously throughout the day.
Many of these devices support media apps with built-in repeat functions, while others allow you to create playlists that automatically restart after completion. The key is selecting a playback method that remains stable even during extended use.
Popular Devices That Support Video Looping
- Amazon Fire TV Stick
- Roku Streaming Stick 4K
- NVIDIA Shield TV
- Android TV Boxes
- Dedicated Digital Signage Media Players
- Apple TV
These devices typically connect to the projector through an HDMI port and require minimal setup.
Method 1: Using a Streaming Device
If your projector has an available HDMI input, follow these steps:
- Plug the streaming device into the projector’s HDMI port.
- Connect the device to a power source.
- Complete the initial setup process.
- Install a media player app that supports looping.
- Upload or access your video content.
- Enable the app’s repeat or continuous playback option.
- Start the video and confirm that it loops correctly.
Method 2: Using a Dedicated Media Player
For commercial environments, digital signage players are often the most reliable option.
- Transfer your video files to the media player.
- Connect the media player to the projector via HDMI.
- Create a playlist if multiple videos will be shown.
- Enable automatic repeat mode.
- Configure startup settings to resume playback after power interruptions.
- Test the system before deployment.
Why External Media Players Work Well
External devices provide several advantages over basic projector playback:
- Better support for various video formats.
- Improved playback stability during long sessions.
- Playlist functionality for multiple videos.
- Automatic restart capabilities after outages.
- Easier remote management in some systems.
Choosing the Right Solution
Your ideal setup depends on how you plan to use the projector:
- Home entertainment: Streaming sticks offer affordability and simplicity.
- Business presentations: Android TV devices provide flexibility.
- Retail displays: Dedicated signage players deliver maximum reliability.
- Events and exhibitions: Devices with automatic restart features minimize supervision.
Tips and Troubleshooting for Reliable Continuous Video Playback on a Projector
Successfully looping a video on a projector isn’t just about turning on the repeat function. To ensure uninterrupted playback during presentations, events, advertising displays, or exhibitions, you need to optimize both your equipment and content. A few preventative measures can save you from frozen screens, playback errors, or unexpected interruptions.
Whether you’re using a USB drive, laptop, streaming device, or dedicated media player, following these best practices will help maintain smooth and dependable operation.
Essential Tips for Continuous Playback
Use Compatible Video Formats
Not all projectors and media players support every video format. Before your event, verify the recommended formats in the user manual.
Commonly supported formats include:
- MP4 (most widely compatible)
- AVI
- MOV
- MKV
- WMV
If necessary, convert your video using trusted video conversion software before transferring it to your playback device.
Test the Entire Loop Before the Event
A quick playback test isn’t enough. Allow the video to run through multiple cycles to confirm that:
- The video restarts automatically.
- Audio remains synchronized.
- No error messages appear.
- Playback quality stays consistent.
Testing ahead of time gives you an opportunity to fix issues before your audience notices them.
Keep Backup Copies of Your Content
Technical failures can happen unexpectedly. Always prepare backup solutions, such as:
- A second USB flash drive.
- A duplicate copy on your laptop.
- Cloud storage access.
- An additional HDMI cable.
Having alternatives readily available minimizes downtime.
Prevent Projector Overheating
Continuous operation generates heat. Excessive temperatures may trigger automatic shutdowns.
To improve cooling:
- Keep ventilation openings unobstructed.
- Clean projector air filters regularly.
- Maintain adequate space around the projector.
- Avoid placing it in enclosed cabinets without airflow.
Disable Interruptions on Computers
When using a laptop or desktop, system notifications can disrupt playback.
Before starting:
- Turn on presentation or focus mode.
- Disable screen savers.
- Prevent automatic sleep settings.
- Pause software updates.
- Close unnecessary applications.
Common Problems and How to Fix Them
| Problem | Possible Cause | Solution |
|---|---|---|
| Video doesn’t repeat | Loop mode disabled | Re-enable repeat settings |
| Unsupported file error | Incorrect format | Convert the video to MP4 |
| Playback freezes | Slow USB device | Use a faster flash drive |
| Projector shuts down | Overheating | Improve ventilation and clean filters |
| No sound output | Audio settings issue | Check projector and device audio settings |
| Black screen appears | Loose connection | Reconnect HDMI or USB cables |
Conclusion
Looping a video on a projector is a straightforward process once you understand the capabilities of your equipment. Whether you choose to play content directly from a USB drive, use a laptop with media software, or rely on streaming devices and dedicated media players, the key is enabling the correct repeat settings and testing your setup beforehand.
Preparing backup files, using compatible video formats, and preventing common issues such as overheating or unexpected interruptions can make the difference between a seamless presentation and a frustrating experience. With the right approach, you can confidently run promotional videos, event slideshows, educational content, or digital signage for extended periods without manual intervention.
Frequently Asked Questions About How to Loop Video on Projector
Can all projectors loop videos automatically?
No. Not every projector has a built-in video looping feature. Many modern projectors can repeat videos played from a USB drive through their integrated media player, but older models often require an external device such as a laptop, streaming stick, or dedicated media player to achieve continuous playback. Always check your projector’s specifications or user manual to confirm its capabilities.
What is the best video format for looping on a projector?
MP4 is generally considered the best format because it offers broad compatibility across projectors, USB media players, computers, and streaming devices. If your video does not play correctly, converting it to MP4 often resolves the issue. However, some projectors may also support AVI, MOV, MKV, or WMV files.
3. Can I loop multiple videos instead of just one?
Yes. Many media players and digital signage devices allow you to create playlists that automatically repeat. Applications such as VLC Media Player and dedicated signage players can cycle through several videos continuously without requiring user interaction.
Why does my projector stop playing the video after one cycle?
This usually happens because the repeat setting has not been enabled. Check the playback menu and activate options labeled:
- Loop
- Repeat
- Repeat One
- Continuous Playback
If the issue persists, ensure your device’s firmware and media player software are up to date.
Can I loop videos without using a laptop?
Absolutely. You can use:
- USB flash drives with supported projectors
- Streaming devices like Fire TV Stick or Roku
- Android TV boxes
- Dedicated digital signage media players
These options eliminate the need for a computer while still providing reliable continuous playback.
How long can a projector safely play looping videos?
Most projectors can operate for several hours continuously, especially those designed for business or signage use. However, adequate ventilation is essential. Clean filters regularly, avoid blocking air vents, and follow the manufacturer’s recommendations regarding operating time and maintenance schedules.
What should I do if my looping video freezes?
Start by checking the video file and playback device. Try using a faster USB drive, converting the video to a compatible format, restarting the projector, or testing the file on another device. Having a backup copy of your content can also help minimize disruptions during important presentations or events.
Looping videos on a projector becomes simple once you understand the available playback methods and prepare your equipment properly. Whether you’re managing digital signage, hosting an event, or creating an engaging display, these answers should help you achieve smooth and uninterrupted playback with confidence.
Can a Projector Get a Virus?why you need to know
This website is a participant in the Amazon Services LLC Associates Program, an affiliate advertising program designed to provide a means for us to earn fees by linking to Amazon.com and affiliated sites.