
This website is a participant in the Amazon Services LLC Associates Program, an affiliate advertising program designed to provide a means for us to earn fees by linking to Amazon.com and affiliated sites.
Projector photoshoot ideas for stunning visuals involve using projected images, patterns, colors, and videos to create artistic, immersive, and eye-catching portraits without elaborate sets.
Photography is constantly evolving, and projector photography has emerged as one of the most creative ways to produce dramatic and unique images. Instead of relying solely on traditional backdrops, photographers can transform ordinary rooms into visually captivating scenes with the help of a projector.
Whether you’re a professional photographer, content creator, or someone looking to elevate your social media photos, projector photography opens endless possibilities. From dreamy galaxy projections to urban cityscapes and abstract color patterns, projectors allow you to experiment with light and storytelling in ways that standard lighting equipment cannot.
The best part is that projector photoshoots can be done at home with minimal equipment. By understanding how to position your projector, control ambient light, and select compelling visuals, you can create stunning portraits that look professionally produced.
Best for Creating Stunning Projector Photoshoots
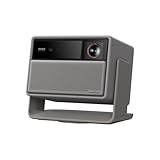
XGIMI Horizon Pro
The XGIMI Horizon Pro delivers crisp 4K images and exceptional brightness, making projected patterns and backgrounds appear sharp and vivid even during detailed portrait photography sessions.
- RGB Triple Laser Brilliance: Dive into color-rich, lifelike visuals with…
- Pro-Level Gaming Features: Play big with 200″ visuals, 1ms response, 240Hz…
- Lossless Optics: Flexible lens shift and optical zoom give you more freedom…
BenQ TH685P
This projector offers excellent color reproduction and low input lag, allowing photographers to display dynamic visuals, animations, and colorful backgrounds with impressive image accuracy.

- PLEASE NOTE: TH685P does not have VGA-in or Monitor-Out when compared to…
- AUDIO W/EQUALIZER: integrated 5 watt speaker by treVolo, with an equalizer…
- 1080P 4K SUPPORTED HDR READY: 3500 ANSI lumen brightness; 1080p HDR-enabled…
Anker Nebula Capsule 3 Laser
Its compact size and portability make it ideal for creative shoots in small spaces, enabling photographers to experiment with different projections almost anywhere.

- Laser Engine to Illuminate Your World: Experience vibrant visuals with this…
- Travel Light, Project Big: At just 2 lb (900 g) and 90% smaller than others…
- Marathon Viewing Sessions: Watch a full 2.5-hour movie or listen to 8 hours…
Why Projector Photography Creates Stunning Visual Effects
Projector photography stands out because it turns light itself into an artistic element. Rather than simply illuminating a subject, the projector casts images, colors, and patterns directly onto the model and surroundings. This instantly creates layered compositions that feel cinematic and visually rich.
Another advantage is versatility. A single projector can produce countless themes without changing locations or purchasing expensive props. You can project starry skies, floral illustrations, geometric designs, or city skylines to completely transform the mood of a photograph.
Projectors also encourage experimentation. Photographers can blend projected visuals with poses, wardrobe choices, and camera angles to tell compelling visual stories. Since the projected image interacts with the subject’s face and body, every slight movement creates a different composition.
Benefits of projector photoshoots include:
- Endless background possibilities
- Lower setup costs than elaborate studio sets
- Highly customizable themes and moods
- Unique lighting effects and textures
- Creative storytelling opportunities
How to Set Up the Perfect Projector Photoshoot at Home
Creating a stunning projector photoshoot at home is easier than many people imagine. With the right setup, you can transform an ordinary bedroom, living room, or home studio into a visually striking photography space. The key is controlling light and maximizing the projector’s image quality.
Start by choosing a room that can become as dark as possible. Projected images look significantly better when there is minimal ambient light. Close curtains, switch off unnecessary lights, and use blackout blinds if available. A darker room allows colors and patterns to appear brighter and more defined on your subject.
Next, position your projector carefully. Place it at a distance that creates a large, sharp projection without distortion. Depending on the desired effect, you can project directly onto your subject, a plain wall, or a backdrop behind the model.
For the best results, you’ll need:
- A projector with good brightness and color accuracy
- A white wall or projector screen
- A camera with manual settings
- A tripod for stability
- Visual content such as patterns, landscapes, or abstract animations
Camera settings also play a major role. Using a wider aperture, moderate ISO, and slower shutter speed helps capture projected details without excessive noise. Experimenting with focus and exposure compensation can dramatically improve the final image.
Finally, encourage your subject to move slowly and try different poses. Because projected images interact with the body and face, small changes in position can completely transform the composition and mood of the photograph.
Creative Projector Photoshoot Ideas for Unique and Artistic Portraits
One of the biggest advantages of projector photography is its limitless creative potential. By changing the projected image, colors, or animations, you can completely reinvent the look and feel of your photoshoot. Whether you’re aiming for dramatic portraits or playful social media content, projector-based photography offers countless artistic possibilities.
Galaxy and Space-Themed Portraits
Project stars, planets, and nebula images onto your subject to create a dreamy, cinematic atmosphere. Dark clothing often works best because it allows colorful projections to stand out. This style is especially popular for conceptual portraits and creative profile photos.
Floral and Nature Projections
Flowers, leaves, and tree silhouettes add softness and elegance to portraits. These projections create romantic and calming visuals that work beautifully for fashion photography, engagement shoots, and artistic self-portraits.
Geometric Pattern Photography
Triangles, circles, lines, and abstract shapes can produce modern and eye-catching images. Geometric projections emphasize facial features and body contours while adding depth and texture to the composition.
Cityscape and Travel Themes
Project famous skylines, streets, or landmarks to simulate different locations without leaving home. Urban projections create storytelling opportunities and are ideal for editorial photography.
Color Gradient and Abstract Light Effects
Using animated color gradients or moving visuals can create highly expressive portraits. Experiment with red, blue, purple, and orange tones to evoke different emotions and moods.
Additional Creative Ideas
- Project handwritten text or meaningful quotes.
- Use vintage movie scenes as backgrounds.
- Create seasonal themes with snowflakes, autumn leaves, or tropical scenery.
- Combine smoke or fog effects with projections for a cinematic appearance.
- Layer multiple projections for surreal and artistic compositions.
Lighting and Camera Tips for Capturing Better Projector Photos
The success of a projector photoshoot depends heavily on how well you manage lighting and camera settings. Since projectors produce less light than professional studio flashes, careful adjustments are necessary to preserve image quality and capture the projected details clearly.
The first rule is to minimize competing light sources. Ambient lighting can wash out projected images, making colors appear dull and reducing contrast. Shooting in a dark room allows the projections to remain vibrant and sharp.
Camera settings should also be adjusted manually whenever possible. Automatic modes often struggle to expose projector scenes correctly because they contain both bright highlights and dark areas.
Recommended Camera Settings
- ISO: Start between 400 and 800 to maintain brightness while controlling noise.
- Aperture: Use a wide aperture, such as f/1.8 to f/2.8, to allow more light into the camera.
- Shutter Speed: Begin around 1/60 second and adjust according to subject movement.
- White Balance: Experiment with custom white balance settings to preserve the projector’s colors accurately.
- Focus: Use single-point autofocus or manual focus for maximum precision.
Positioning your subject is equally important. Standing too close to the projector can create harsh shadows, while standing too far away may weaken the projected details. Encourage your model to turn slightly and move gradually so that patterns interact naturally with facial features and clothing.
Additional Lighting Techniques
- Use a tripod to reduce camera shake during slower exposures.
- Add a dim fill light if facial features become too dark.
- Increase projector brightness when possible.
- Choose high-contrast images for stronger projections.
- Capture multiple exposures and review them frequently.
Common Mistakes to Avoid When Taking Projector Photos
Projector photography can produce breathtaking images, but several common mistakes can prevent you from achieving professional-looking results. Understanding these issues beforehand can save time and help you create cleaner, more visually striking portraits.
One of the biggest mistakes is shooting in a room with too much ambient light. Sunlight, ceiling lights, and even lamps can wash out the projected image, causing colors to appear faded and details to disappear. A dark environment almost always produces stronger and more vibrant projections.
Another frequent issue is using low-resolution images. Since the projector enlarges the content significantly, blurry or pixelated visuals become even more noticeable. Always select high-quality images, videos, or patterns to maintain sharpness.
Common Projector Photography Mistakes
Placing the Subject Too Close to the Projector
Standing directly in front of the projector can create harsh shadows and uneven lighting. Experiment with positioning until the projection falls naturally across the face and body.
Using Automatic Camera Settings
Auto mode often overexposes bright areas or underexposes darker sections of the image. Manual settings provide greater control over exposure and color accuracy.
Ignoring Focus
Projected patterns can confuse autofocus systems. Switching to manual focus or using single-point autofocus typically delivers better results.
Choosing Busy Backgrounds
Overly complex projections can distract from the subject. Simpler patterns often create stronger compositions and make portraits more visually appealing.
Forgetting to Experiment
Many photographers settle on one projection and pose. However, changing images, angles, and subject positions often leads to unexpectedly creative results.
Quick Tips for Better Results
- Darken the room as much as possible.
- Use high-resolution projected visuals.
- Keep a tripod nearby.
- Review images frequently during the session.
- Capture a variety of poses and compositions.
Editing and Enhancing Projector Photos for a Professional Finish
Post-processing is the final step that transforms good projector photos into exceptional ones. Even when projections are captured correctly, minor adjustments in editing software can enhance colors, improve sharpness, and make the projected patterns appear more vivid and immersive.
Begin by correcting exposure. Projector photography often contains bright highlights and deep shadows, so balancing these areas helps reveal more detail without losing the dramatic mood. Slightly increasing contrast can also make projected patterns stand out against the subject and background.
Color adjustments are equally important. Because projector images rely heavily on vibrant hues, carefully increasing vibrance or saturation can restore the richness of colors that may have been softened during capture. However, avoid excessive adjustments that create unnatural skin tones.
Essential Editing Techniques
Fine-Tune Exposure and Contrast
Adjust highlights, shadows, and contrast to create a balanced image while preserving the projected details.
Improve Color Accuracy
Modify white balance and vibrance to ensure colors look realistic and visually appealing.
Reduce Digital Noise
Higher ISO settings sometimes introduce grain. Applying moderate noise reduction helps maintain a cleaner image without sacrificing detail.
Sharpen Important Areas
Sharpen the eyes, projected patterns, and facial details selectively rather than applying heavy sharpening to the entire image.
Crop for Better Composition
Cropping can remove distractions and direct attention toward the interaction between the subject and projected visuals.
Recommended Editing Workflow
- Adjust exposure and contrast.
- Correct white balance.
- Fine-tune colors and vibrance.
- Apply noise reduction.
- Sharpen selectively.
- Crop and straighten the image.
- Export in high resolution.
Conclusion
Projector photography offers an exciting way to create stunning visuals using light, color, and imagination. By combining a quality projector, a dark environment, thoughtful camera settings, and creative projections, you can transform ordinary spaces into extraordinary photographic scenes.
From galaxy-themed portraits and floral patterns to geometric designs and cinematic backgrounds, projector photoshoots provide nearly endless opportunities for artistic expression. Paying attention to lighting, avoiding common mistakes, and applying careful post-processing techniques will further elevate your images.
The beauty of projector photography lies in experimentation. Try different projections, poses, and compositions to discover your own style and create portraits that are memorable, visually striking, and uniquely yours.
Frequently Asked Questions About Projector Photoshoot Ideas for Stunning Visuals
Do I need an expensive projector for a photoshoot?
No. While premium projectors usually offer better brightness and color reproduction, many affordable portable projectors can produce excellent results in a dark room.
What images work best for projector photography?
High-resolution visuals with strong contrast often perform best. Popular choices include galaxy scenes, abstract patterns, flowers, cityscapes, and colorful gradients.
Can I do a projector photoshoot with a smartphone?
Yes. Modern smartphones can capture impressive projector photos, especially when using manual controls or a dedicated camera application that allows adjustments to ISO, shutter speed, and focus.
Why do my projector photos look blurry?
Blur can occur because of incorrect focus, camera shake, low-resolution projections, or subject movement. Using a tripod and manually checking focus usually improves image quality.
Should the room be completely dark?
The darker the room, the better the projections will appear. Eliminating unnecessary light sources helps maintain vibrant colors and sharp projected details.
What should my camera settings be?
There is no single setting that works for every situation. However, many photographers start with:
- ISO between 400 and 800
- Aperture around f/1.8 to f/2.8
- Shutter speed near 1/60 second
Can projector photography be used professionally?
Absolutely. Projector photography is widely used in portrait, fashion, editorial, commercial, and social media photography because it creates distinctive visuals that stand out from traditional studio images.
Can a Projector Get a Virus?why you need to know
This website is a participant in the Amazon Services LLC Associates Program, an affiliate advertising program designed to provide a means for us to earn fees by linking to Amazon.com and affiliated sites.