
This website is a participant in the Amazon Services LLC Associates Program, an affiliate advertising program designed to provide a means for us to earn fees by linking to Amazon.com and affiliated sites.
Capture the magic of back-to-school season with creative first day of school photo board ideas that create lasting memories. These proven photo display methods turn a simple milestone into a cherished family tradition.
This complete guide reveals expert tips for designing custom boards, selecting perfect props, and staging stunning shots. Discover how to make your child’s first-day photos truly unforgettable.
Best Photo Boards for First Day of School – Detailed Comparison
Choosing the right photo board elevates your back-to-school photos from basic to breathtaking. Below are three top-rated products that combine durability, design, and ease of use for stunning first-day results.
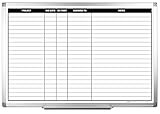
Rustic Charm Chalkboard – Best Overall Choice
The Rustic Charm Chalkboard (Model RC-2024) offers a classic 24×36 inch surface perfect for yearly reuse. Its sturdy wooden frame includes a built-in easel stand for quick setup. This board is ideal for families wanting a timeless, customizable backdrop that grows with their child.

- VERSATILE USE: Perfect for labeling food items, drinks, desserts at…
- PACKAGE CONTENTS: Set includes 10 mini chalkboard signs with rustic wooden…
- DESIGN FEATURES: Double-sided black chalkboard surface allows for easy…
Creative Options Dry Erase Board – Best for Customization
The Creative Options Dry Erase Board (Model CO-DE18) features a sleek 18×24 inch magnetic surface and includes colorful markers and stencils. Its lightweight design allows easy wall mounting or tabletop display. This option is best for parents who love adding unique prompts and decorations each year.
- MAGNETIC DRY-ERASE SURFACE — The whiteboard design is permanently printed…
- EASY INSTALLATION — Comes complete with durable mounting brackets and…
- DURABLE ALUMINUM FRAME — Built with a sleek 1″ aluminum border and a…
SnapBox Photo Prop Kit – Best All-in-One Solution
The SnapBox Photo Prop Kit (Model SB-PK100) combines a 24×30 inch double-sided board with over 50 themed props, including chalk, signs, and stickers. The kit comes in a convenient storage box for year-after-year use. This is the recommended choice for busy parents seeking a complete, mess-free setup.

- 【High Brightness】Portable photography studio is built-in 104pcs…
- 【Easy to assemble】Use it after three seconds of assembly, you can…
- 【CRI>95】This photo lighting studio kit Adopt CRI95 color temperature…
How to Design a Stunning First Day of School Photo Board
Creating a memorable photo board requires thoughtful planning and simple design principles. Follow these expert steps to build a board that captures your child’s personality and the excitement of a new school year.
Choosing the Right Size and Material
Select a board size that accommodates your child and any siblings comfortably. A 24×36 inch board works well for individual shots, while a 36×48 inch board is ideal for group photos.
- Chalkboard: Classic, reusable, and easy to customize with chalk markers each year.
- Dry erase board: Modern, clean look with quick cleanup and magnetic accessory options.
- Fabric backdrop: Lightweight, portable, and available in endless patterns and colors.
Selecting a Theme and Color Palette
Choose a cohesive theme that reflects your child’s interests or the school’s spirit. A unified color scheme creates visually appealing photos that look professional and intentional.
- School colors: Incorporate the school’s primary colors for a spirited, team-focused look.
- Favorite hobby: Feature sports, music, or art elements that showcase your child’s passions.
- Minimalist: Use neutral tones and simple fonts for a timeless, elegant aesthetic.
Adding Essential Information and Prompts
Include key details like grade, teacher name, and date to document the milestone clearly. Fun prompts like “My favorite subject is…” or “I want to be a…” add personality and spark conversation.
- Grade and year: Always include the grade level and current year for easy chronological reference.
- Fun facts: Add 2-3 short prompts that capture your child’s current favorites and future dreams.
- Photo location: Write the school name or “First Day of School” for clear context in every shot.
Keep text readable by using bold fonts and high-contrast colors against your board’s background. Avoid overcrowding the board with too much information, as negative space enhances visual appeal.
Expert Tips for Staging and Photographing Your First Day Board
Once your board is designed, proper staging and photography techniques make all the difference. These proven methods ensure your photos look polished, professional, and emotionally resonant every single year.
Finding the Perfect Lighting and Location
Natural light is your best friend for capturing true colors and soft shadows on your child’s face. Position the board near a large window or in an open shaded area outdoors for the most flattering results.
- Golden hour: Shoot during the first hour after sunrise or the last hour before sunset for warm, even lighting.
- Avoid direct sun: Harsh sunlight creates unflattering squints and deep shadows on the board’s text.
- Consistent spot: Use the same location each year to create a cohesive annual album that shows growth clearly.
Posing Your Child Naturally
Encourage genuine smiles by engaging your child in conversation rather than demanding a forced pose. Ask about their favorite summer memory or what they are most excited to learn this year.
- Hold the board: Have younger children hold the board at chest height for a cute, interactive shot.
- Stand beside it: Older kids look natural standing next to the board with a relaxed posture and confident stance.
- Action shots: Capture a candid moment of your child walking toward the board or adjusting their backpack.
Using Props and Accessories Effectively
Props add personality and depth to your photos without distracting from your child’s face. Choose items that complement the theme and enhance the story of the first day.
- School supplies: Include a fresh backpack, lunchbox, or new pencils to emphasize the back-to-school theme.
- Signs and arrows: Use wooden arrows or mini chalk signs pointing to “Grade 3” or “My New Classroom.”
- Fresh flowers: A small bouquet in school colors adds a soft, celebratory touch to the composition.
Keep props minimal to avoid visual clutter. One or two carefully selected items are far more effective than a crowded scene that overwhelms the viewer.
Creative First Day of School Photo Board Themes and Ideas
Finding fresh inspiration each year keeps the tradition exciting for both parents and children. Below are three popular themes that work beautifully across different ages and school stages, from preschool to high school.
Classic Schoolhouse Theme
This timeless theme focuses on traditional school elements like apples, chalkboards, and wooden rulers. It evokes a nostalgic feel that parents love and children enjoy participating in.
- Red apple prop: Place a shiny red apple on the board’s corner or have your child hold it for a classic touch.
- Ruler border: Decorate the board’s edges with colorful ruler stickers or washi tape for a schoolhouse frame.
- Vintage fonts: Use script-style chalk markers to write the grade and year for an old-fashioned classroom look.
Superhero Growth Theme
Celebrate your child’s growth by framing them as the hero of their own school story. This theme works especially well for younger children who love imaginative play and positive reinforcement.
- Cape and mask: Let your child wear a simple cape or mask as a fun prop that sparks confidence and joy.
- Growth chart: Include a height marker on the board to show how much they have grown since last year.
- Action pose: Capture your child jumping or striking a superhero stance for an energetic, memorable photo.
Modern Minimalist Theme
Clean lines, neutral colors, and simple typography define this sleek, contemporary approach. This theme appeals to older students and parents who prefer a sophisticated, Instagram-worthy aesthetic.
- Black and white: Use a black board with white chalk markers for a striking, high-contrast visual effect.
- Single accent color: Add one pop of color, such as a gold frame or a single flower, for subtle warmth.
- Negative space: Leave large empty areas on the board to draw focus directly to your child’s face and expression.
Consider your child’s personality when choosing a theme each year. A theme that reflects their current interests ensures they feel excited and proud to participate in the photo tradition.
How to Make Your First Day Photo Board a Lasting Tradition
Turning a single photo into an annual tradition creates a priceless visual timeline of your child’s growth. Simple organizational strategies ensure you never miss a year and can easily look back on memories.
Creating a Dedicated Photo Album or Wall Display
Collect all your first-day photos in one central location for easy viewing and sharing. A dedicated album or wall gallery becomes a cherished family heirloom over time.
- Yearly album: Use a single photo album with one page per school year, adding the photo and a short note about your child’s interests that year.
- Gallery wall: Arrange framed first-day photos in chronological order along a hallway or staircase for a stunning visual timeline.
- Digital folder: Create a cloud-based folder named “First Day of School” and upload photos annually with the year in the file name.
Involving Your Child in the Process
Letting your child help design the board and choose props builds excitement and ownership. This involvement makes them more willing participants, especially during the often-stubborn teenage years.
- Board design: Ask your child to pick the theme or write their own fun facts on the board each year.
- Prop selection: Let them choose one or two props that represent their current favorite hobby or interest.
- Pose choice: Give older children the freedom to decide how they want to stand or sit for their photo.
Sharing and Celebrating the Results
Share your finished photos with family and friends to spread the joy of the new school year. This celebration reinforces the milestone and creates positive associations with the tradition.
- Social media: Post the photo with a fun caption and hashtag like #FirstDayOfSchool or #BackToSchool2024.
- Family group chat: Send the photo to grandparents, aunts, and uncles who love watching your child grow.
- Classroom contribution: Print a small copy for your child to share with their teacher and new classmates on the first day.
Remember that the goal is to capture genuine joy, not perfection. A slightly messy board or a goofy smile often becomes the most beloved memory years later.
Common First Day Photo Board Mistakes and How to Avoid Them
Even experienced parents can make simple errors that diminish the quality of their first-day photos. Recognizing these common pitfalls ensures your annual tradition stays beautiful and stress-free.
Overcrowding the Board with Too Much Text
Adding excessive information like full names, multiple quotes, and long lists of favorites clutters the visual space. This mistake makes the board hard to read and distracts from your child’s face.
- Limit text: Stick to 3-5 key pieces of information such as grade, teacher name, year, and one fun fact.
- Use large fonts: Write text in bold, readable letters that are visible from several feet away.
- Prioritize spacing: Leave at least 30% of the board empty to create a clean, professional look.
Ignoring Lighting Conditions
Poor lighting is the number one reason first-day photos look washed out or shadowy. Many parents shoot indoors under harsh overhead lights or outdoors in direct midday sun.
- Test first: Take a test photo of the board alone to check for glare, shadows, or uneven brightness.
- Diffuse light: Use a white sheet or curtain to soften harsh sunlight if shooting near a window.
- Backup plan: Have an indoor spot ready in case of unexpected rain or cloudy weather on the big day.
Waiting Until the Last Minute
Rushing to create the board the night before school leads to sloppy handwriting, missing supplies, and stressed-out kids. This frantic energy often shows in your child’s expression during the photo.
- Prepare early: Design and decorate the board at least one week before the first day of school.
- Gather props: Collect all props, markers, and accessories in a dedicated bin for easy access.
- Practice pose: Do a quick rehearsal photo the night before to ensure everything looks right.
A calm, organized morning sets a positive tone for the entire school year. Your child will feel excited rather than rushed, resulting in authentic smiles and genuine memories.
DIY First Day of School Photo Board Ideas on a Budget
Creating a stunning photo board does not require expensive materials or professional design skills. These budget-friendly ideas use household items and simple supplies to achieve beautiful, professional-looking results.
Repurposing Household Items as Photo Boards
Look around your home for everyday items that can double as a creative photo backdrop. This approach saves money and adds a unique, personal touch to your first-day tradition.
- Large cardboard box: Flatten a sturdy box, paint it with chalkboard paint, and reuse it for multiple years.
- Fabric curtain: Hang a solid-colored bedsheet or curtain on a wall for a clean, wrinkle-free backdrop.
- Whiteboard from home: Use an existing office whiteboard and decorate it with colorful dry erase markers and magnets.
Using Free Printable Templates
Countless websites offer free printable first-day-of-school signs and templates. These ready-made designs save time and ensure professional typography without any artistic skill required.
- Search online: Look for “free first day of school sign printable” on sites like Pinterest or Canva.
- Customize easily: Edit the template with your child’s name, grade, and year using free online tools.
- Print at home: Use standard 8.5×11 inch paper or visit a local print shop for larger poster-sized versions.
Creating Props from Recycled Materials
Transform everyday recyclables into charming photo props that add personality without extra expense. This eco-friendly approach also teaches children about creativity and sustainability.
- Paper plate signs: Write messages on paper plates and attach them to wooden skewers for handheld signs.
- Cardboard cutouts: Cut shapes like stars, apples, or school buses from cardboard and paint them in bright colors.
- Fabric scraps: Use leftover fabric to create a simple banner or bunting to hang above the photo board.
Involving your child in creating these DIY props turns the photo preparation into a fun bonding activity. The handmade elements also add warmth and authenticity that store-bought items cannot replicate.
Adapting First Day Photo Boards for Different Age Groups
A photo board that delights a kindergartner may feel childish for a high school sophomore. Tailoring your approach to your child’s age ensures they remain engaged and excited about the tradition each year.
Preschool and Kindergarten (Ages 3-5)
Young children thrive on bright colors, familiar characters, and interactive elements. Keep the board playful and simple to match their short attention spans and love of fun.
- Large text: Write the grade in big, colorful letters that are easy for little eyes to recognize and read.
- Character props: Include a favorite stuffed animal or cartoon character to make the experience feel like playtime.
- Height marker: Add a simple growth chart on the side of the board to show how much they have grown.
Elementary School (Ages 6-10)
Children in this age group develop stronger opinions and enjoy showcasing their unique personality. Involve them in the design process to foster pride and ownership in the tradition.
- Favorite subject: Include a prompt like “My favorite subject is…” and let your child write the answer themselves.
- Hobby section: Add a small area for them to display a drawing or list their current favorite activities.
- Teacher name: Write the teacher’s name prominently to build excitement about their new classroom.
Middle School and High School (Ages 11-18)
Older students often feel self-conscious about elaborate or cutesy photo setups. A minimalist, sophisticated approach respects their growing maturity while still capturing the milestone.
- Neutral colors: Use black, white, or earth tones for a clean, modern aesthetic that appeals to teenage sensibilities.
- Simple typography: Write only the grade and year in a sleek, professional font without decorative flourishes.
- Quick setup: Keep the process under five minutes by using a pre-made board that requires minimal preparation.
Respecting your teenager’s preferences is crucial for maintaining the tradition through the challenging adolescent years. A quick, dignified photo session is far better than a forced, uncomfortable experience that breeds resentment.
Conclusion: Capture Every First Day with Confidence
Your first day of school photo board tradition creates a beautiful visual timeline of your child’s growth and achievements. With the right board, thoughtful design, and simple photography techniques, you can capture stunning memories every single year.
The key is consistency and creativity. Start your tradition this year, involve your child in the process, and watch your collection of cherished photos grow into a priceless family heirloom.
Gather your supplies, choose a theme, and make this school year’s first-day photo the best one yet. Your future self will thank you for preserving these fleeting, precious moments.
Frequently Asked Questions about First Day of School Photo Board Ideas
What is the best size for a first day of school photo board?
A 24×36 inch board is the most versatile size for individual children, providing enough space for text and props without overwhelming the frame. This size works well for children from preschool through elementary school.
For families with multiple children or group photos, a 36×48 inch board offers ample room for everyone to stand comfortably. Always consider your shooting distance and available wall space when choosing dimensions.
How do I make a first day of school photo board reusable?
Choose a chalkboard or dry erase board as your base material for easy annual updates. Simply erase last year’s information and write fresh details for the new school year.
Store the board flat in a protective cover between uses to prevent scratches and damage. Keep a dedicated supply box with markers, erasers, and props so everything is ready to go each August.
What should I write on a first day of school photo board?
Include the child’s name, current grade, school name, teacher’s name, and the year as essential information. Add one or two fun facts like “My favorite subject is math” or “I want to be a veterinarian.”
Avoid overcrowding the board with excessive text. Three to five pieces of information are sufficient for a clean, readable design that keeps the focus on your child’s face.
How can I take better first day of school photos at home?
Use natural light from a window or shoot outdoors during the golden hour for soft, flattering illumination. Position your child facing the light source to avoid harsh shadows on their face.
Get down to your child’s eye level for a more intimate and engaging perspective. Take multiple shots in quick succession to capture genuine smiles rather than forced poses.
What are good props for first day of school photo boards?
Classic props include a fresh backpack, new lunchbox, pencils, rulers, and a small chalkboard sign. Themed items like a superhero cape, sports equipment, or musical instruments reflect your child’s personality.
Keep props minimal to avoid visual clutter. One or two carefully chosen items are more effective than a crowded scene that distracts from your child’s expression.
How do I involve a reluctant teenager in first day photos?
Respect their preferences by using a minimalist board with neutral colors and simple typography. Keep the photo session under five minutes and avoid elaborate decorations that feel childish.
Give them control over their pose and prop choices to foster cooperation. A quick, dignified photo is far better than a forced session that creates negative associations with the tradition.
What is the best way to store first day of school photos?
Create a dedicated digital folder on your computer or cloud storage labeled “First Day of School” with subfolders for each year. Name each file with the year and child’s name for easy searching.
For physical copies, use a single photo album with one page per school year. Add a short handwritten note about your child’s interests and personality from that year for added sentimental value.
How do I take first day photos when my child is nervous?
Create a calm morning routine with plenty of time for the photo session before heading to school. Engage your child in conversation about their favorite summer memory or something they are excited to learn.
Use humor and patience to ease their anxiety, and take breaks if needed. A genuine smile captured after a few minutes of relaxation is always better than a forced grin from a stressed child.
Can a Projector Get a Virus?why you need to know
This website is a participant in the Amazon Services LLC Associates Program, an affiliate advertising program designed to provide a means for us to earn fees by linking to Amazon.com and affiliated sites.