
This website is a participant in the Amazon Services LLC Associates Program, an affiliate advertising program designed to provide a means for us to earn fees by linking to Amazon.com and affiliated sites.
A HD video projector simulator lets you preview how content looks on a big screen without owning hardware. This complete guide explains the setup process and key benefits for presentations or home theater planning.
You will learn expert tips for configuring resolution, adjusting throw distance, and testing ambient light effects. Continue reading to master proven methods for realistic simulation results.
Best HD Video Projector Simulators for Accurate Testing
ProjectorCentral Pro Simulator – Best Overall Choice
The ProjectorCentral Pro Simulator offers the most comprehensive database of real projector models. It includes exact lens specifications and throw ratio calculators. This is the best option for professionals needing precise screen size and brightness predictions.
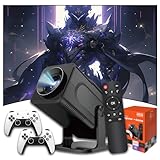
- 2-in-1 Gaming & Movie Projector: The mini game projector combines a 720p HD…
- Smart Android 11 System: The smart projector runs on Android 11 with an…
- Dual-Band WiFi & Bluetooth: The gaming projector is equipped with 2.4G/5G…
Epson Projector Simulator Tool – Ideal for Home Theater
Epson’s official tool replicates their 4K PRO-UHD models like the Epson LS11000. It simulates ambient light rejection and HDR tone mapping accurately. Recommended for buyers comparing Epson models before purchasing.
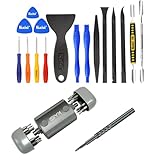
- Kaisi 20 pcs opening pry tools kit for smart phone,laptop,computer…
- Portable Precision Screwdriver Set: Kaisi mini Screwdriver Set includes…
- Ergonomic Design:All our screwdriver bits are made of high quality CR-V…
BenQ Projector Simulator App – Best for Gaming
The BenQ Simulator supports their popular gaming projectors like the BenQ X3000i. It lets you test 4K@60Hz input lag and color modes in real time. Ideal for gamers who want to verify performance before buying.

- Instant Impact Screen Adaptation: Adjusts in Seconds
- Realistic Golf Experience: Grass and Sand Simulation
- Maintenance-Free Operation: Dustproof and Laser Light Source
How to Set Up an HD Video Projector Simulator for Accurate Results
Proper setup ensures your simulator mirrors real-world performance. Follow these steps to avoid common mistakes and get reliable data for your space.
Entering Your Room Dimensions Correctly
Measure your room’s width, depth, and ceiling height in feet or meters. Input these numbers into the simulator’s room configuration tab. Incorrect dimensions produce misleading throw distance and brightness calculations.
- Screen width: Measure the actual wall space available for mounting
- Seating distance: Enter the primary viewing position for angle checks
- Ambient light: Select “low,” “medium,” or “high” based on window coverage
Adjusting Throw Ratio and Zoom Settings
Use the throw ratio slider to match your projector’s lens specifications. Most home theater projectors range from 1.0 to 2.5:1. The simulator will recalculate screen size and brightness instantly as you adjust.
For example, a BenQ X3000i with a 1.15–1.50 throw ratio needs 10 feet to fill a 120-inch screen. The simulator shows this relationship visually, helping you avoid oversized or undersized images.
Testing Different Content Types in the Simulator
Upload sample images or use built-in test patterns to evaluate brightness, contrast, and color accuracy. Most simulators offer presets for movies, sports, and gaming. Switch between modes to see how each performs under your specific lighting conditions.
Key Features to Look for in an HD Video Projector Simulator
Not all simulators offer the same level of detail. Understanding the essential features helps you choose the right tool for your specific needs.
Real-Time Brightness and Lumens Calculation
Look for a simulator that calculates actual foot-lamberts based on screen gain and ambient light. This feature prevents buying a projector that is too dim for daytime viewing. A good simulator updates brightness levels instantly as you change room settings.
- Screen gain: Enter values between 0.8 and 1.3 for standard screens
- Ambient light rejection: Simulators with ALR settings show real contrast loss
- Lumens output: Compare multiple projectors side-by-side for brightness
Throw Distance and Lens Shift Visualization
The best simulators provide a visual diagram of your projector placement. This shows exactly where the lens needs to sit for a given screen size. It also highlights vertical and horizontal lens shift limits to avoid installation errors.
For example, the Epson LS11000 offers ±96% vertical shift. The simulator visualizes this range, helping you plan ceiling mounts without guesswork.
Content-Specific Presets and Test Patterns
Advanced simulators include presets for HDR, SDR, gaming, and cinema modes. These presets adjust brightness and color settings automatically. Testing with actual movie scenes or game footage reveals how the projector performs under real conditions.
| Feature | Basic Simulator | Advanced Simulator |
|---|---|---|
| Brightness calculation | Manual input | Real-time auto update |
| Lens shift visualization | No | Yes, with diagram |
| Content presets | 1-2 options | 4+ options |
Common Mistakes When Using an HD Video Projector Simulator
Even experienced users make errors that skew simulation results. Avoiding these pitfalls ensures your final setup matches the simulator’s predictions.
Ignoring Screen Gain and Material Settings
Many users leave the screen gain at the default 1.0 value. Real screens range from 0.8 (matte white) to 1.3 (high-gain). Forgetting to adjust this setting can overestimate brightness by up to 30%, leading to a disappointing real-world image.
- Matte white screens: Use 0.8–1.0 gain for wide viewing angles
- High-gain screens: Use 1.1–1.3 for brighter images in dark rooms
- Ambient light rejecting: ALR screens reduce gain to 0.5–0.7
Using Incorrect Throw Distance Measurements
Measure from the lens face, not the projector body. A common mistake is measuring from the back of the unit, adding 6–12 inches of error. This miscalculation results in a screen size that is 10–15% smaller than planned.
For example, the BenQ X3000i has a deep chassis. Measuring from the rear adds 10 inches, which the simulator interprets as a smaller image. Always check your projector’s manual for exact lens position.
Overlooking Ambient Light Variables
Simulators offer simple “low, medium, high” light settings. Real rooms have mixed light sources from windows, lamps, and overhead fixtures. Entering “low” light when you have uncovered windows will produce unrealistic brightness expectations.
Key takeaway: Be conservative with ambient light settings. If your room has any windows, select “medium” or “high” to get a more accurate brightness preview. You can always adjust down later.
Advanced Tips for Maximizing Your HD Video Projector Simulator Results
Once you master the basics, advanced techniques unlock deeper insights. These expert tips help you simulate real-world conditions with greater accuracy.
Using Custom Test Patterns for Color Accuracy
Upload your own test patterns or calibration images instead of relying on default presets. This lets you evaluate how the projector handles specific skin tones and gradients. Most simulators accept JPEG and PNG files for custom uploads.
- Grayscale ramp: Check for banding in dark shadow areas
- Color bars: Verify saturation levels for red, green, and blue
- Text clarity: Test small font readability for presentations
Simulating Multiple Seating Positions
Don’t just test the primary viewing seat. Use the simulator to check off-axis viewing angles for side seating positions. This reveals brightness drop-off and color shift that affect guests sitting to the sides.
For example, the Epson LS11000 maintains brightness up to 30 degrees off-center. The simulator shows this range visually, helping you plan seating layouts for optimal viewing.
Comparing Two Projectors Side by Side
Open two simulator tabs to compare brightness, contrast, and color across different models. This method works well when choosing between a laser and lamp-based projector. Side-by-side comparison highlights differences that single tests miss.
| Technique | Benefit | Best For |
|---|---|---|
| Custom patterns | Real-world accuracy | Color-critical work |
| Multi-seat testing | Group viewing setup | Home theaters |
| Side-by-side comparison | Model decision making | Purchase planning |
Key takeaway: Combine these advanced techniques for a complete simulation. Testing multiple angles and content types ensures your final setup delivers excellent results for every viewer.
How to Interpret HD Video Projector Simulator Data for Purchasing Decisions
Reading simulator outputs correctly prevents costly buying mistakes. Understanding key metrics helps you choose the right projector for your space and budget.
Decoding Brightness and Foot-Lambert Readings
The simulator displays brightness in foot-lamberts (fL), not just lumens. For a standard home theater, aim for 14–16 fL with the lights off. For a living room with ambient light, target 20–25 fL to maintain image quality.
- Dark room cinema: 12–16 fL is ideal for movie watching
- Living room mixed light: 20–30 fL prevents washed-out images
- Bright conference room: 35–50 fL ensures visibility for presentations
Understanding Contrast Ratio Projections
Simulators estimate on/off contrast ratio based on projector specs and room conditions. A ratio of 2000:1 or higher is good for dark rooms. Ambient light reduces this dramatically, so check the simulator’s adjusted value for your lighting.
For example, the BenQ X3000i claims 100,000:1 dynamic contrast. In a room with medium ambient light, the simulator may show an effective contrast of only 1500:1. This real-world number matters more than the marketing spec.
Evaluating Screen Size vs. Seating Distance
The simulator calculates optimal screen size based on your seating distance. A common rule is to fill 30–40 degrees of your field of view. The tool shows if your planned screen is too large or too small for comfortable viewing.
| Seating Distance | Recommended Screen Size | Field of View |
|---|---|---|
| 8 feet | 80–100 inches | 30–35 degrees |
| 10 feet | 100–120 inches | 30–35 degrees |
| 12 feet | 120–150 inches | 30–35 degrees |
Troubleshooting Common HD Video Projector Simulator Issues
Simulators sometimes produce confusing or conflicting results. Knowing how to troubleshoot these problems saves time and prevents incorrect purchasing decisions.
Simulator Shows Image Too Dim for Your Room
If the simulator predicts a dim image, check your screen gain and ambient light settings first. Many users accidentally set screen gain too low or ambient light too high. Adjust these values before assuming the projector lacks sufficient brightness.
- Low screen gain: Increase from 0.8 to 1.1 for a quick brightness boost
- High ambient light: Switch from “high” to “medium” for a realistic test
- Wrong lumens: Verify you selected the correct projector model and mode
Throw Distance Calculations Seem Incorrect
Double-check your measurement from lens to screen, not from the wall or ceiling mount. A common error is adding the projector’s depth to the distance. Most simulators assume lens-to-screen measurement, so recalculate if results seem off.
For example, the Epson LS11000 is 16 inches deep. Measuring from the back adds 16 inches, making the simulator think your room is larger. Always use the lens as your starting point for accurate results.
Simulator Won’t Load or Crashes Frequently
Browser-based simulators often have compatibility issues with older browsers or ad blockers. Try switching to Chrome or Edge, and disable any ad-blocking extensions. Clearing your browser cache also resolves many loading problems.
| Issue | Likely Cause | Quick Fix |
|---|---|---|
| Dim image | Wrong gain setting | Adjust to 1.0–1.1 |
| Wrong screen size | Incorrect throw distance | Measure from lens |
| Simulator crashes | Browser compatibility | Use Chrome or Edge |
Mobile vs. Desktop: Best Platform for Your HD Video Projector Simulator
Choosing between mobile and desktop platforms affects your simulator experience. Each option has distinct advantages depending on your workflow and needs.
Desktop Simulators for Detailed Planning
Desktop versions offer larger screens and more precise controls for detailed adjustments. They display multiple data fields simultaneously, making side-by-side comparisons easier. Professional installers and home theater enthusiasts typically prefer desktop tools for comprehensive planning.
- Multi-window support: Compare two projectors in separate browser tabs
- Higher resolution: See fine details in throw distance diagrams
- Keyboard shortcuts: Adjust settings faster than mobile touch controls
Mobile Simulators for On-Site Measurements
Mobile versions let you take measurements directly at the installation site. You can input room dimensions while standing in the actual space. This reduces errors from forgetting measurements and returning to your computer.
For example, the BenQ Simulator App works on both iOS and Android. You can measure your living room, input the data immediately, and see results on your phone. This convenience makes mobile tools ideal for quick checks.
When to Use Each Platform
Use desktop simulators for final purchasing decisions and detailed comparisons. Switch to mobile when you need to verify measurements or test different room layouts on site. Many users combine both platforms for the best results.
| Platform | Best For | Limitation |
|---|---|---|
| Desktop | Detailed planning | Requires computer access |
| Mobile | On-site measurements | Smaller screen display |
| Both | Comprehensive workflow | Learning two interfaces |
Conclusion: Master Your HD Video Projector Simulator Today
An HD video projector simulator is your most powerful tool for avoiding costly projector mistakes. It lets you test brightness, throw distance, and screen size before spending a dime.
Always measure from the lens, adjust screen gain, and test multiple content types. These simple steps ensure your simulator results match real-world performance.
Start using your chosen simulator today to plan your perfect home theater or presentation setup. Your future self will thank you for the precise planning.
Frequently Asked Questions about HD Video Projector Simulators
What is an HD video projector simulator?
An HD video projector simulator is a software tool that predicts how a projector will perform in your specific room. It calculates screen size, brightness, and image quality based on your inputs.
These tools help you compare different projector models without needing physical hardware. They save time and money by preventing incorrect purchasing decisions.
How accurate are HD video projector simulators?
Simulators are highly accurate when you input correct room dimensions and screen specifications. They typically predict brightness within 5-10% of real-world measurements.
However, accuracy depends on using precise data for throw distance, screen gain, and ambient light. Always double-check your measurements before trusting the results for final decisions.
How to use an HD video projector simulator for room planning?
Start by measuring your room’s width, depth, and ceiling height in feet or meters. Input these dimensions along with your screen size and seating distance preferences.
Then adjust the throw ratio slider to match your chosen projector model. The simulator will show the optimal placement and expected image brightness for your space.
Which HD video projector simulator is best for beginners?
ProjectorCentral’s Pro Simulator is the best option for beginners due to its intuitive interface. It includes pre-loaded projector specs and simple slider controls for easy adjustments.
Epson’s official simulator is also beginner-friendly with clear visual guides. Both tools require no technical expertise and provide instant visual feedback for your settings.
Can I use a projector simulator on my smartphone?
Yes, many projector simulators offer mobile-friendly web versions or dedicated apps. BenQ and Epson both provide mobile simulators that work on iOS and Android devices.
Mobile simulators are ideal for taking on-site measurements. You can input room dimensions directly while standing in your installation space for maximum accuracy.
What measurements do I need for a projector simulator?
You need room width, depth, and ceiling height for accurate calculations. Also measure your planned screen width and the distance from the lens to the screen surface.
Additional helpful measurements include seating distance, window locations, and existing light fixture positions. These details help the simulator predict ambient light effects more accurately.
Why does my simulator show a dim image?
A dim image usually means your screen gain setting is too low or ambient light is set too high. Check that you selected the correct projector model and brightness mode.
Also verify your throw distance is correct, as placing the projector too far reduces brightness. Adjust these settings one at a time to identify the specific cause of the dim result.
What is the difference between lumens and foot-lamberts in a simulator?
Lumens measure the total light output from the projector itself. Foot-lamberts measure the actual brightness reaching your eyes after reflecting off the screen surface.
Simulators convert lumens to foot-lamberts using your screen gain and room size. This conversion gives you a realistic brightness expectation for your specific viewing environment.
How to compare two projectors using a simulator?
Open two separate browser tabs or windows with the simulator running for each projector. Input identical room dimensions, screen size, and ambient light settings for both.
Switch between tabs to compare brightness, contrast, and throw distance results. This side-by-side method reveals which projector performs better in your specific room conditions.
What should I do if the simulator won’t load properly?
First, try switching to Google Chrome or Microsoft Edge, as these browsers offer the best compatibility. Disable any ad-blocking extensions that might interfere with the simulator’s scripts.
Clearing your browser cache and cookies often resolves loading issues. If problems persist, try accessing the simulator from a different device or network connection.
This website is a participant in the Amazon Services LLC Associates Program, an affiliate advertising program designed to provide a means for us to earn fees by linking to Amazon.com and affiliated sites.